Hinterhoeller HR29 Refurb
Sorry if my questions seem obvious, but after many years in a daysailer, this is my first "big" boat.
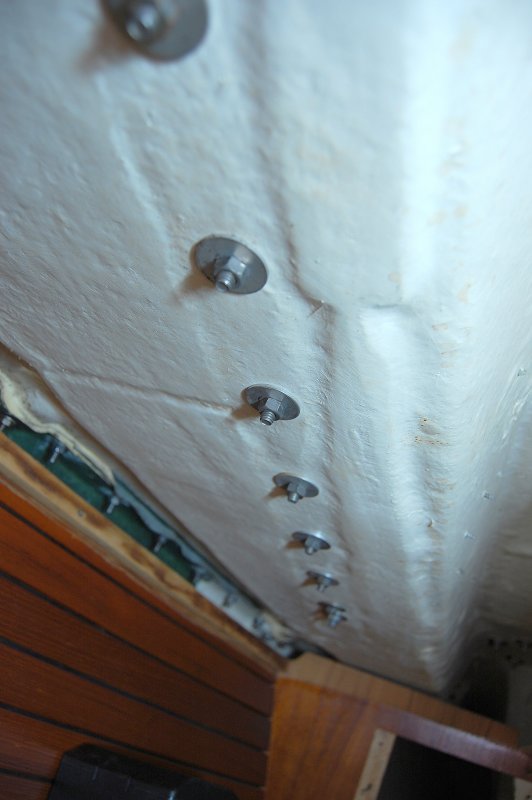
The attached photo shows a lifeline termination fitting I removed from the deck. The PO bedded the four holes but NOT the entire surface area of the fitting. When I re-bed, is this the proper technique? I would have placed material under the ENTIRE fitting and turned the interior nuts until material seeped out on all sides.
Also, Casey says to torque down till material seeps out the entire perimeter, then let it cure before tightening all the way. What he does not say is how thick that bedding layer shoud be before tightening. I'm thinking a generous portion of material that'll leave maybe 1/16 inch to cure before final tightening... sound about right? too much material?
Thanks
Bedding Procedure
-
Hirilondë
- Master of the Arcane
- Posts: 1317
- Joined: Thu Dec 28, 2006 8:50 am
- Boat Name: Hirilondë
- Boat Type: 1967 Pearson Renegade
- Location: Charlestown, RI
Re: Bedding Procedure
Throroughly clean the site and the hardware first. Then apply a layer of goop to both areas (the entire meeting surface of the hardware and landing area of the deck). Using a spreader or your finger work the goop on both surfaces to assure that there are no voids (bubbles) in the goop on either. Apply goop to the shaft of the bolts all the way around up near and under the head. Assemble. You are looking to see ooze out all the way around the meeting surfaces. If there is any part of the edge that did not ooze out you have to wonder if you have a void. Yes, this process yields some waste, but a small price to assure no leaks. Clean up.
Dave Finnegan
builder of Spindrift 9N #521 'Wingë'
--------------------------------------------------------------------------------------------------------------------------------------------------------------------
Gresham’s Law of information: Bad information drives out good. No matter how long ago a correction for a particular error may have appeared in print or online, it never seems to catch up with the ever-widening distribution of the error.
-
hriehl1
- Topside Painter
- Posts: 126
- Joined: Fri Aug 28, 2009 6:53 pm
- Boat Name: s/v Mooney Hahn
- Boat Type: '68 DS I; '68 Hinterhoeller 28
- Location: So. NH / Merrimac Valley
Re: Bedding Procedure
Waste does not concern me... a proper job is what I want here.

Re: Bedding Procedure
A couple more thoughts:
1) For caulk-like sealants, I don't really like the "tighten partially, let cure, then re-tighten" method, because I don't want the sealant to lose its bond to the fastener threads (which, by the way, clean off with solvent along with everything else before bedding). I would recommend tightening down to your final position right off the bat.
2) I've never felt really happy about bedding things onto aggressive non-skid like you have there. I would sand that down so that it was flat (but... what do the experts say?).
3) I hate cleaning up "over-goop," especially on non-skid. So I completely surround the fitting with tape before I start. You can use the stanchion base (or whatever) to mark the tape for a nice cutout.
3) Like Dave says, bed the whole thing, not just little circles like the PO did.
-
Hirilondë
- Master of the Arcane
- Posts: 1317
- Joined: Thu Dec 28, 2006 8:50 am
- Boat Name: Hirilondë
- Boat Type: 1967 Pearson Renegade
- Location: Charlestown, RI
Re: Bedding Procedure
I completely agree!Rachel wrote:A couple more thoughts:
1) For caulk-like sealants, I don't really like the "tighten partially, let cure, then re-tighten" method, because I don't want the sealant to lose its bond to the fastener threads (which, by the way, clean off with solvent along with everything else before bedding). I would recommend tightening down to your final position right off the bat.
If I can get it clean I have no problem with textured surfaces.Rachel wrote:2) I've never felt really happy about bedding things onto aggressive non-skid like you have there. I would sand that down so that it was flat (but... what do the experts say?).
The only time I mask is when I am bedding to unfinished wood (teak decks or base blocks) or using dark bedding. Maybe this is because I use Sikaflex 291-LOT white most of the time and it cleans up so easily it is less work to not bother masking, even on non-skid.Rachel wrote:3) I hate cleaning up "over-goop," especially on non-skid. So I completely surround the fitting with tape before I start. You can use the stanchion base (or whatever) to mark the tape for a nice cutout.
Dave Finnegan
builder of Spindrift 9N #521 'Wingë'
--------------------------------------------------------------------------------------------------------------------------------------------------------------------
Gresham’s Law of information: Bad information drives out good. No matter how long ago a correction for a particular error may have appeared in print or online, it never seems to catch up with the ever-widening distribution of the error.
builder of Spindrift 9N #521 'Wingë'
--------------------------------------------------------------------------------------------------------------------------------------------------------------------
Gresham’s Law of information: Bad information drives out good. No matter how long ago a correction for a particular error may have appeared in print or online, it never seems to catch up with the ever-widening distribution of the error.
Re: Bedding Procedure
That's a good point, Dave. With caulk, maybe just cleaning it up afterward (while it is still uncured) it easier than clever taping. I was just epoxying today, so I may have been a bit overzealous on that part!
-
Hirilondë
- Master of the Arcane
- Posts: 1317
- Joined: Thu Dec 28, 2006 8:50 am
- Boat Name: Hirilondë
- Boat Type: 1967 Pearson Renegade
- Location: Charlestown, RI
Re: Bedding Procedure
Even epoxy cleans up easily before it cures. So I may not even mask in some instances for epoxy. I am however a big fan of drop cloths, cardboard, and other protective materials. I can be a slob. Even I have figured out that you don't have to clean up the mess you never made.
Dave Finnegan
builder of Spindrift 9N #521 'Wingë'
--------------------------------------------------------------------------------------------------------------------------------------------------------------------
Gresham’s Law of information: Bad information drives out good. No matter how long ago a correction for a particular error may have appeared in print or online, it never seems to catch up with the ever-widening distribution of the error.
builder of Spindrift 9N #521 'Wingë'
--------------------------------------------------------------------------------------------------------------------------------------------------------------------
Gresham’s Law of information: Bad information drives out good. No matter how long ago a correction for a particular error may have appeared in print or online, it never seems to catch up with the ever-widening distribution of the error.
-
Maine Sail
- Skilled Systems Installer
- Posts: 243
- Joined: Fri Feb 24, 2006 10:47 am
- Location: Casco Bay
- Contact:
Re: Bedding Procedure
Personally I prefer butyl tape over most of the caulk type products but I do like Sika 295UV and 291 LOT and really liked the old 3M101 polysulfide but it is no longer available.
A few months ago I was in the barn staring at a cleat, and a small scrap of clear Lexan, hmmmm...... A drill, counter sink, some butyl tape, my camera and a few minutes later I had the pics I needed.
Here's how I bed with butyl. I actually find it cleaner and easier to clean up and it lasts and lasts and lasts..
Step 1 - Countersink the deck holes slightly and then clean everything with Acetone or a similar fast evaporating solvent.
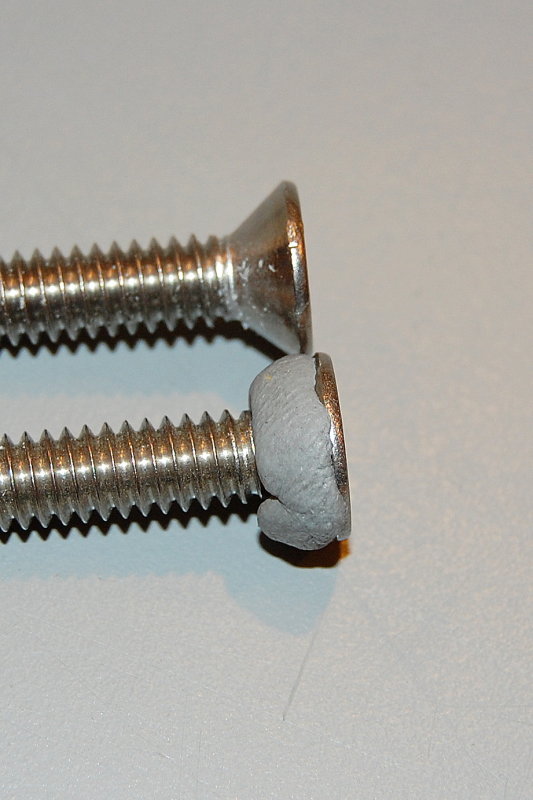
Step 2 - Wrap Bolt Heads - You'll want to rip off a small piece of butyl and knead it into a string then wrap the underside of the bolt head.
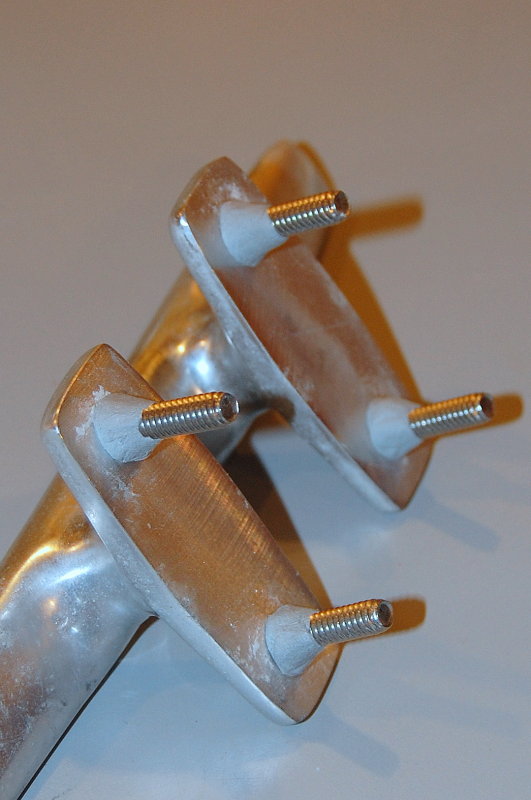
Step 3 - Press the through bolts into deck hardware with some good pressure.
Step 4 - Strip some more butyl tape and make another round string. Wrap the string around the bolt threads or shoulder. Knead and work & twist the cones into the threads of the bolt and shape them like a cone.
Step 5 - Apply butyl tape to the rest of the base. It is perfectly ok to stretch and pull on the butyl while laying it on to make slightly thinner. I used 1/2" wide by 1/16" thick gray butyl tape for this.
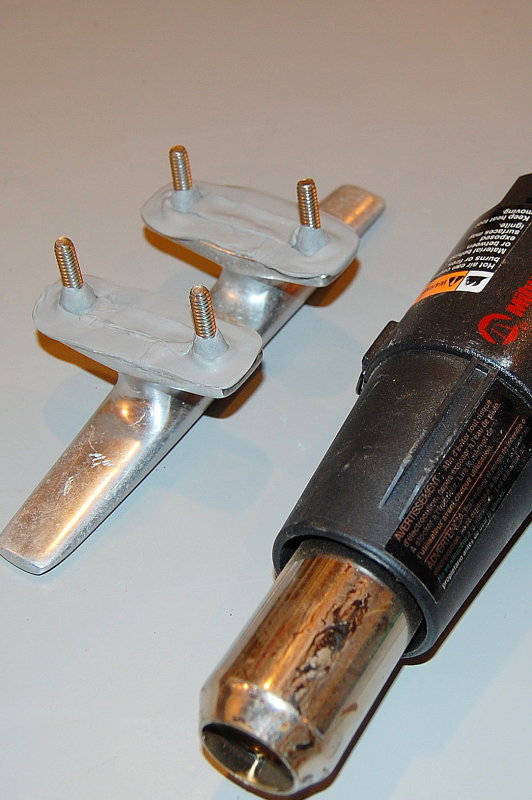
Step 6- In colder climates you may want to pre-heat the butyl to soften it some. After pre-heating with heat gun on the warm setting line up the bolts with the holes and press the hardware firmly onto the deck. For illustrative purposes clear polycarbonate was used in place of a deck. This allows you to see what actually happens when you bed with butyl.
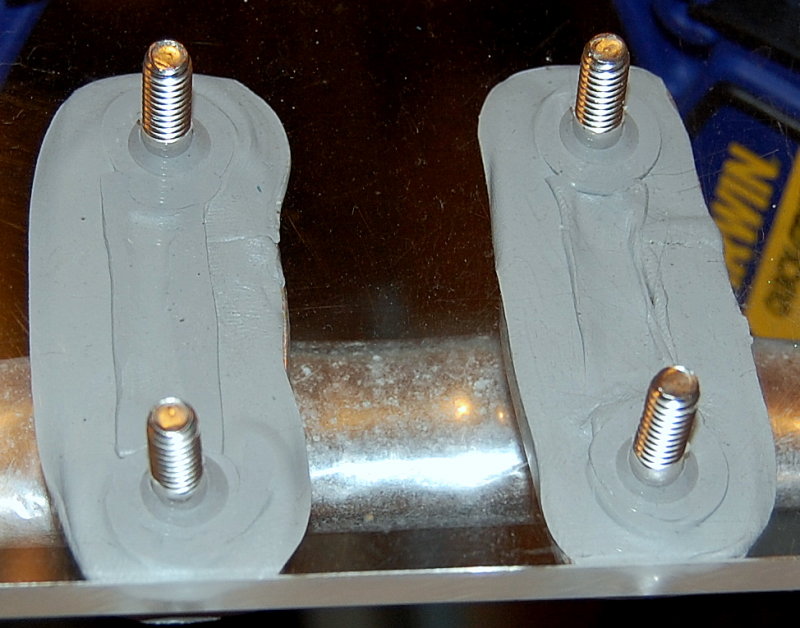
Step 7 - Install the backing plates, in this case I just used fender washers, and begin to tighten. You will be best to have two people or a good way to keep the bolt from moving. Ideally you do not want the machine screw or bolt to spin, but if you absolutely have to, you can slightly soften the butyl with a q-tip and some mineral spirits and go for it.
Tighten a little bit at a time as the butyl will ooze out slowly because the consistency is quite thick. Tighten, let sit, tighten, let sit etc. etc.. When little to none squishes & the bolt & nut become tight you can stop. If you have a wood deck core DO NOT crush it by over tightening, better yet bore out some core and pot the hole with thickened epoxy.
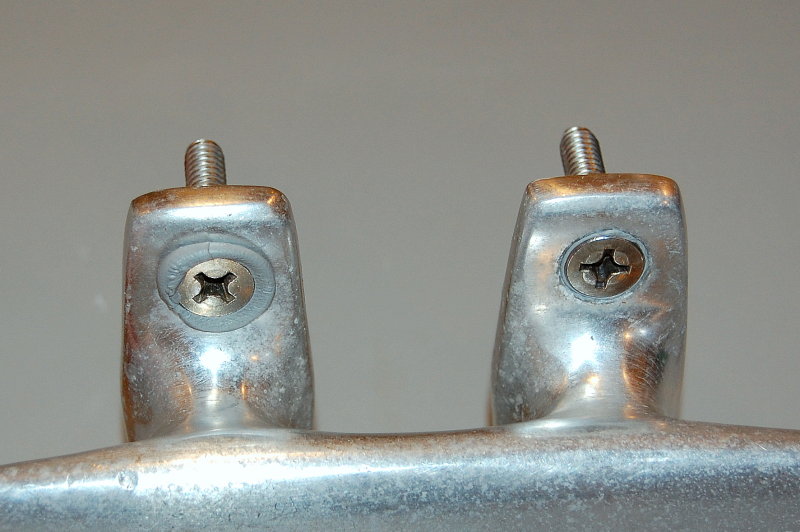
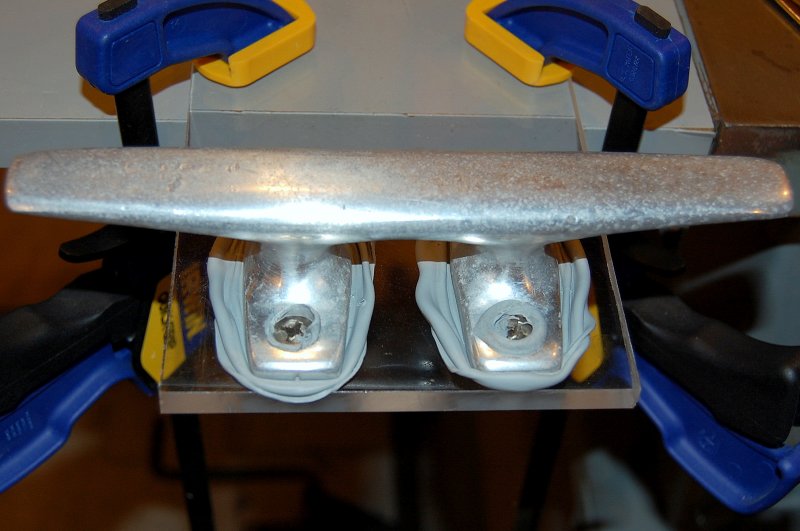
Here I have taken pictures of the underside and the top side of the fitting.
Underneath view when tight:
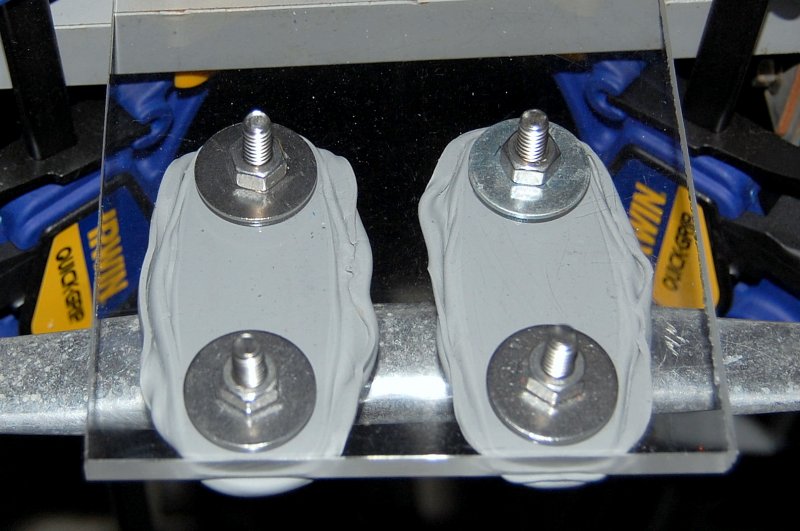
Deck side view:
Step 7 - Peel away excess ooze and clean with Meguiars cleaner wax, or a rag slightly dampened with mineral spirits. Do not saturate the rag with mineral spirits as it can creep under the fitting, just damp.
I find a ball of already "peeled" butyl works well at pulling away excess using a stab and pull motion. Stab the ball into the joint and pull away. The butyl will stick to the ball first and usually peel away from the joint. Alternatively you can use plastic razor blades or scrapers.
Contrary to popular myths about bedding all the butyl does not squeeze out from between the surfaces even after the fitting is fully tight. This is the magic of butyl, but it does take multiple small tightening events, ideally without letting the bolt spin, to get the vast majority of the butyl to squeeze out.

This is a view after tightening to full tight, and then removing the nut and washer. You can see how well it actually seals and also the o-ring seal of very thick butyl created by countersinking & butyl cone.

In short butyl is more labor intensive than a marine sealant but will last a very, very long time. Butyl never hardens, is significantly more flexible than any of the commercially available polysulfides or polyurethane sealants and the best part is that 30 years later it will come apart with ease. The only down side is more labor to install and it is not solvent resistant. Unless you regularly clean your decks with mineral spirits this is not a worry.
This is our 31 year old genoa track that was factory bedded with butyl, and is still bone dry 31 years later.
The butyl bedded chain plates also did not leak in 31 years.
If you decide to try butyl please do yourself a favor and do not use black butyl tape. You'll just have to trust me on this. It can be found in off white and gray. I prefer the flat ribbon style with a max thickness of 1/16". It also comes in widths from 1/2" to over 1"..
Some Butyl Tape Sources:
http://mobilehomepartsstore.com/Merchan ... ry_Code=RC
http://www.rvwholesalers.com/catalog/ta ... -0865.html
A few months ago I was in the barn staring at a cleat, and a small scrap of clear Lexan, hmmmm...... A drill, counter sink, some butyl tape, my camera and a few minutes later I had the pics I needed.
Here's how I bed with butyl. I actually find it cleaner and easier to clean up and it lasts and lasts and lasts..
Step 1 - Countersink the deck holes slightly and then clean everything with Acetone or a similar fast evaporating solvent.
Step 2 - Wrap Bolt Heads - You'll want to rip off a small piece of butyl and knead it into a string then wrap the underside of the bolt head.
Step 3 - Press the through bolts into deck hardware with some good pressure.
Step 4 - Strip some more butyl tape and make another round string. Wrap the string around the bolt threads or shoulder. Knead and work & twist the cones into the threads of the bolt and shape them like a cone.
Step 5 - Apply butyl tape to the rest of the base. It is perfectly ok to stretch and pull on the butyl while laying it on to make slightly thinner. I used 1/2" wide by 1/16" thick gray butyl tape for this.
Step 6- In colder climates you may want to pre-heat the butyl to soften it some. After pre-heating with heat gun on the warm setting line up the bolts with the holes and press the hardware firmly onto the deck. For illustrative purposes clear polycarbonate was used in place of a deck. This allows you to see what actually happens when you bed with butyl.
Step 7 - Install the backing plates, in this case I just used fender washers, and begin to tighten. You will be best to have two people or a good way to keep the bolt from moving. Ideally you do not want the machine screw or bolt to spin, but if you absolutely have to, you can slightly soften the butyl with a q-tip and some mineral spirits and go for it.
Tighten a little bit at a time as the butyl will ooze out slowly because the consistency is quite thick. Tighten, let sit, tighten, let sit etc. etc.. When little to none squishes & the bolt & nut become tight you can stop. If you have a wood deck core DO NOT crush it by over tightening, better yet bore out some core and pot the hole with thickened epoxy.
Here I have taken pictures of the underside and the top side of the fitting.
Underneath view when tight:
Deck side view:
Step 7 - Peel away excess ooze and clean with Meguiars cleaner wax, or a rag slightly dampened with mineral spirits. Do not saturate the rag with mineral spirits as it can creep under the fitting, just damp.
I find a ball of already "peeled" butyl works well at pulling away excess using a stab and pull motion. Stab the ball into the joint and pull away. The butyl will stick to the ball first and usually peel away from the joint. Alternatively you can use plastic razor blades or scrapers.
Contrary to popular myths about bedding all the butyl does not squeeze out from between the surfaces even after the fitting is fully tight. This is the magic of butyl, but it does take multiple small tightening events, ideally without letting the bolt spin, to get the vast majority of the butyl to squeeze out.
This is a view after tightening to full tight, and then removing the nut and washer. You can see how well it actually seals and also the o-ring seal of very thick butyl created by countersinking & butyl cone.
In short butyl is more labor intensive than a marine sealant but will last a very, very long time. Butyl never hardens, is significantly more flexible than any of the commercially available polysulfides or polyurethane sealants and the best part is that 30 years later it will come apart with ease. The only down side is more labor to install and it is not solvent resistant. Unless you regularly clean your decks with mineral spirits this is not a worry.
This is our 31 year old genoa track that was factory bedded with butyl, and is still bone dry 31 years later.
The butyl bedded chain plates also did not leak in 31 years.
If you decide to try butyl please do yourself a favor and do not use black butyl tape. You'll just have to trust me on this. It can be found in off white and gray. I prefer the flat ribbon style with a max thickness of 1/16". It also comes in widths from 1/2" to over 1"..
Some Butyl Tape Sources:
http://mobilehomepartsstore.com/Merchan ... ry_Code=RC
http://www.rvwholesalers.com/catalog/ta ... -0865.html
-
Skipper599
- Candidate for Boat-Obsession Medal
- Posts: 302
- Joined: Mon Mar 16, 2009 1:48 am
- Boat Name: "MACUSHLA"
- Boat Type: Passage 24-30 Cutter
- Location: Cloverdale in Beautiful BC Canada.
Re: Bedding Procedure
... Lots of good advice in this thread. ... Can Butyl be safely used on Thru-hulls below the water line? ... I have lots of black sheet Butyl available to me, but you advise against using black. I'm curious ... WHY NOT?
I am: Bob of Wight.
s/v 'Ros Na Cosquin'
a 'Passage - 24'
There are good ships, there are wood ships, and these ships sail the sea
But the best ship, is friendship and may this always be! ... ... ... A prayer from Ireland.
s/v 'Ros Na Cosquin'
a 'Passage - 24'
There are good ships, there are wood ships, and these ships sail the sea
But the best ship, is friendship and may this always be! ... ... ... A prayer from Ireland.
-
Maine Sail
- Skilled Systems Installer
- Posts: 243
- Joined: Fri Feb 24, 2006 10:47 am
- Location: Casco Bay
- Contact:
Re: Bedding Procedure
Buytl "sheet" rubber is not the same as butyl tape. Butyl tape is tenaciously sticky and comes on a roll of waxed paper which even then it can sometimes stick to. Butyl tape never dries and never hardens if some black did not clean up well and gets on the deck it can make a mess. It will clean up easily but gray or off white are much better. I don't use it for below waterline applications just above deck.Skipper599 wrote:... Lots of good advice in this thread. ... Can Butyl be safely used on Thru-hulls below the water line? ... I have lots of black sheet Butyl available to me, but you advise against using black. I'm curious ... WHY NOT?
-
triton318
- Master Varnisher
- Posts: 108
- Joined: Mon Oct 08, 2007 3:34 pm
- Boat Name: Dove
- Boat Type: Pearson Triton
- Location: Hayes, VA
Re: Bedding Procedure
Thanks for the great information on using butyl tape as a sealant! I've been considering using this material to bed deck hardware on my boat. You say you prefer 1/16" thickness, but the products you provided links to are both 1/8" thick. Do you have a source for butyl tape in a 1/16" thickness?
Thanks.
Thanks.
Jay
Dove, Pearson Triton #318
Hayes, VA
Dove, Pearson Triton #318
Hayes, VA
-
Duncan
- Candidate for Boat-Obsession Medal
- Posts: 388
- Joined: Fri Mar 03, 2006 7:28 am
- Boat Name: Coquine
- Boat Type: Cape Dory 27
- Location: Montréal
- Contact:
Re: Bedding Procedure
Thanks for another great "pictorial tutorial".
Two points - I'll have to check in Canada, but your suppliers are WAY cheaper than my local chandlery. I was delighted to see butyl tape there the other day, but they had put a "Marine" label on it, and wanted 5X as much money.
My other point isn't really economic, but just an aside. With the nice job you did around the fasteners and countersunk holes, etc., it seems like overkill to seal the entire fitting even where there are no other openings to protect. I guess it's cheap insurance, and probably not very much more work while you're at it, but it seems to me that it's the careful work you did around the fastenings and the openings that really does the job?

Cape Dory 10 & 27
-
Maine Sail
- Skilled Systems Installer
- Posts: 243
- Joined: Fri Feb 24, 2006 10:47 am
- Location: Casco Bay
- Contact:
Re: Bedding Procedure
I personally don't like to let any water get under the fitting and sit there. In Maine we have to deal with freeze thaw cycles so I prefer to bed the entire bottom of the fitting. No water under it no freeze/thaw, expansion/contraction. Also salt water under sitting stagnant under a stainless fitting could eventually lead to crevice corrosion. The butyl is also quite inexpensive. I special ordered a case of it about 8 years ago from a local glass shop and it is still going. I think I spent about $160.00 and got 20 rolls. At the rate that open polyurethane tubes harden when not used the butyl is a great value comparatively speaking. Can't even count the number of hard $12.00 to $15.00 tubes of goop I have had go bad over the years. My butyl still works just as well as it did when I bought it 8 yeas ago. You can also re-use the stuff that oozes out when you tighten the fitting, pretty tough & very messy with a PU or PS sealant..
In terms of simply protecting the deck from leaking you are right that you don't technically need to seal the whole thing but I prefer to for the reasons listed above.
In terms of simply protecting the deck from leaking you are right that you don't technically need to seal the whole thing but I prefer to for the reasons listed above.
Last edited by Maine Sail on Tue Sep 21, 2010 9:31 pm, edited 1 time in total.
-
Skipper Dan
- Master Varnisher
- Posts: 102
- Joined: Wed Jun 30, 2010 2:58 pm
- Boat Name: Jade
- Boat Type: Pearson Triton
Re: Bedding Procedure
I am wondering if that is the same stuff that we used to install windshields with? We used the black, came in a windshield kit long roll and very sticky like you said. I never looked at the product information only windshield kit. Now of course we (They) use Urethane.
Dan
Dan
-
Maine Sail
- Skilled Systems Installer
- Posts: 243
- Joined: Fri Feb 24, 2006 10:47 am
- Location: Casco Bay
- Contact:
Re: Bedding Procedure
Yes, it is basically the same stuff. Except I would not advise black or round. Flat in either 1/2" or 3/4" widths by 1/16" or 1/8" thick, in gray, are the ones I use most.Skipper Dan wrote:I am wondering if that is the same stuff that we used to install windshields with? We used the black, came in a windshield kit long roll and very sticky like you said. I never looked at the product information only windshield kit. Now of course we (They) use Urethane.
Dan
-
carterskemp
- Rough Carpentry Apprentice
- Posts: 54
- Joined: Wed Sep 23, 2009 9:57 am
- Boat Name: Hali'a
- Boat Type: Pearson Triton #345
- Location: Bristol, RI
Re: Bedding Procedure
just a quick props for the butyl rubber tape. fantastic stuff. rebedded all my deck hardware this spring as well as the large windows on my triton(glass and bronze). so far so good. boat is now almost bone dry from above(this winter is going to be the winter of though hull replacements). used a grey tape I found at an rv store as well as some tan stuff ordered online. tan stuff seems stiffer which should be accounted for. also, careful with the thickness, as it is easy to put in a layer that is thick enough to mess with starting a screw. for example I tried bedding the hand rails with it but could not get it thin enough to get the screws started properly. i know this sounds like there is not enough catch, but there really is, I think the nut buried in the hand rail gets pushed up before it then gets cinched down. switched to polysulfide for those.
also seems to work really well as an airtight end cap for the half used polysulfide tube.
anybody ever answer the question of it's appropriateness for through hulls?
carter
also seems to work really well as an airtight end cap for the half used polysulfide tube.
anybody ever answer the question of it's appropriateness for through hulls?
carter
-
Tim

- Shipwright Extraordinaire
- Posts: 5708
- Joined: Tue Apr 01, 2003 6:39 pm
- Boat Name: Glissando
- Boat Type: Pearson Triton
- Location: Whitefield, ME
- Contact:
Re: Bedding Procedure
Not recommended. Through hulls deserve an adhesive sealant and, properly installed, can be considered more or less a permanent part of the boat, unlike deck hardware.carterskemp wrote:anybody ever answer the question of it's appropriateness for through hulls?
---------------------------------------------------
Forum Founder--No Longer Participating
Forum Founder--No Longer Participating
-
Ceasar Choppy

- Boat Obsession Medal Finalist
- Posts: 622
- Joined: Thu Mar 09, 2006 11:05 am
- Location: Port Starboard, MD
Re: Bedding Procedure
That said, future owners of your boat will really appreciate it if you don't use an adhesive sealant as strong as 5200!Tim wrote:Not recommended. Through hulls deserve an adhesive sealant and, properly installed, can be considered more or less a permanent part of the boat, unlike deck hardware.carterskemp wrote:anybody ever answer the question of it's appropriateness for through hulls?
-
hriehl1
- Topside Painter
- Posts: 126
- Joined: Fri Aug 28, 2009 6:53 pm
- Boat Name: s/v Mooney Hahn
- Boat Type: '68 DS I; '68 Hinterhoeller 28
- Location: So. NH / Merrimac Valley
Re: Bedding Procedure
To Maine Sail:
Thanks for the great explanation... butyl it will be for me. A couple questions.
1. You said when tightening "Tighten, let sit, tighten, let sit etc. etc.. ". Can you elaborate on the duration of the "let sit" intervals... 5 minutes? an hour? What is the purpose?
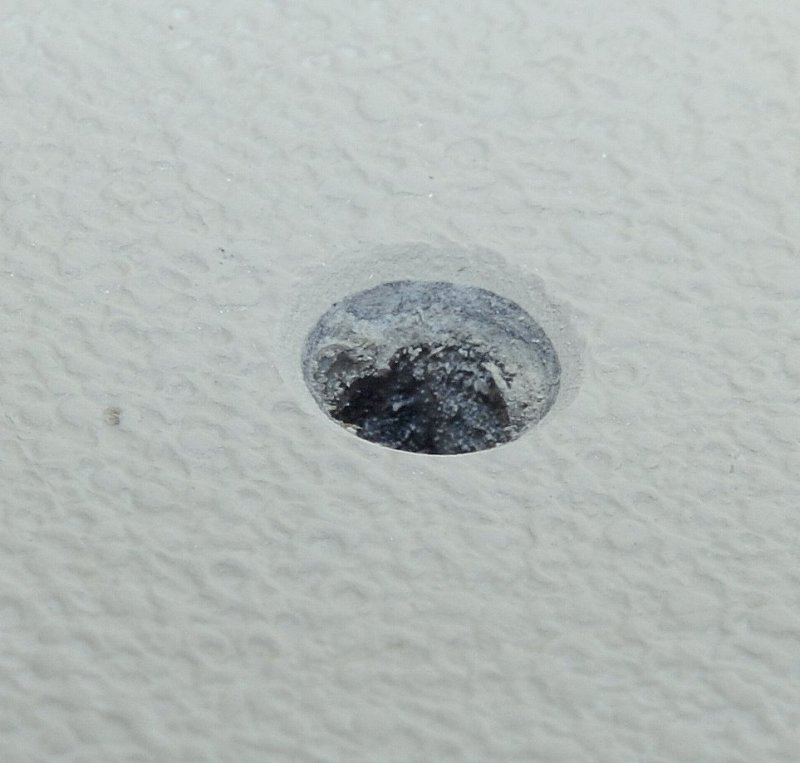
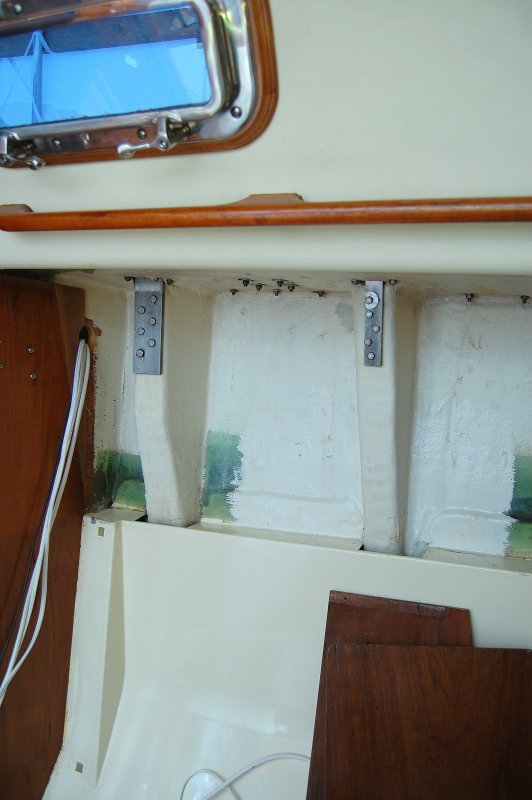
2. Would you recommend butyl tape for rebedding a new acrylic portlight panel in the channel of a previously used aluminum frame? See photo. The previous panel was bedded with silicone (removing it is the subject of a separate thread) but would I pretty much just pack the channel with butyl and then press in the acrylic and trim off the excess that oozes out?
Thanks
Thanks for the great explanation... butyl it will be for me. A couple questions.
1. You said when tightening "Tighten, let sit, tighten, let sit etc. etc.. ". Can you elaborate on the duration of the "let sit" intervals... 5 minutes? an hour? What is the purpose?
2. Would you recommend butyl tape for rebedding a new acrylic portlight panel in the channel of a previously used aluminum frame? See photo. The previous panel was bedded with silicone (removing it is the subject of a separate thread) but would I pretty much just pack the channel with butyl and then press in the acrylic and trim off the excess that oozes out?
Thanks
- Attachments
-
-
Maine Sail
- Skilled Systems Installer
- Posts: 243
- Joined: Fri Feb 24, 2006 10:47 am
- Location: Casco Bay
- Contact:
Re: Bedding Procedure
hriehl1 wrote:To Maine Sail:
Thanks for the great explanation... butyl it will be for me. A couple questions.
1. You said when tightening "Tighten, let sit, tighten, let sit etc. etc.. ". Can you elaborate on the duration of the "let sit" intervals... 5 minutes? an hour? What is the purpose?
Butyl is more dense than playdough or silly putty. If you tighten it all down at once you can literally deflect a thin stanchion base. By tightening a bit at a time it lets is squeeze out round the edges slowly and evenly until the fixture is tight against the deck. On a warm day you may be able to just make one or two tighten sessions but if colder like a Maine spring it may take more time for it to oooze out. Bedding with butyl is mostly just common sense. Think like water and butyl and picture how and where the water and butyl are sealing and you'll be fine.
Without seeing the whole frame and port and how much room you have between frame and acrylic etc. I can't honestly say. I know I would certainly try it but that is up to you. I am not much of a fan of silicone but butyl can certainly be more labor intensive so your call. You might also try to source a U shaped rubber channel gasket. A glass supplier may have them in the size you need?hriehl1 wrote:2. Would you recommend butyl tape for rebedding a new acrylic portlight panel in the channel of a previously used aluminum frame? See photo. The previous panel was bedded with silicone (removing it is the subject of a separate thread) but would I pretty much just pack the channel with butyl and then press in the acrylic and trim off the excess that oozes out?
Thanks
I have finally solidified a deal with a butyl supplier, it is great stuff and the perfect density, thickness, color and width for bedding. It took me many months and many sample rolls to find just the right product. I can sell 50' rolls of 1/16" thick by 1/2" wide gray butyl to you if you need it. If you want information email me at compassmarineservices at gmail dot com