The Plastic Classic Forum, your free and in-depth resource for information on re/building classic sailboats. ... Be sure to visit / join our sister site at sailFar.net! ... And don't forget to check out Atom's Virtual Home Port! ...
This is the place to post your ideas, thoughts, questions and comments as relates to general boatbuilding and reconstruction techniques and procedures (i.e. recoring, epoxy, fiberglass, wood, etc.)
I originally posted this in another thread. One that I had started about a painting project. It was suggested to me that starting a new thread with a title that was more inline with the subject matter would get more replies.
@@@@@@@@@@@@@@@@@@@@@@
I’m now installing new toe rails and having a little trouble. The scarf joints are splitting or popping apart during installation. I used West Systems epoxy with 404 additive as the adhesive. Is 403 a better choice? Would a different shape scarf be better?
The wood I’m using is Utile/Sipo which I purchased from St Angelo Hardwoods in Rhode Island. Utile billed as a mahogany substitute. From what I’ve been able to determine through research on the Internet, Utile has about the same rot resistance and working properties as Mahogany. The wood is a dark reddish brown color before varnishing and you can see from the photos what it looks like after 4 coats of Z-Spars 2015 Flagship Varnish.
Because I’m having trouble I’m considering, as an alternative, installing the rail in 2 separate sections creating a scupper at the point where the scarf joint is now. I’m not sure how that would look though. The deck joint was glassed over during all the work I’ve done and it’s painted so that part would be OK (e.g. no ugly joint seam visible in the scupper opening). Any thoughts?
Transfered from original post
Gary wrote:I’m now installing new toe rails and having a little trouble. The scarf joints are splitting or popping apart during installation. I used West Systems epoxy with 404 additive as the adhesive. Is 403 a better choice?
Hirilondë wrote: The best additive for gluing wood is 406 aka colloidal silica, but that should not make a huge difference.
Gary wrote: Would a different shape scarf be better? The length of the scarf is 4.5 inches.
Hirilondë wrote:A straight scarf is just fine, but yours is way too short. The ratio of length to thickness of the wood should be 8:1 or more. It would also help if the scarf was oriented in the other direction (diagonally from top to bottom). This way as you bend the toerail into place you are trying to shear the glue joint instead of break it apart.
Gary wrote: The wood I’m using is Utile/Sipo which I purchased from St Angelo Hardwoods in Rhode Island.
Hirilondë wrote:I have no first hand experience with the wood, but I don't see any reason why you should not use it. If the wood itself is not breaking as you bend the toe rail into place, then it should work. It will likely have the same issues as mahogany regarding finish (staining if not kept up well) but compared to $30/board foot teak there is a compelling argument to use it.
Gary wrote: Because I’m having trouble I’m considering, as an alternative, installing the rail in 2 separate sections creating a scupper at the point where the scarf joint is now. I’m not sure how that would look though. The deck joint was glassed over during all the work I’ve done and it’s painted so that part would be OK (e.g. no ugly joint seam visible in the scupper opening). Any thoughts?
Hirilondë wrote:If your deck has other means for draining then I would hate to see you do this simply because of your first bad experiences with scarf joints. Many people are intimidated by them at first, and even more so after an experience like yours. But try again with a much longer scarf in the other direction before you give up. It is very satisfying to have the ability to lengthen wood in you set of skills.
Last edited by Gary on Sun Feb 27, 2011 11:16 am, edited 1 time in total.
Hirilondë wrote:A straight scarf is just fine, but yours is way too short. The ratio of length to thickness of the wood should be 8:1 or more. It would also help if the scarf was oriented in the other direction (diagonally from top to bottom). This way as you bend the toerail into place you are trying to shear the glue joint instead of break it apart.
Dave,
Could you somehow describe how this would be different if the scarph were oriented the way you suggest? I can see it looks too short, but I can't visualize the other orientation (as this looks diagonally top to bottom to me). Is what you are describing a joint that would produce a diagonal line across the toerail if you were looking down at it from above, and then just a faint vertical line when looking from abeam?
Edit: Actually, now that I look at the following photo, I'm confused, as it looks like we are looking down from above and the scarph does go the opposite way (i.e. like it was rotated 90º from the other one). Or is that just a stress crack and not the scarph, and it's actually running the same way as the first photo?
Thanks,
Rachel
PS: If I could make a request it would be that you (Gary) add a couple of photos when making a specific question post like this. It's just so nice to have them to look at right as I'm reading about it. Not that a link to more isn't welcome of course.
The picture with file name "toerail.jpg" you uploaded is the starboard side and toerail2.jpg is the port side. Maybe this series will help clear things up.
The above and below picture of the port toe rail scarf is actually a second attempt. The short white epoxy streak running for and aft in the above picture is where the wood cracked and broke free when the scarf joint broke during the first installation attempt.
Last edited by Gary on Sun Feb 27, 2011 11:42 am, edited 3 times in total.
Thanks, Gary. The one that's confusing me is the second one I posted, where the hull looks black. Looking at that (and is that a chainplate slot on deck?), it seems like that photo is giving a bird's-eye view, but then I still see a diagonal line? Although.... it looks less distinct that the other ones, so I wondered if it might have been a crack or something vs. the actual scarph.
Maybe I'm just seeing that photo all wrong though, as the others all look in agreement to me.
I think my posting method is creating some confusion. Sorry about that!
I edited the post adding a comment under one of the pictures. You're right the birds eye view shows a repair of a crack that happened during my first attempt at the installation of the port toe rail, and yes that is a chainplate slot.
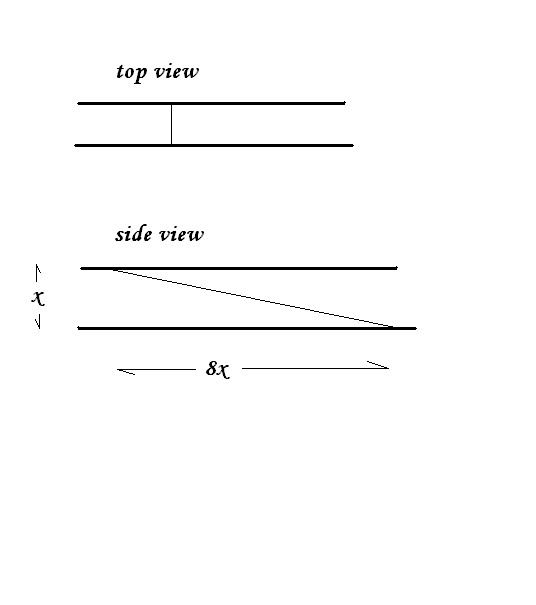
1. the shape - The strongest shape for a scarf that will come under load from bending is a straight scarf. It appears that you used a form of an S shape. This resembles grain run out as where the joint exits the wood is almost perpendicular to the loads. This makes it much more susceptible to cracking under bending loads. Decorative scarf joints are pretty. When jointing 2 pieces that carry no load from one to another they are fine. Actually, they are beautiful.
2. orientation - After further examination it appears you have the scarf oriented correctly, but considering the length and shape, it is not enough.
3. how I do it - In this sketch you can see the shape, orientation and relative dimensions of how I do a structural scarf joint for bending:
There are many different types of scarf joints shapes. Some are decorative, one in particular to carry bending loads, and others that interlock to resist slipping. Like everything in boat materials and methods, the key is finding the best options for the application. I think you will find an 8:1 straight scarf best for a continuous toe rail.
Dave Finnegan
builder of Spindrift 9N #521 'Wingë'
-------------------------------------------------------------------------------------------------------------------------------------------------------------------- Gresham’s Law of information: Bad information drives out good. No matter how long ago a correction for a particular error may have appeared in print or online, it never seems to catch up with the ever-widening distribution of the error.
Thanks for the additional explanation, Dave. Your sketches always make things crystal clear. I went back and looked at the side on view (red hull) of the scarph, and I see that if you don't count the "decorative" flat bits at the ends, it is less than 2x. So if 8x is the proportion to strive (in this bending application) for I guess that explains the breakage. That's a big difference.
The "decorative" flat bits at the ends" (although they look curved to me) add to the glued surface, but make the joint more susceptible to cracking. So even if the joint were 8x long, this decorative feature would be a detriment to the integrity of the joint. Maybe you can get away with it some times, but I have stopped pressing my luck where loads are concerned.
Dave Finnegan
builder of Spindrift 9N #521 'Wingë'
-------------------------------------------------------------------------------------------------------------------------------------------------------------------- Gresham’s Law of information: Bad information drives out good. No matter how long ago a correction for a particular error may have appeared in print or online, it never seems to catch up with the ever-widening distribution of the error.
You're right Dave, I should have just said "decorative bits" -- they don't really look flat.
Gary, on the bright side, if your joints hung together at all, with less than 2x (and it looks like they sort of did), then think how good they will be with 8x!
Thanks for the additional info. Just to make sure I understand: My toe rail is; X=2" (1 7/8" to be precise) so the scarf would end up being about 16 inches long right?
In your experience Dave, will the longer arch and therefore greater bending of the epoxy in the scarf cause the epoxy to crack? Or maybe the hull curvature is not enough that it will be a problem because thickened epoxy is more flexible than I think?
Gary wrote:..... will the longer arch and therefore greater bending of the epoxy in the scarf cause the epoxy to crack?
Longer arch of what? Are you asking if the longer scarf will have more bending? If so, this doesn't change anything. The toe rail, whether solid wood or laminated like at the scarf bends at the same rate regardless of how long the scarf is. Any given section or length of toe rail bends the same amount regardless of how long the scarf is. If the rate of bend is too great, then even the solid wood will break. The closer the scarf angle is to the plane of the toe rail itself (the greater the ratio), the better it resists the loads of bending regardless of the radius of the bend.
If you add too much cabosil the epoxy will become quite brittle, and this could cause it to crack. You only want to add a little so as to thicken it up a little and help fill voids in the joint.
Dave Finnegan
builder of Spindrift 9N #521 'Wingë'
-------------------------------------------------------------------------------------------------------------------------------------------------------------------- Gresham’s Law of information: Bad information drives out good. No matter how long ago a correction for a particular error may have appeared in print or online, it never seems to catch up with the ever-widening distribution of the error.
Dave's got it right (of course) about the direction of the scarph. You should see the angle from the side of a toe rail, not the top.
As others have said, the length of the scarph is a minimum of 8:1 and I'd venture to say that the angle should be 8:1 including the vertical bits at the end, that is, the scarph would end up 8.5:1. Again a minimum. Scarphs in wooden airplane structures and in fancy composites, like carbon and Kevlar, should be much longer.
Using a 'stopped' scarph like you picture is fine so long as you know the vertical bit is doing absolutely nothing for strength of the joint. What it does do is eliminate the smear of glue that's visible when finishing; it changes a sloping wide-ish smear to a hairline. I'd make the 'stop' no more than, say, 3/32" which would include most of the radius you'd want at the top corners.
LeComte used another trick on our NE38's toerails: He doweled the joint at each end with a 1/4" or maybe a .5mm dowel. A little transverse fiber is never bad.
The 16" scarf worked great. I used a thinner epoxy mixture too. In previous attempts the thickened epoxy was a peanut butter consistency. I'm not sure how much of a diference, if any that makes, but I thought I'd mention it here.
Here are some photos:
Before glue up. 12 ruler shown to depict scarf length.
Wow! Not only did it hold but it looks much better! Really nice :) I'm impressed. You certainly didn't waste any time sitting around moaning about your misfortune.
So on the thickened epoxy, did you go for like a soupy mayonnaise consistency (just the right food analogy is not coming to mind)?
And thanks for putting the photos right in the post.
We are in the planning stages for the toe-rail replacement in the next few weeks.
How did you make the cut for the scarf. Did you have to make a jig?
I have seen where you stack one one length of toe rail over the other, off set each piece the length of the scarf and machine or hand plane both at the same time. Here is a video on You tube.
Thanks. Yeah I'm committed to getting her in the water this spring so there's no time to waste worrying about my mistakes. I do this as a sort of hobby not a vocation, and this is my first go at most of these tasks so there's no way I'm going to get everything right the first time.
People on this forum are so knowledgeable I find I'm better off, when given advice, to ask a couple of question to make sure I understand what's being said then just push the I believe button and get back to work.
The epoxy was about like catsup this time. Soupy mayonnaise works too :-).
Photos in the post - You're welcome. I'll be sure to do it that way from now on.
I used a kind of jig, but it was more to hold the toe rail in proper alinement. The sides are angled so I couldn't use a table or circular saw without some support to keep the saw square to the top and bottom of the rail.
This picture shows what I mean.
Last edited by Gary on Sun Mar 06, 2011 7:40 am, edited 1 time in total.
It does look great Gary, both the joinery and installation.
Gary wrote:The epoxy was about like catsup this time. Soupy mayonnaise works too :-).
That is a great analogy for the consistency of epoxy for gluing wood. The thickener is just to help the goo bridge gaps in a joint. You are not making filler.
Gary wrote:Photos in the post - You're welcome. I'll be sure to do it that way from now on.
You had better! You won't get me involved again without the eye candy reward. I don't come here to read. ;>)
Dave Finnegan
builder of Spindrift 9N #521 'Wingë'
-------------------------------------------------------------------------------------------------------------------------------------------------------------------- Gresham’s Law of information: Bad information drives out good. No matter how long ago a correction for a particular error may have appeared in print or online, it never seems to catch up with the ever-widening distribution of the error.
I did the starboard side last night and installed (dry fit) it today. I'll have to lengthen them one more time so they meet with the anchor platform properly. I still have to make the taft rail. I'm going to start that tomorrow.