Prop Shaft Saga

Post photos and descriptions of your ongoing projects here. No project is too big or too small.
Post Reply
User avatar
catamount
Candidate for Boat-Obsession Medal
Posts: 378
Joined: Sun Jun 19, 2005 7:30 am
Boat Name: GREYHAWK
Boat Type: Peterson 34
Location: Boothbay Harbor, ME
Contact:

Prop Shaft Saga

Post by catamount »

Success!

Finally, I have separated the coupler from the end of my prop shaft! It took some doing; let me explain.
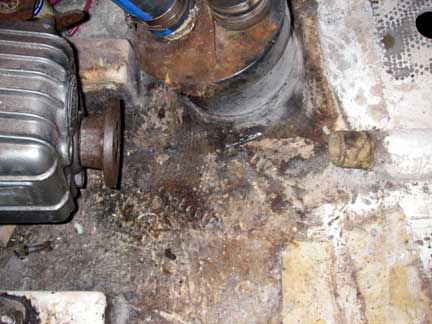
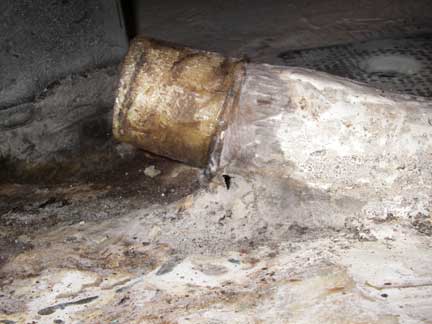
Before:
Image

After:
Image

Ultimately, I need to re-attach/re-bed my prop shaft support strut; and I wanted to replace the hose on my stuffing box. But, to do those things, I needed to get the prop shaft out of the way, which required removing the coupler. The set screws were rusted solid with the coupler, so after struggling unsuccessfully for a bit with various wrenches, I cut one of the screws off and started drilling it out, and drilling, and drilling, and drilling...

Well, this stuff is hard, and I guess I just don't have a lot of patience (nor a lot of experience drilling in hard metal -- I'm sure my technique is all wrong). In the meantime, I had acquired some special miracle "Rust Buster" and I bought an impact tool. Working with those things, I was able to unscrew the other set screw from the coupler (the one that I had not cut off yet), without too much trouble. But the one I had cut off and started drilling was still in there. I tried an ez-out on it with no luck, so I went back to the tool store for yet another cobalt drill bit and kept at it. Eventually, I had drilled out most of the screw, not all the way into the dimple, but below the level of the shaft based on my crude depth gauging. I hoped that if any part of the screw hadn't been drilled out and was standing proud, that it would just shear off when I started to drive the coupler off.

So I set to work at that, using an old 1/2" clevis pin as the spacer and some longer bolts. A little heat on the coupler, some penetrating oil, tighten the bolts with breaker bars, repeat. It was on hard, but by golly it started moving! I had to swap out the spacers and bolts a couple of times to go the distance, and the further out it got, the easier it went. Finally it was off! Great!

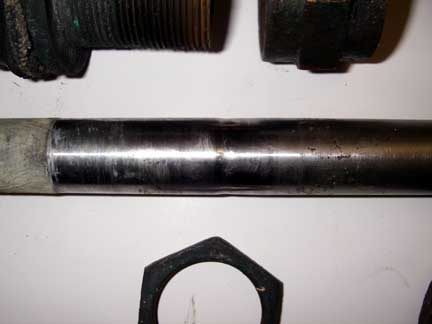
I went down outside the boat to pull the shaft out the back, but it wouldn't come. Hmmmm.. it's hanging up on something. So I went back up to check, and there on the shaft was a little burr of metal standing proud, dragged down from the set screw dimple. It had gouged a path for itself through the coupler! (No wonder it was so hard driving it off the shaft!)

Image
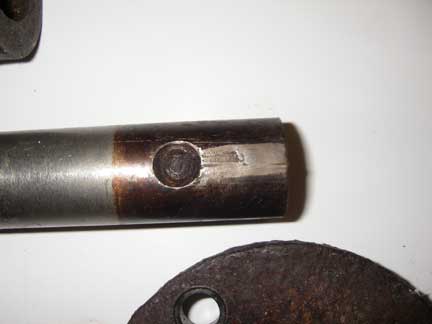
The burr after I ground it down so it would slip through the stuffing box.

Image
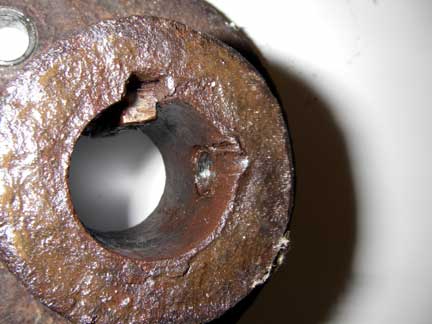
The gouge it plowed in the coupler.

I ground the burr down with my Dremel, and the shaft came out fine. I pulled the stuffing box off the shaft log, and gave it all a good once over. There was definite groove worn in the shaft by the stuffing, and there were some gouges in the shaft where it lies in the cutlass bearing, which can't be good. I guess it's time for a new shaft...

Image
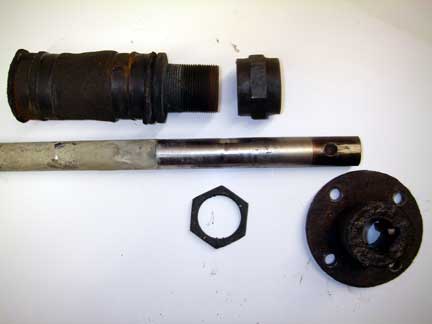
All the pieces layed out more or less in proper relation to one another.

Image
The groove worn in the shaft at the stuffing box.

Image
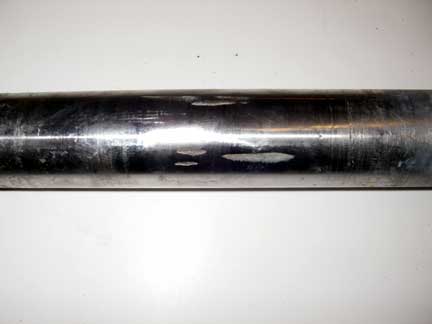
Gouges in the shaft where it passes through the cutlass bearing.

When I put it all back together, I would like to insert a Drivesaver or similar (it seems that the Yanmar equivalent that Tim L. would recommend is about 1/2 the price!), but I don't know if I've got enough room between the coupler and the stuffing box as they were (see Before picture above). Moving the coupler back (and shortening the shaft) by an inch would leave only about an inch or so between the packing nut and the coupler, which doesn't give one a whole lot of room for picking out the old flax or placing new stuff when the time comes for that. I suppose I could try moving the engine forward an inch. It could use new mounts, anyways. Then I'll need a new length of exhaust hose to reach the waterlift muffler. Does it ever end? (rhetorical question, you don't need to answer that!)

Alternatively, I could shorten the hose between the stuffing box and the shaft log/stern tube -- there appears to be an inch plus of space there. What do you think? How much clearance is needed between the end of the stuffing box and the shaft log/stern tube?


Here's a shot looking at the back of the engine. You can see I've ripped out the engine box walls:

Image

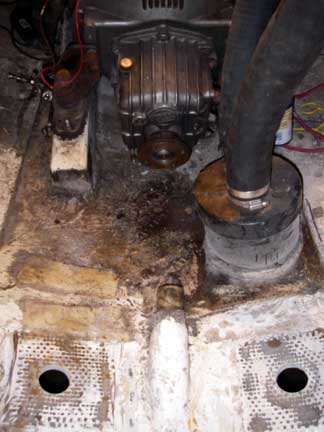
Just for fun, heres a view down the shaft log/stern tube from the transmission:

Image

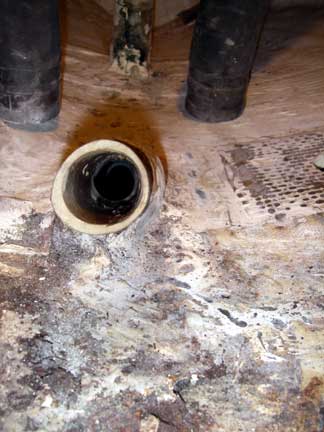
And here's a side view of my shaft log/stern tube:

Image

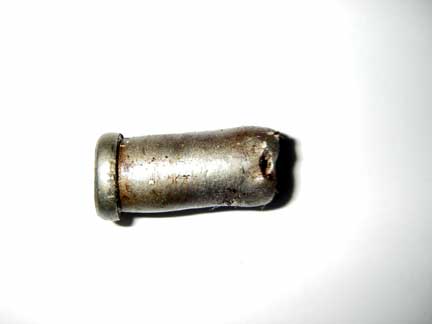
And finally, here's what's left of the 1/2" clevis pin I started with as push rod spacer for driving the shaft out of my coupler:

Image

Next, I'll be tackling the shaft support strut, as first presented here.

Any feedback welcome....

Thanks,
Last edited by catamount on Thu Apr 30, 2009 7:22 pm, edited 1 time in total.
Tim Allen -- 1980 Peterson 34 GREYHAWK
Harborfields Housekeeping Cottages, West Boothbay Harbor, Maine
Sailors for the Sea, a new voice for ocean conservation
User avatar
Tim
Shipwright Extraordinaire
Posts: 5708
Joined: Tue Apr 01, 2003 6:39 pm
Boat Name: Glissando
Boat Type: Pearson Triton
Location: Whitefield, ME
Contact:

Post by Tim »

I really wish boat builders would start leaving some reasonable clearance behind the engine so that there's ample exposed shaft. Having only an inch or two of shaft between the coupling and the packing nut complicates just about every possible procedure. But perish the thought of having that nasty ol' engine protrude a critical 2" or 3" further into the cabin...

Bellyaching aside, I agree with you that installing a Drivesaver in the mix may effectively prevent you from properly being able to service your packing, whether routinely or, worse, in an emergency.

I suppose option #1 might be to go with a packless stuffing box, such as the PYI PSS packless system. Since these eliminate the need to service packing, a short clearance on your shaft wouldn't present a problem. While most report success and happiness with these seals, there's the other side of the story where it is said that it's much harder to field-repair these should something go wrong and it begins to leak, whereas with traditional packing boxes you can generally stuff almost anything in there to stop a leak. (Of course, if you can't expose the packing nut enough because of the shaft length, then this is a moot point!)

Option #2 is to shorten the stuffing box hose, which it sounds like you might be able to do. If doing so retains the safe installation of the hose, and also provides you with enough shaft clearance for servicing, then this is perhaps the easiest route.

Option #3 is to slide the engine forward. Do you have the room to do this without major modifications to the foundations or other areas?

Finally, Option #4 is to forego the Drivesaver and save yourself the hassle of modifying everything. Drivesavers are nice, but one is really only required if you're going for the "isolate all metals from one another" school of thought with your underwater fittings.
---------------------------------------------------
Forum Founder--No Longer Participating
User avatar
Ceasar Choppy
Boat Obsession Medal Finalist
Posts: 622
Joined: Thu Mar 09, 2006 11:05 am
Location: Port Starboard, MD

Post by Ceasar Choppy »

You could always turn the engine around and install a v-drive! :)
User avatar
catamount
Candidate for Boat-Obsession Medal
Posts: 378
Joined: Sun Jun 19, 2005 7:30 am
Boat Name: GREYHAWK
Boat Type: Peterson 34
Location: Boothbay Harbor, ME
Contact:

Post by catamount »

1) I looked carefully at the PSS Shaft Seal. There sure are a lot of modern boat builders who seem to be installing these as standard in their new boats. But... I've heard a few horror stories about catastrophic failures of the bellows; and reading the installation and care instructions, they sure do seem to be a bit finicky.

I think I'll stick to the tried and traditional stuffing box, but will try GFO Gore-tex Packing (not the "GTU Gore" knock-off stuff from West Marine). Still, I don't expect my bilges to stay completely dry all the time (besides the drip around the prop shaft, I've got a keel stepped mast with internal halyards...) With the existing arrangement, there is room to service the packing; my concern was that adding a Drivesaver would reduce if not eliminate that room.

2) The existing stuffing box hose is 4.5 inches long, with 1.5 inches on the stuffing box and 1.5 inches on the stern tube, leaving 1.5 inches of "extra" hose. So the stuffing box could possibly be moved back as much as an inch, by shortening the hose. That gives more room for servicing the packing, or for accommodating a Drivesaver (by shortening the shaft).

3) There is some room on the engine stringers to schooch the engine forward about an inch (depending on the replacement mounts used and what their footprint is; right now it looks like I've got Bushings mounts...). Of course, the forward edge of the forward mounts would be right at the end of the stringers. There is no interior furniture in the area to worry about. (The engine location and bed placement are likely hold-overs from the production version of my boat, where there would be some interior furnishing constraints.)

4) My interest in a Drivesaver coupling interface is mainly for vibration isolation, although the galvanic isolation would be a nice benefit, too. But I've got enough other stuff to do that I think I'll put it (Drivesaver, Engine Mounts, etc...) off for another year.

But should I get a new prop shaft now? If I shorten the stuffing box hose, the packing will be in a different spot on the shaft, and the groove that's worn into it now won't be an issue. I am concerned about the gouges in the shaft where it goes through the cutlass bearing, though. They are rather curious, however. I wonder how you could get longitudinal gouges in the shaft there?

Thanks,
Tim Allen -- 1980 Peterson 34 GREYHAWK
Harborfields Housekeeping Cottages, West Boothbay Harbor, Maine
Sailors for the Sea, a new voice for ocean conservation
fusto
Master Varnisher
Posts: 109
Joined: Sun Aug 13, 2006 9:49 pm
Boat Name: Erebus
Boat Type: Apollo 16
Location: Adams, MA

Post by fusto »

catamount wrote: I am concerned about the gouges in the shaft where it goes through the cutlass bearing, though. They are rather curious, however. I wonder how you could get longitudinal gouges in the shaft there?
I've seen longitudinal crevice corrosion in the cutless area on shafts on boats that tend to sit in the slip for very long periods of time.
Especially if their slip is far inside the harbor or around a tight corner and doesnt get a lot of fresh tidal water. The water sits in the concave parts of the cutless against the shaft and stagnates. Eventually all the oxygen gets used up and then the corrosion starts.
Takes a really long time though.

Kind of hard to tell in your photo. Crevice corrosion in shafting is fairly distinctive.
It sort of reveals the granular structure of the stainless in shallow pits, and there can be some rust staining as well.
Last edited by fusto on Sat Feb 24, 2007 11:55 am, edited 1 time in total.
Zachary
Adams, MA
User avatar
Tim
Shipwright Extraordinaire
Posts: 5708
Joined: Tue Apr 01, 2003 6:39 pm
Boat Name: Glissando
Boat Type: Pearson Triton
Location: Whitefield, ME
Contact:

Post by Tim »

Catamount wrote:But should I get a new prop shaft now? If I shorten the stuffing box hose, the packing will be in a different spot on the shaft, and the groove that's worn into it now won't be an issue. I am concerned about the gouges in the shaft where it goes through the cutlass bearing, though. They are rather curious, however. I wonder how you could get longitudinal gouges in the shaft there?
Crevice corrosion can take a lot of forms. I can't tell from your photos either, but it's a possibility. Cutless bearings typically wear (or, more accurately, polish) smooth, shiny, consistent areas on the shaft. Scoring is possible from debris or misalignment, but your photo doesn't look like scoring so much.

If you get a new shaft now, even if you don't reconfigure for a Drivesaver, you'll be OK in the future as long as you don't later decide to move the engine. It's always straightforward to remove length from the coupling end of a shaft, as the re-machining is easy. Or you can move your engine forward an inch and not need to modify the shaft at all, if you install a Drivesaver later.

My inclination, expensively, is to always replace items that appear worn or suspect. I think I'd replace the shaft in your shoes, but that doesn't necessarily mean that replacement is required. Between the scoring and the mysterious marks at the bearing end, though, it seems prudent. You've got it all apart now, so it's the perfect time. And then you can get your new coupling face machined to the shaft so that the coupling face is perfectly perpendicular to the shaft axis, improving overall alignment and eliminating one potential source of vibration.
---------------------------------------------------
Forum Founder--No Longer Participating
Post Reply