Looking more closely at your mast step now, it's not the same as mine. Mine is cast aluminum. Is yours wood?
For one reason or another I've repainted my mast step every couple of years. I wouldn't want to have to break a paint joint and potentially compromise the deck paint to remove it or rebed it.
A favorite joke:
Q. When does aluminum start to corrode?
A. As soon as you paint it!
Triton #680 deck work
-
bcooke
- Master of the Arcane
- Posts: 2272
- Joined: Sat Oct 04, 2003 10:55 pm
- Boat Name: Jenny
- Boat Type: 1966 Pearson Triton
- Location: Rowley, MA
- Contact:
Yeah, my mast step is an epoxy saturated mahogony plywood contraption. I am expecting the paint to stick to it just as well as the rest of the deck. It is removable but I just can't see any reason to remove it. I probably should have just set it in a bed of epoxy and made it permanent.
Then again...
-Britton
Then again...
-Britton
-
dasein668
- Boateg
- Posts: 1637
- Joined: Thu Apr 03, 2003 9:09 am
- Boat Name: Dasein
- Boat Type: Pearson Triton 668
- Location: Portland, Maine
- Contact:
I have the same. I pulled it off for painting, but I don't see a pressing reason to do so. I definitely would NOT make it permanant, however. Plywood and rot potential, epoxy soaked or no, after all...bcooke wrote:Yeah, my mast step is an epoxy saturated mahogony plywood contraption. I am expecting the paint to stick to it just as well as the rest of the deck. It is removable but I just can't see any reason to remove it. I probably should have just set it in a bed of epoxy and made it permanent.
Then again...
-Britton
Nathan
dasein668.com
dasein668.com
-
Tim

- Shipwright Extraordinaire
- Posts: 5708
- Joined: Tue Apr 01, 2003 6:39 pm
- Boat Name: Glissando
- Boat Type: Pearson Triton
- Location: Whitefield, ME
- Contact:
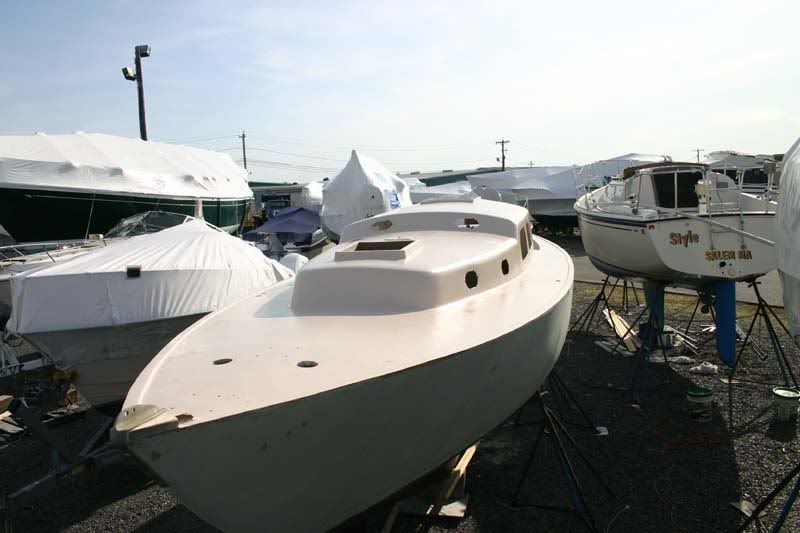
Funny...my first thought was also how inaptly named that particular boat was!Rachel wrote: And I'm not going to say a word about "Style" (the boat to starboard of yours).
Looks good, Britton. I hope you get a weather window soon.
I see no reason not to just paint over and around your mast step in your particular case. Those laminated ones as seen on most of the mid-and later model Tritons are either good as is for another 40 years, or junk right now; there seems to be no in-between. Since yours is good, and you've already addressed the deck beneath and rebedded, you won't have a need to touch it again for a very long time.
---------------------------------------------------
Forum Founder--No Longer Participating
Forum Founder--No Longer Participating
-
bcooke
- Master of the Arcane
- Posts: 2272
- Joined: Sat Oct 04, 2003 10:55 pm
- Boat Name: Jenny
- Boat Type: 1966 Pearson Triton
- Location: Rowley, MA
- Contact:
Schedule and weather didn't come together this week. Thur/Fri were pretty torturous with gorgeous weather Next week looks like a Maybe.
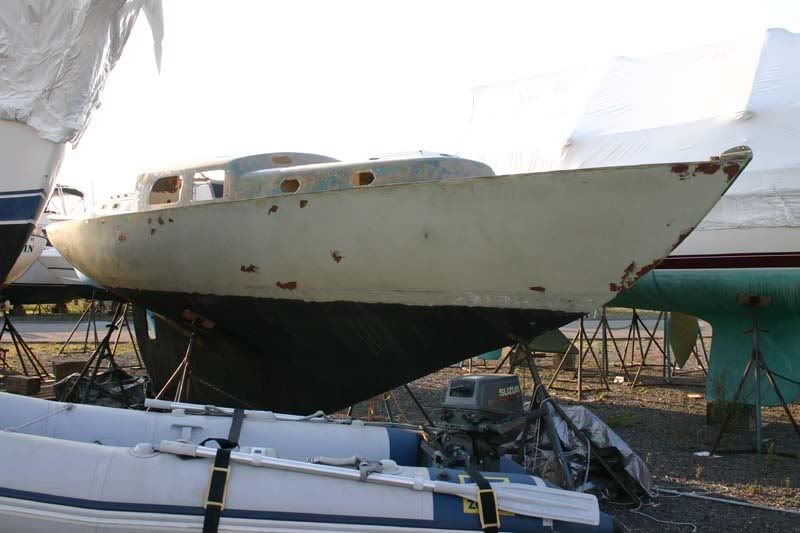
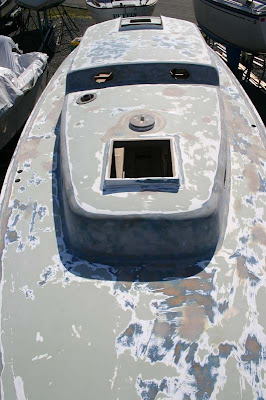
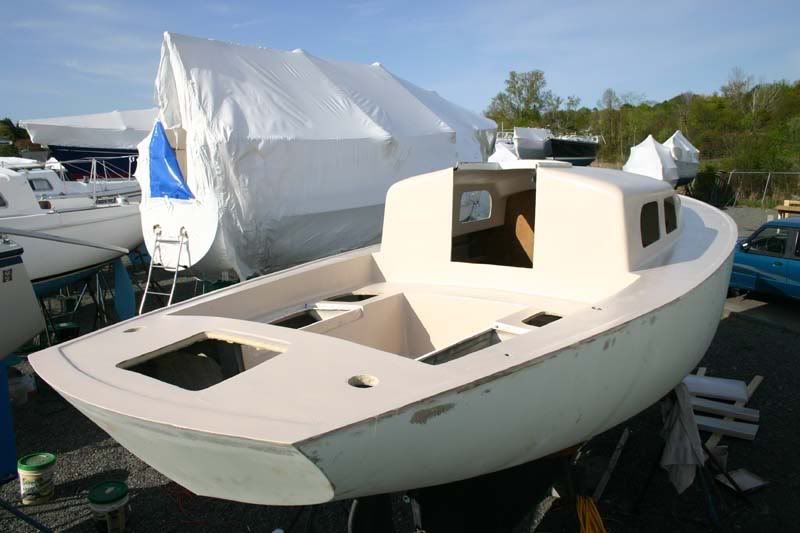
I contented myself with hull work. A thorough washing, acetone wipe, and awl-prep-plus wipe really made the hull look better (probably only to my eyes.) Lowering the waterline to where it should be really seemed to have a positive effect too (also probably to my own eyes.)
I ground out the battle scars and filled with fairing filler. I also filled in some holes around the stern. Curious, we all hear about how over-built the old boats are; while grinding out the battle scars I kept waiting to see good solid laminate. It wasn't going to happen. The deeper I ground, the more I just keep finding hull that looks like swiss cheese inside. Well, not really swiss cheese but the laminate is riddled with small holes/voids/dry bits/etc. With so much hull thickness I am not worried but there might be a good reason they built the hulls so thick. I really wish I had a camera while I was grinding...
Note, I have a lot more sanding to do on the hull. I just wanted to hit the big stuff before I went over most of the hull with 60/80 grit. A close examination shows lots of random gelcoat cracks that will have to be dealt with.

-Britton
I contented myself with hull work. A thorough washing, acetone wipe, and awl-prep-plus wipe really made the hull look better (probably only to my eyes.) Lowering the waterline to where it should be really seemed to have a positive effect too (also probably to my own eyes.)
I ground out the battle scars and filled with fairing filler. I also filled in some holes around the stern. Curious, we all hear about how over-built the old boats are; while grinding out the battle scars I kept waiting to see good solid laminate. It wasn't going to happen. The deeper I ground, the more I just keep finding hull that looks like swiss cheese inside. Well, not really swiss cheese but the laminate is riddled with small holes/voids/dry bits/etc. With so much hull thickness I am not worried but there might be a good reason they built the hulls so thick. I really wish I had a camera while I was grinding...
Note, I have a lot more sanding to do on the hull. I just wanted to hit the big stuff before I went over most of the hull with 60/80 grit. A close examination shows lots of random gelcoat cracks that will have to be dealt with.
-Britton
-
bcooke
- Master of the Arcane
- Posts: 2272
- Joined: Sat Oct 04, 2003 10:55 pm
- Boat Name: Jenny
- Boat Type: 1966 Pearson Triton
- Location: Rowley, MA
- Contact:
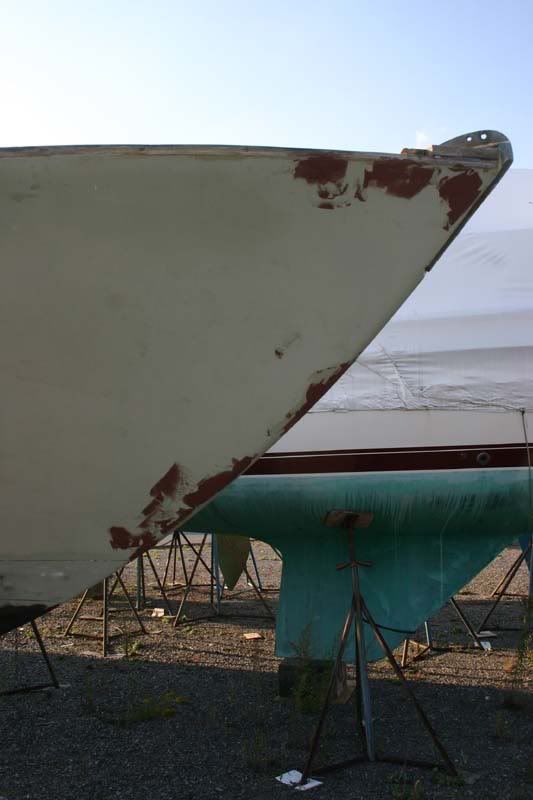
I didn't have the heart to take off the stem strap.
It would be easier than painting around it but I know something would break in the removal and I would have an additional project to deal wth.
The duct tape is just holding some wax paper against the hull so the thickened epoxy didn't sag down and make a mess. Well,... a bigger mess.
-Britton
It would be easier than painting around it but I know something would break in the removal and I would have an additional project to deal wth.
The duct tape is just holding some wax paper against the hull so the thickened epoxy didn't sag down and make a mess. Well,... a bigger mess.
-Britton
-
Tim
- Shipwright Extraordinaire
- Posts: 5708
- Joined: Tue Apr 01, 2003 6:39 pm
- Boat Name: Glissando
- Boat Type: Pearson Triton
- Location: Whitefield, ME
- Contact:
Progress is progress!
Looking good.
Jamestown has 3/8" flathead machine screws in 6" and 8" lengths; I think that's where I got the new bolts for my stem casting way back when. They are very expensive, but it's good to know they're available if need be.
Mike: what's your source?
Looking good.
Jamestown has 3/8" flathead machine screws in 6" and 8" lengths; I think that's where I got the new bolts for my stem casting way back when. They are very expensive, but it's good to know they're available if need be.
Mike: what's your source?
---------------------------------------------------
Forum Founder--No Longer Participating
Forum Founder--No Longer Participating
-
Figment
- Damned Because It's All Connected
- Posts: 2846
- Joined: Tue Apr 08, 2003 9:32 am
- Boat Name: Triton
- Boat Type: Grand Banks 42
- Location: L.I. Sound
ah, more fun with Triton inconsistencies!!!
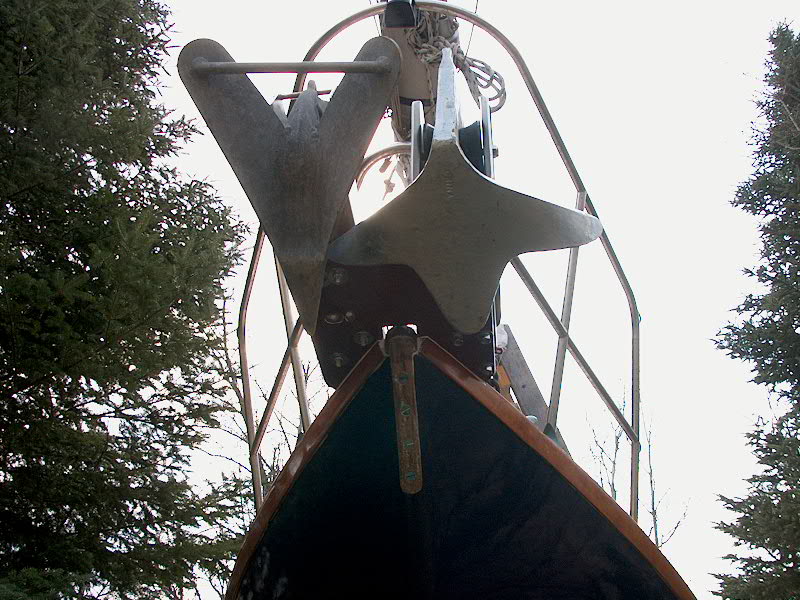
The 3/8" bolts carried by Jamestown don't have the necessary (7/8" I think) heads required to fit my stemstrap. Are later castings cut for normal-size heads? Also, I don't think that 8" is enough for that long bolt that reaches all the way through to the deck side.
I can't remember the source off the top of my head, but I have it stashed away somewhere. They had a screw lathe going on display at the woodenboat show in Mystic this year, can cut anything within reason. So can any machine shop, of course, but I don't want to know the cost of four bits of metal from a machine shop around here.

-
bcooke
- Master of the Arcane
- Posts: 2272
- Joined: Sat Oct 04, 2003 10:55 pm
- Boat Name: Jenny
- Boat Type: 1966 Pearson Triton
- Location: Rowley, MA
- Contact:
I paid $8 a piece for four bronze bolts I wound up not using...
The heads look pretty big for a 3/8" bolt but I don't know what I have under there (which is partly why I am afraid to touch it). Bolts going up to the deck?! I think mine goes into a sort of false stem that acts as just a backing block for the pointy end of the boat. I haven't been up to that end of the boat in a while though.
My problem with taking pictures is that the only digital camera I have is a Canon SLR and I don't like leaving it in the toolbox for those just-in-case photos. I treat the camera badly enough as it is. And videos? Not until I have purchased all the boat treats I want first.
-Britton

-
bcooke
- Master of the Arcane
- Posts: 2272
- Joined: Sat Oct 04, 2003 10:55 pm
- Boat Name: Jenny
- Boat Type: 1966 Pearson Triton
- Location: Rowley, MA
- Contact:
It might be awhile.
I was near the limits of minimum cure temps (55 deg F.) and minimum dewpoint spread (3 deg F). Between these two and the unexpected downpour I think I lost it.
I only started sanding on it later in the day but it appears that a good part of the high build application has failed and will have to be ground off and re-coated. Compounding matters was the fact that I had to delay sanding for four days so what did set up correctly is pretty hard now.
Given my ever-shrinking weather window and this little learning experience, I may call it quits until Spring.
It looked nice when it was all one color though.
-Britton

-
dasein668
- Boateg
- Posts: 1637
- Joined: Thu Apr 03, 2003 9:09 am
- Boat Name: Dasein
- Boat Type: Pearson Triton 668
- Location: Portland, Maine
- Contact:
It was a whole week. Jeez, whaddya want from a guy?bcooke wrote:I knew you couldn't keep a secret for long...
Nathan
dasein668.com
dasein668.com
-
dasein668
- Boateg
- Posts: 1637
- Joined: Thu Apr 03, 2003 9:09 am
- Boat Name: Dasein
- Boat Type: Pearson Triton 668
- Location: Portland, Maine
- Contact:
Ugh, that stinks. Sorry man! Hopefully a nice October sail with Beers and Cheesey Comestibles will brighten your disposition.
Nathan
dasein668.com
dasein668.com
-
bcooke
- Master of the Arcane
- Posts: 2272
- Joined: Sat Oct 04, 2003 10:55 pm
- Boat Name: Jenny
- Boat Type: 1966 Pearson Triton
- Location: Rowley, MA
- Contact:
Definitely. I am looking forward to it. My second sail of the season.Hopefully a nice October sail with Beers and Cheesey Comestibles will brighten your disposition.
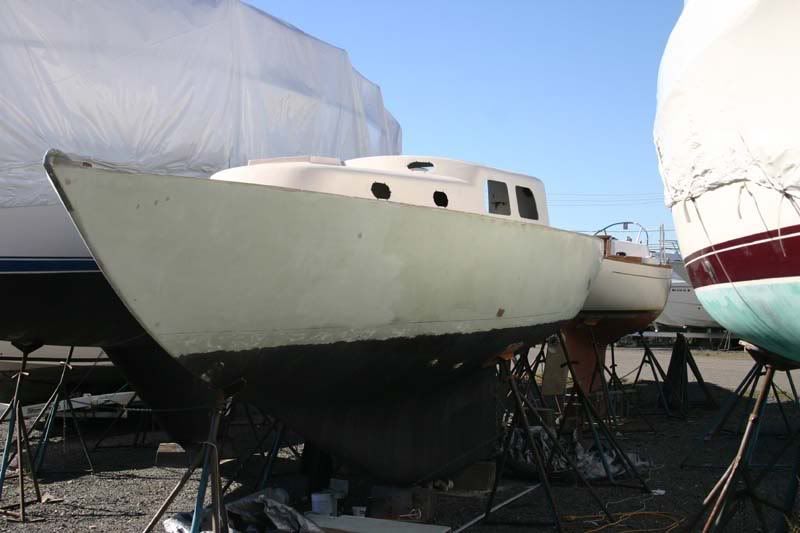
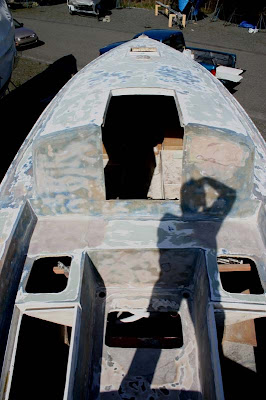
Hmmm..... Failed. How do I describe it. Sort of a mixed variety of sorts.
First. I noticed on the cabin top that the high build primer had lifted and cracked but only on the upper doghouse. Using a scraper the paint lifted off cleanly.
Second. In a couple of places on the upper doghouse, after sanding nearly all the way through, it almost looked like the gel-coat - the soft, thick, non-skid portion -itself had bubbled up slightly. Sort of like paint under a heat gun, but only a little bit.
Third. In a couple of spots it was really weird. The sander would really bog down (I was working with 120 grit) and yet I wasn't applying much pressure and the disc wasn't clogging up. Almost like the primer was still sticky but it felt dry to the touch. Weird.
The primer itself didn't approach anything like self-leveling but I wasn't surprised at that. I had to nearly grind all the way through it to get a level smooth surface. Occasionally, I would burn through those smooth surfaces and the edges would lift cleanly. I kept sanding away until the edges were well feathered and obviously well adhered. (With the cooler temperatures I should have used a thinner but I didn't have any on hand and figured no amount of thinning was going to make this mud paint well so there was no point in trying. I will thin next time.)
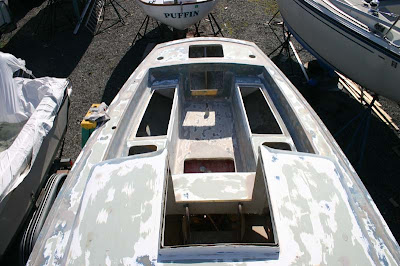
I first tried sanding with 120 grit on the DA sander but the sander was chattering a lot. I tried a heavier grit but the same thing was happening. So I switched to the palm sander (120, then 80) which worked smoothly except it was taking forever. I decided I would rather lean down and take too much paint off rather than spend a week sanding so I went back to the DA- which did in fact take most of the primer off. Now I am back to a multi-colored deck.
If the point of the high build is to simply fill the pinholes then I am okay. The vast majority of pinholes are filled. If I am also supposed to have a solid non-transparent layer of high build primer over everything then I am not okay. I may go straight to 545 but I really want to investigate more of the deck first.
I am not finished yet. I did some work on the aft deck which seemed marginal. I went through in spots but it is mostly decent. The cabin top however is almost devoid of primer which is where I stopped for the evening. Funnily enough both surfaces were painted at roughly the same time. A half day of sanding tomorrow will tell me a lot more.
There are so many variables I am not sure which ones are acting up here. Certainly the fact that I was applying the primer right at the edge of its limits didn't help much. At worst, I may also have some foreign material (i.e. silicone) ground into the surfaces by mistake. I did the detailed cleaning and solvent wash before sanding but I might have missed something. My boat was loaded with silicone before I started.
I will know a lot more tomorrow but today I am just going to wallow in my dissapointment for a bit. I definitely have a better idea of the limits of the material and won't be pushing my luck so hard next time.
Like I said, for a few days, seeing a single solid color on the deck was great. Good things are coming. I just need a few more learning experiences first.
-Britton
-
Tim
- Shipwright Extraordinaire
- Posts: 5708
- Joined: Tue Apr 01, 2003 6:39 pm
- Boat Name: Glissando
- Boat Type: Pearson Triton
- Location: Whitefield, ME
- Contact:
First off, you have my heartfelt condolences. There's nothing worse than taking such major steps backward. But I think you're smart to cut your losses and wait for more clement weather. Even on good days, there just aren't enough warm sunlight hours to allow paints and varnishes to cure appropriately at this time of year up here.
Sounds like you have a good attitude about the setback, so just press on with other parts of the project and you'll be fine.
Am I to understand that you applied this without using any reducer? Reducer in these products isn't an optional thing...it's required. At a minimum, at any temperature, you need the minimum percentage indicated in the directions. Reducer is an important part of the paint system and cannot be left out.bcooke wrote:I should have used a thinner...
Sounds like that may have been the best choice, given the way your primer cured (or didn't cure). Disappointing, but a lot less so than having your shiny topcoats fail in the future because of bad primer coat.bcooke wrote:I decided I would rather lean down and take too much paint off rather than spend a week sanding so I went back to the DA- which did in fact take most of the primer off.
That certainly couldn't have helped things! Fall weather is so unpredictable.bcooke wrote:...unexpected downpour...
Silicone contamination is generally easily recognizable and forms "fish eyes"--circular areas where the paint basically pulls away from itself over the area of contamination. While this may be part of your problem, it doesn't really sound like it's the cause from your description of the way the paint is acting.bcooke wrote:At worst, I may also have some foreign material (i.e. silicone) ground into the surfaces by mistake...My boat was loaded with silicone before I started.
Sounds like you have a good attitude about the setback, so just press on with other parts of the project and you'll be fine.
---------------------------------------------------
Forum Founder--No Longer Participating
Forum Founder--No Longer Participating
-
keelbolts
- Skilled Systems Installer
- Posts: 271
- Joined: Mon Jun 12, 2006 12:20 pm
- Location: Tidewater, VA
Sorry to hear about your uncooperative primer. I had a similar problem recently and hated life for about a day. I don't think it's just me, but, while I love a beautiful paint job, I don't enjoy painting and sanding enough to do it for no good reason. Whenever I feel unhappy with my boat progress I think of Jeff & Christine, friends of mine who cold-molded a 50-something foot schooner and 'glassed it. They wanted a wood deck, but they didn't want to penetrate the fiberglass on the deck so they glued ipe to the deck w/ 5200. This involved a good deal of wood, 5200, spacers, and weight (to hold down the ipe while the 5200 set). They did the deck and the cabin tops. 50 feet by about 14 feet and when they removed the weights the wood almost immediately curled, cupped, and did other ugly things from one end to the other. You can't imagine it any worse than it was. My wife would have had to put me on a suicide watch. Jeff & Christine took it pretty well, cleaned and painted the deck, and ended up sailing away to the islands. Things could be worse & you'll win in the end. I hope that helps you just a little as it does me when things aren't working for me the way they always seem to work for Tim.
Celerity - 1970 Morgan 30
How much deeper would the ocean be without sponges in it?
How much deeper would the ocean be without sponges in it?
-
Summersdawn
- Skilled Systems Installer
- Posts: 279
- Joined: Fri Nov 04, 2005 6:34 pm
I feel for you Britton. I had an unexpected rain shower on my freshly primed deck last year. I knocked the loose stuff off, sanded it well, and kept going. I now have a handful of spots were the primer has peeled up off the deck.
You are doing the right thing by taking the majority of the primer off. It is easier to sand and re-prime now, than it will be later.
You are doing the right thing by taking the majority of the primer off. It is easier to sand and re-prime now, than it will be later.
Rick
Summer's Dawn
24 San Juan #380
Summer's Dawn
24 San Juan #380
-
bcooke
- Master of the Arcane
- Posts: 2272
- Joined: Sat Oct 04, 2003 10:55 pm
- Boat Name: Jenny
- Boat Type: 1966 Pearson Triton
- Location: Rowley, MA
- Contact:
I think I really should post my screw-ups more often. I haven't felt this many warm thoughts in a long time. Thank you all.
I am pretty much over it now.
I had heard the stuff goes on like mud and I wanted a thick application so it seemed like the right thing to do at the time. A chemist/boat carpenter friend and part time paint expert already set me straight. Next time reduce.
No fisheyes so no silicone contamination. At least that is a load off my mind.
I was too cavalier. I will admit it now. I pushed too hard. It won't happen again.
Yesterday I sanded off a good part of what was on the cabin top. The rest looked pretty secure. When I showed up this morning a few more blisters appeared. That did it. I am definitely taking every bit of the stuff back off. I just wish I could sand decks all day without my back cramping up and causing me to crawl around on all fours. It is going to take a few days to get the job done a few hours at a time.
Next time I might just forego anything that will have non-skid over it. All this sanding is making everything pretty smooth and further fairing under the non-skid is probably not necessary.
Which leads me to a question. If I am going with an Interlux product for the non-skid, wouldn't I rather put down Interlux primer there? Why even bother using an Awl-Grip primer in parts that won't see Awl-Grip paint? Everybody I know that does an Awl-grip (or the like) job on the decks seems to cover the entire deck surface with the two-part primer.
On another good note, the primer sanded off smooth and I found very few areas that weren't really fair already. All this sanding must be good for something.
Thanks again for the good thoughts.
-Britton
I am pretty much over it now.
Now you tell me :-)Am I to understand that you applied this without using any reducer?
I had heard the stuff goes on like mud and I wanted a thick application so it seemed like the right thing to do at the time. A chemist/boat carpenter friend and part time paint expert already set me straight. Next time reduce.
No fisheyes so no silicone contamination. At least that is a load off my mind.
I was too cavalier. I will admit it now. I pushed too hard. It won't happen again.
I am really sorry to hear that but I really appreciate it. It will make tomorrow's work much easier to digest knowing for certain I am doing the right thing....now have a handful of spots were the primer has peeled up off the deck.
Yesterday I sanded off a good part of what was on the cabin top. The rest looked pretty secure. When I showed up this morning a few more blisters appeared. That did it. I am definitely taking every bit of the stuff back off. I just wish I could sand decks all day without my back cramping up and causing me to crawl around on all fours. It is going to take a few days to get the job done a few hours at a time.
One coat over everything. Three coats over the cockpit and cabin sides where I had hoped to see acres of smooth brilliant white.How many coats did you apply?
Next time I might just forego anything that will have non-skid over it. All this sanding is making everything pretty smooth and further fairing under the non-skid is probably not necessary.
Which leads me to a question. If I am going with an Interlux product for the non-skid, wouldn't I rather put down Interlux primer there? Why even bother using an Awl-Grip primer in parts that won't see Awl-Grip paint? Everybody I know that does an Awl-grip (or the like) job on the decks seems to cover the entire deck surface with the two-part primer.
On another good note, the primer sanded off smooth and I found very few areas that weren't really fair already. All this sanding must be good for something.
Thanks again for the good thoughts.
-Britton
-
dasein668
- Boateg
- Posts: 1637
- Joined: Thu Apr 03, 2003 9:09 am
- Boat Name: Dasein
- Boat Type: Pearson Triton 668
- Location: Portland, Maine
- Contact:
You tease! (Thank goodness that I know what other is!)bcooke wrote:Rachel wrote:So, what's the word on topsides color?
...I take it back. I am going with the Other option...Me wrote:Green
Nathan
dasein668.com
dasein668.com
-
Tim Mertinooke
- Skilled Systems Installer
- Posts: 200
- Joined: Wed Jan 11, 2006 12:50 am
- Location: Massachusetts
- Contact:

-
Tim
- Shipwright Extraordinaire
- Posts: 5708
- Joined: Tue Apr 01, 2003 6:39 pm
- Boat Name: Glissando
- Boat Type: Pearson Triton
- Location: Whitefield, ME
- Contact:
Now, now...how many times have I emphasized the need to read and follow product directions?bcooke wrote:Now you tell me :-)Am I to understand that you applied this without using any reducer?
Mostly because it's an easy way to cover the entire deck with an outstanding primer system, and because it avoids a need to mask the patterns early in the process, and possibly multiple times (particularly outdoors, where tape probably wouldn't last through the whole process). You certainly could go the other route if you prefer, since you don't need Awlgrip primer beneath non-Awlgrip paint products.bcooke wrote:Which leads me to a question. If I am going with an Interlux product for the non-skid, wouldn't I rather put down Interlux primer there? Why even bother using an Awl-Grip primer in parts that won't see Awl-Grip paint? Everybody I know that does an Awl-grip (or the like) job on the decks seems to cover the entire deck surface with the two-part primer.
Epoxy primer makes a good substrate for any paint of equal or lesser quality, so it's an excellent choice regardless. And you tend to have more than enough on hand anyway, avoiding the need for yet another can of paint later.
---------------------------------------------------
Forum Founder--No Longer Participating
Forum Founder--No Longer Participating
-
dasein668
- Boateg
- Posts: 1637
- Joined: Thu Apr 03, 2003 9:09 am
- Boat Name: Dasein
- Boat Type: Pearson Triton 668
- Location: Portland, Maine
- Contact:
Have we actually established that Britton can read? ;-PTim wrote:Now, now...how many times have I emphasized the need to read and follow product directions?
Nathan
dasein668.com
dasein668.com
-
bcooke
- Master of the Arcane
- Posts: 2272
- Joined: Sat Oct 04, 2003 10:55 pm
- Boat Name: Jenny
- Boat Type: 1966 Pearson Triton
- Location: Rowley, MA
- Contact:
Yeah, I can't read so don't worry about me finding out what you really think of me.
Do you ever get the feeling the boat Gods don't like you?
I found out why my Porter Cable 7335 was chattering a bit on occasion. It wasn't the paper gripping the material funny.
The bearing blew out. It is now only a SA sander and not very effective at that.
Replacement cost for the bearing is $35 and 1-2 weeks delivery.
I think I am going to buy a new sander today.
I worked it pretty hard these past four years but I expected to get a little more life out of it. One complete boat project at least.
Guess I won't be sanding this morning either.
-Britton
-
Capn_Tom
- Skilled Systems Installer
- Posts: 194
- Joined: Thu Jan 12, 2006 6:04 pm
- Boat Type: Westsail 32
- Location: Erlanger, Ky
If you are using Iterdeck it doesn't require a primer If you need the primer for fairing purposes Interlux doesn't have a true high build primer but you could use Interprotect due to it's quick overcoat time. Epoxy primekote their 2 part primer is n't much thicker than 2 part poly but it does sand well.
The board does not cut itself short!

-
dasein668
- Boateg
- Posts: 1637
- Joined: Thu Apr 03, 2003 9:09 am
- Boat Name: Dasein
- Boat Type: Pearson Triton 668
- Location: Portland, Maine
- Contact:
I actually like the idea, but the execution of the eye of infinity "logo" leaves something to be deisred.Tony wrote:I'm sorry, Britton, but I have to give away your new color scheme.
hehe...subtle...:-p
Nathan
dasein668.com
dasein668.com
-
bcooke
- Master of the Arcane
- Posts: 2272
- Joined: Sat Oct 04, 2003 10:55 pm
- Boat Name: Jenny
- Boat Type: 1966 Pearson Triton
- Location: Rowley, MA
- Contact:
You people are bringing my thread down.
Bottom growth indeed.
That is actually a fantastic looking hull under those colors and the more I look at it the less I am put off by the bold colors. In my case I am thinking a bit more subtle still. Single color. Not immediately obvious perhaps. Quite rare. People will say "nice color,why don't more people use it?..."
At least I hope that is the reaction. I am going color shopping next week to get some more specifics. It will definitely be a custom mix.
-Britton
-
keelbolts
- Skilled Systems Installer
- Posts: 271
- Joined: Mon Jun 12, 2006 12:20 pm
- Location: Tidewater, VA
I think in terms of repainting my topsides each year, so a graphic scheme like that one looks like waaay too much work. It's interesting though. Don't you get just a tiny bit bored with the marinas full of white and blue boats? ... and this coming from a guy who only has white rope on his boat. Not sold on the graphics, but love the boat.
Celerity - 1970 Morgan 30
How much deeper would the ocean be without sponges in it?
How much deeper would the ocean be without sponges in it?
-
Zach
- Boat Obsession Medal Finalist
- Posts: 684
- Joined: Wed Jan 25, 2006 6:28 pm
- Location: Beaufort, North Carolina
- Contact:
Looking good!
I love the smooth lines of that lazarette, no humps bumps or other compound curves with no purpose! Did you modify her back there, or is that factory?
Zach
I love the smooth lines of that lazarette, no humps bumps or other compound curves with no purpose! Did you modify her back there, or is that factory?
Zach
1961 Pearson Triton
http://pylasteki.blogspot.com/
1942 Coast Guard Cutter - Rebuild
http://83footernoel.blogspot.com/
http://pylasteki.blogspot.com/
1942 Coast Guard Cutter - Rebuild
http://83footernoel.blogspot.com/