The Plastic Classic Forum, your free and in-depth resource for information on re/building classic sailboats. ... Be sure to visit / join our sister site at sailFar.net! ... And don't forget to check out Atom's Virtual Home Port! ...
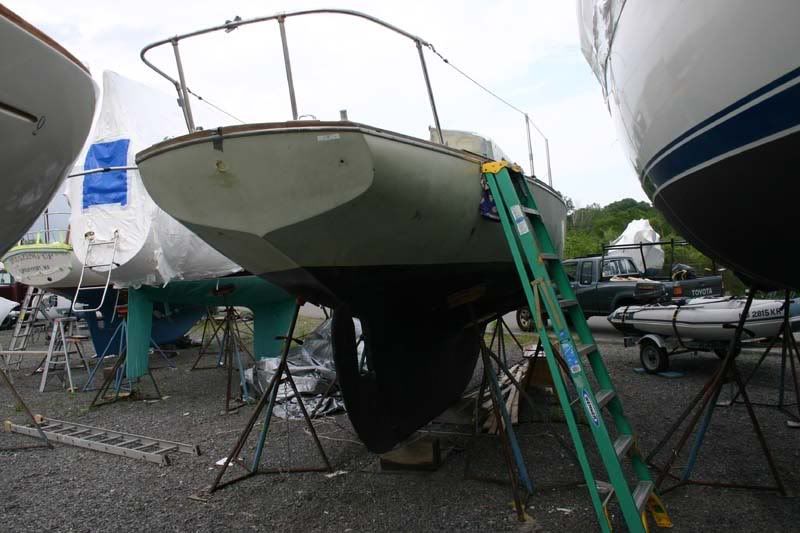
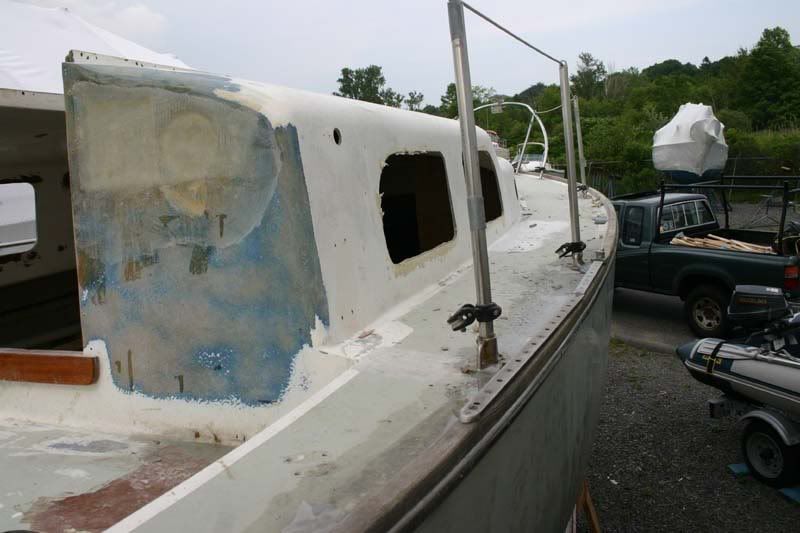
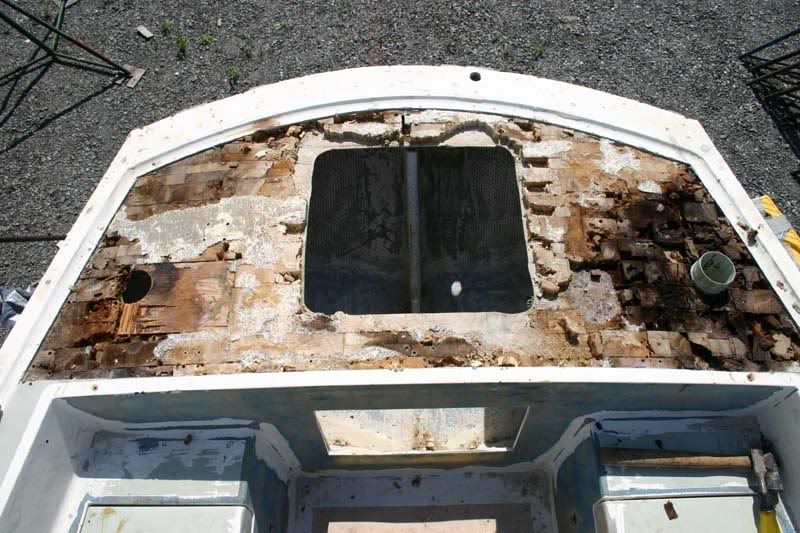
For the next three months I will be working on my decks - weather permiting of course. I thought I would post some 'before' pictures. These photos were taken two days ago. Since then I have pulled all the deck hardware and the toerail. I thought I had more recent pictures with everything removed but I must have been delusional.
Next week is all booked up with non-boat stuff unfortunately so don't hold your breath. When I pulled the toe rail I found an ugly deck/hull joint so I might get that cleaned up in the few moments I have next week along with filling the toe rail screw holes and maybe cutting off the top skin of the aft deck in preparation for some recore.
This is the first time my decks have seen daylight in a year and a half. I just love this view of the hull. I could stare for hours... ... ... oh, excuse me, where was I?...
Note that my hull is not in the same league as some of the other Tritons on this forum. If this picture doesn't convince you keep looking...
I hate to say good-bye but I love to see you go...
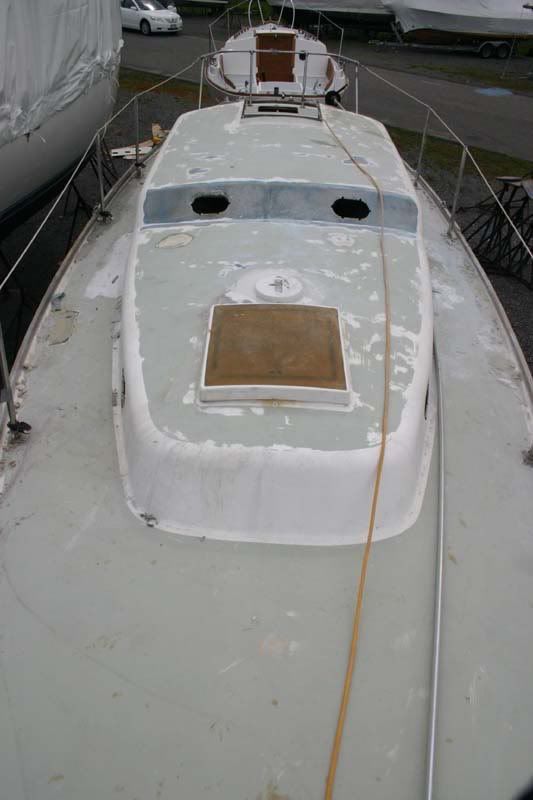
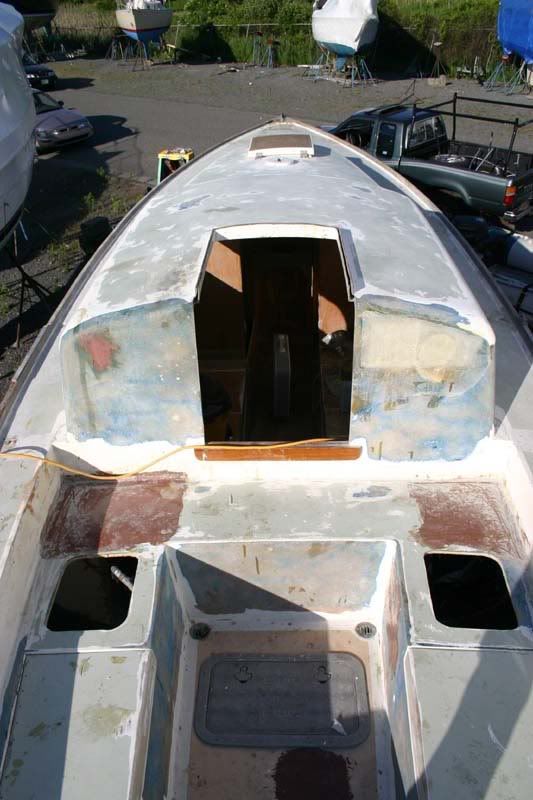
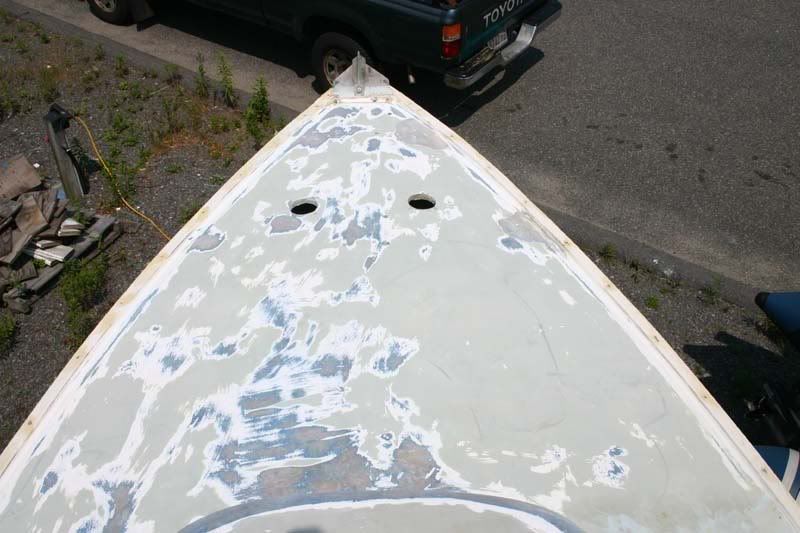
And here is the general condition of the decks. The cabin top has been rough sanded as I had some free time and wasn't motivated to do more. My shelter was too cramped along the sides to do much.
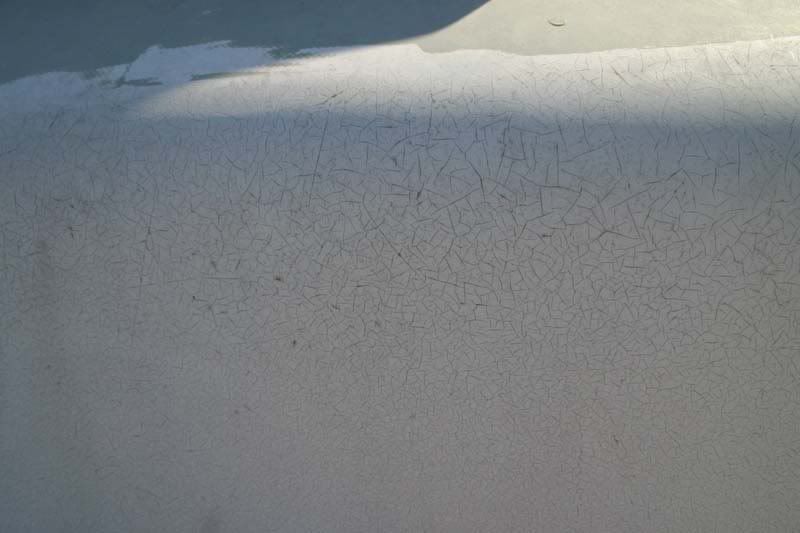
Most of the cabin top gel-coat looks like this...
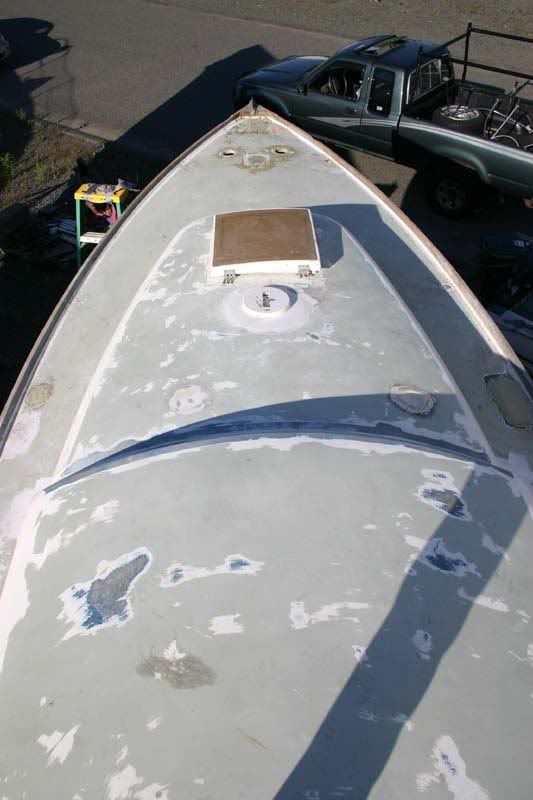
The side decks have been patched a bit...
And the cockpit needs a bit more fairing work
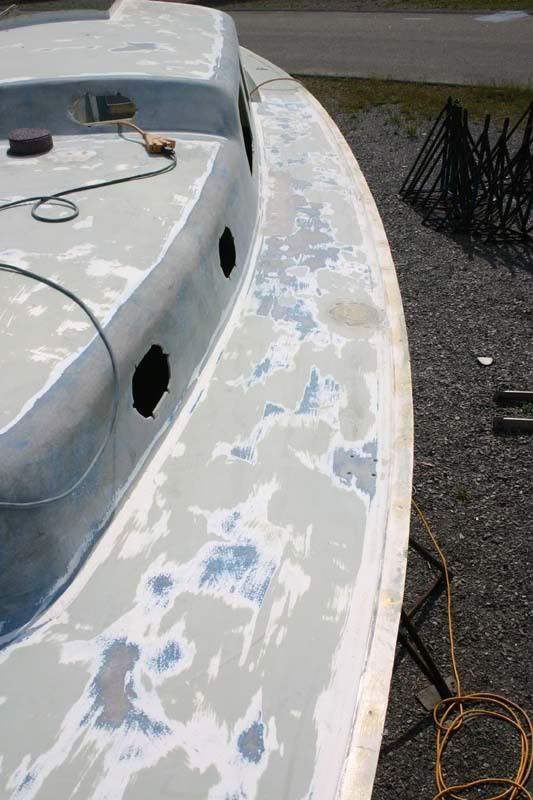
The aft deck that is coming off. Also note that I had some trouble removing the stern pulpit and finally resorted to simply ripping it through the deck with my bare hands at one point.
That is show and tell for today. More coming soon...
:-)
-Britton
-Britton
Work is overrated.
Most everything you read on the Internet is wrong.
Fret not dear people of the Plastic Classic Forum. I have not gone astray.... much. I thought with my shorter work schedule that I would have a lot more time for the boat but all the things I have been putting off while working two jobs have suddenly come up to a critical mass requiring my attention. I am trying to work through those while maintiaining some forward progress on the boat. Also, in the interest of full disclosure, I met a woman at a social gathering two months ago that casually heard that I had a boat. She opened up a conversation by saying that she had always admired the old Pearson hulls and had thought about buying one as a rebuild project once. After recovering my breath I knew I needed to spend more time getting to know this woman...
I had hoped to have more to show this week but the weather (short, frequent, heavy, downpours) had an impact on my boat schedule. I didn't want to expose open core since I am not sure I can keep it really dry with the tarping system I am currently using.
I think I got about a day's worth of work done this week. Next week is looking better though.
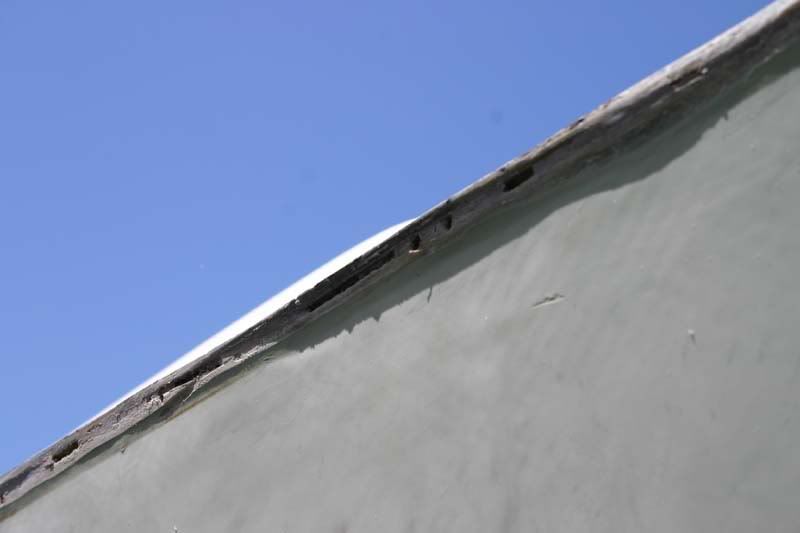
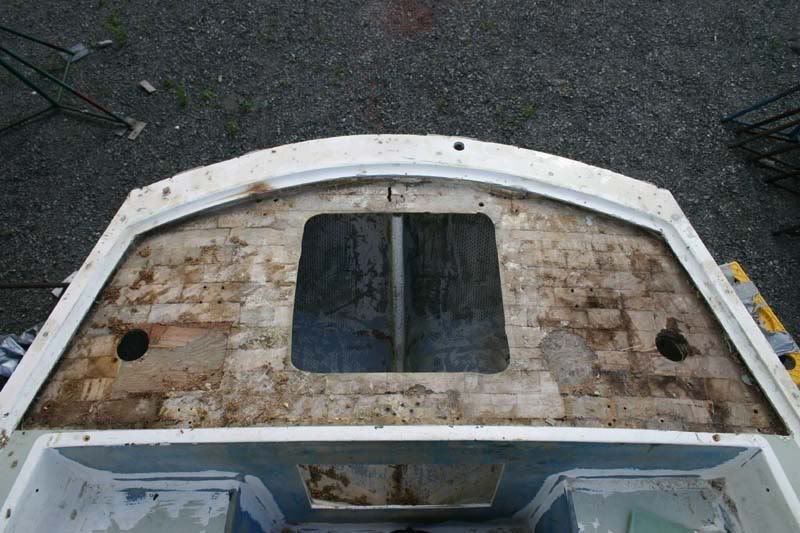
After getting the trim off the exterior edge of the hull to deck joint this is what it looked like. BTW, there was a ton of silicone under the metal trim piece that took quite a bit of time to remove if that is any excuse for my slow progress...
There were also a few irregularities that I want to take out such as this awkward mis-alignment.
The toereail mount holes and the gaps along the hull to deck joint have been filled and are awaiting a final sanding. Nothing really exciting.
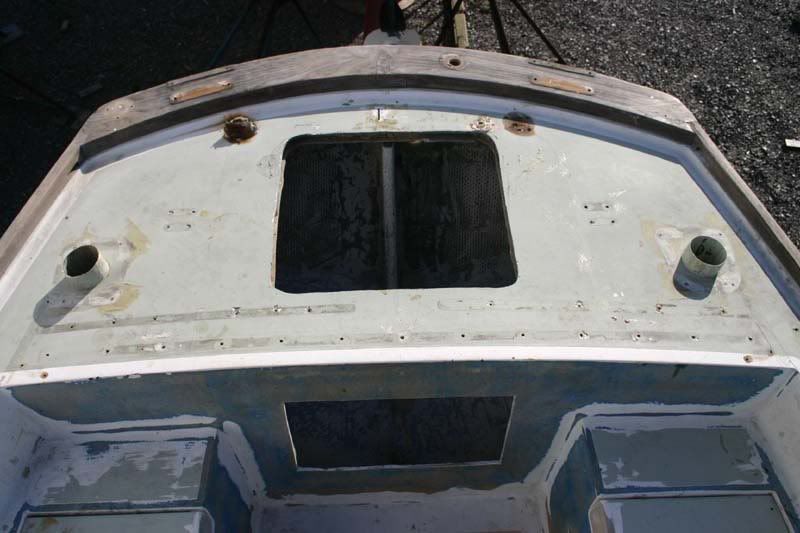
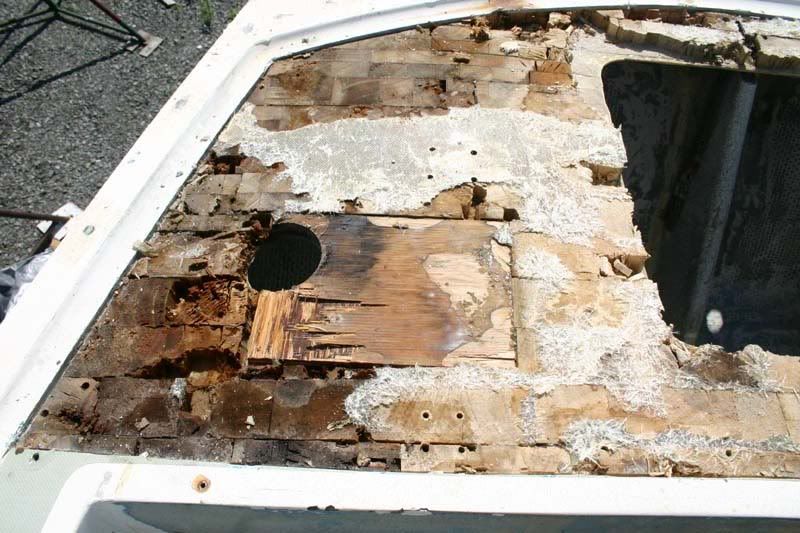
The more exciting item is the aft deck that I had planned on nearly completing this week. Instead I just got the top skin off and had a look.
I am kinda glad I took the trouble to pull up the skin before I painted the decks. I think it needed some attention.
Note the odd insertion of plywood on the starboard side. The bottom skin is pushed down in the outline of the plywood piece. As far as I can tell it is original since the original non-skid gel-coat was untouched. I guess someone had a problem at the factory.
So, I cleaned up the coring and will be laying in new core the next time I get out to the boat - most likely Tuesday.
And here is a question:
With the deck in its current shape, I would like to do any core reinforcement now before I think about fairing and painting. My original thought was to apply solid fiberglass core under the stanchion/pulpit mounts and under the aft anchoring cleats. However, wanting to accelerate my progress I am wondering if I am over engineering things here? Maybe I don't really need the reinforcement? Or perhaps I could fill the areas with thickened epoxy instead of laying layers of fiberglass? I want to do it right but I don't want to be silly.
Any thoughts?
-Britton
-Britton
Work is overrated.
Most everything you read on the Internet is wrong.
Maybe a bit of both. I am not sure what I am worried about really. I just don't want to say later that I wish I had taken more trouble. How good is good enough?
Added question: Could one forego backing plates on deck mounted hardware with solid coring underneath?
-Britton
-Britton
Work is overrated.
Most everything you read on the Internet is wrong.
Would those pre-fab fiberglass pieces some people are using for backing plates work as solid core under the deck hardware? I would think if it comes in the right thickness, it should work fine, and would save you the time of building something up. That way you could "git'er dun" and still not worry about it in the future.
Have you decided exactly where you want all of your hardware? If not, then I wouldn't give it another thought. Put the core in there and be done. If you have decided, then maybe consider putting something besides core in if it will make you feel better. It certainly would be a bit stronger, though honestly, I'm not sure that you need the strength. I mean, in a collision you may push hardware through a cored deck, but you might also just rip the whole solid glass section through anyway.
I don't know if you would need a backing plate or not. My gut reaction is no, provided you are using beefy fender washers. Truth be told, I have some hardware on deck that's installed that way even with cored deck. Not ideal, but...
The water issue can be solved by drilling oversized fastener holes and filling them with epoxy. This is good practice not only for the water issue, but it allows you to tap the holes making for much easier hardware installation. Especially if you're doing it by your lonesome.
Oh, and congrats on the girlfriend-ish-person! (Maybe that hull color might be back on the plate?) ;-D
Hardware positions are pretty well sorted out. Whether I need the reinforcement is really the question. There comes a point as well, when I would prefer the hardware to pull through before damaging the deck further. I think I am probably over-engineering this again.
As for the pre-made fiberglass blocks, yeah they might be a quick and effective option but I would have to order them which means ultimately it would take just as long. If I had thought ahead the idea would have had some real merit. I want my deck back down by early next week so I can stay on schedule.
What about just pouring in some thickened epoxy? Is that somewhere between balsa core and solid fiberglass core in terms of strength and rigidity?
I like the idea of tapping for the mounting hardware. It sounds like a much better idea than going up and down with visegrips as my only friend.
Weekend work schedule starts tomorrow. I will be back in a three days!
-Britton
-Britton
Work is overrated.
Most everything you read on the Internet is wrong.
Hardware on the aft deck doesn't generally see the kinds of fastener loads that mooring bitts, stanchion bases, cabintop winches, etc see. I'm of the opinion that overdrill-fill-redrill-tap-backingplate is perfectly adequate. Just core it up.
I think you can just install the core throughout, and when it comes time to install your hardware, do the normal overbore-fill-drill-tap-and install thing. I see the solid fiberglass thing as more of a wetness-proofing rather than necessary reinforcement for most deck hardware.
Nice to hear from you, Britton. Glad things are moving along.
---------------------------------------------------
Forum Founder--No Longer Participating
Are you putting two more aluminum bomar hatches just forward ot the seat lockers? Are these for battery access primarily?
Will the old toerail go back down, or are you replacing it entirely?
I am also in a race to finish up several modifications to my deck and get it faired for painting before the cold weather hits. Wow, that seems far away, but I know I will have to get moving to make it.
Just plastic hatches for now. The hatches are primarily for battery access and the port side is the main entry point for the engine exhaust. The plastic hatches are definitely 'spongy' under foot but the hinges and the fact that they won't get as hot as the aluminum Bomar hatch is a plus. As cash flow improves I will probably look into upgrading.
All new toerail. The old one came out rather hard. I really wanted to save the toerail and the added effort to replace it but the closer I looked the more obvious it became that it was going to look really ugly sandwiched against a freshly painted hull and deck. I am not looking for the "brand new" look. I am more that happy with "worn but well cared for" look. I like maintaining a bit of history with the boat. In my case though it clearly was not going to work. As a bonus, I will be able to raise the original height slightly like Nathan did with Dasein. I really like the added sense of security that that extra little bit gives.
Wow, that seems far away, but I know I will have to get moving to make it.
Exactly. That is why I am grateful to have enlisted the help of a couple of slavedrivers in my life. This thread also gives everyone permission to yell at me if I start getting behind too :-)
-Britton
-Britton
Work is overrated.
Most everything you read on the Internet is wrong.
bcooke wrote:As a bonus, I will be able to raise the original height slightly like Nathan did with Dasein. I really like the added sense of security that that extra little bit gives.
It's definitely much more secure feeling. I can comfortably stand on it when heeled up at 45 and not feel like I'm going to slip in. But I also think it looks better. The stock Triton rail was a little slight for my taste, visually.
The left over core material I had was not enough so I had to order some more. They were supposed to put it in the mail that day but I didn't get it a week later. Called them. Turns out the whole place is on vacation this week :-( Not a huge deal. It should go quickly once I get started but I was kinda hoping to fill up that hole quickly.
Instead, I have been grinding gel-coat. This week, the holiday got in the way and today I had an unexpected guest and a major thunderstorm that ended my progress early. I can't complain though because I think the guest talked me out of spending too much money for a "professional" paint job on the hull. Looking at some other work in the yard I was advised that I could do much better.
I was leaning towards having a pro spray my boat because (1) I am not in a good location -outdoors in a dusy area (2) I would have a learning curve that I was hoping to avoid (3) Frankly, I would like a better result than I think I can do. After a close inspection of the local painters work however and being advised that the bill tends to go up once the boat is a hostage in the indoor shed and the overall increase in the estimate as the time gets near, I am going back to my earlier inclination to do the job myself and just live with the results. I would be saving several thousand dollars which would be nice.
Question: Since I have no experience with Awl-Grip and I am in an outdoor location I am tempted to go with a more forgiving product. Clearly Awl-Grip is the best but if I could get a better result with a paint that has to be re done more often perhaps the trade-off would be acceptable. Any thoughts on Toplac or someting like it? Would I really hate myself later?
I will have pictures tomorrow but really the only thing new is that the gel-coat on the cabin top has been removed and the deck non-skid has started seeing the business end of a sander.
There are LOTS of tiny pinholes in the raw fiberglass under the gel-coat <sigh>
-Britton
-Britton
Work is overrated.
Most everything you read on the Internet is wrong.
Good paint results are entirely dependent on the care of preparation, and on the skill of the applicator. Quality paint makes a difference, but one can still get a lousy paint job from expensive paint if the prep and/or application was not correct. So in the end, the paint choice is less important than the work behind it.
Cheap paint is cheap paint any way you shake it, but for our purposes here we can call most of the choices you might consider "good paint", since all are high quality. Some will be more durable than others, though.
Your paint choice must be driven by your expectations for the job. Many paints look good after application and hold up fairly well over time, but the quality of the finish does degrade as years pass. How quickly and how dramatically this happens depends on the paint. What most of us notice about new paint is the depth and gloss, and this is also what is most noticeable when it starts to diminish.
A lot of the one part paints don't hold their gloss that well, and become noticeably less shiny and impressive after only a season or so. This doesn't mean the paint has failed, and the surface still might look good, but it looks noticeably less good than it did after application. Gloss and depth retention are where the expensive LPUs (pardon the pun) really shine. They unquestionably hold up better for longer, and are more durable under the tough conditions they face. But no paint is forever.
Boat paint has to withstand a lot of hard use. Wave action and salt have quite an effect over time. Washing boats to remove salt and grime that can etch the paint is important to the paint's life, but can also damage some of the less-durable paints, exacerbating their loss of gloss.
Lots of people have had good results with lots of different paints. Everyone has their favorite. Overall, you can't go truly wrong with any of the choices, but how successful any particular paint is--whether it's Epifanes, Easypoxy, Brightsides, Toplac, Perfection, Awlgrip, Alexseal, or other--is far more dependent on the application process than any feature of the specific paint itself. There are plenty of boats painted with Awlgrip that don't look good because of their application; likewise, there are boats painted with basic enamel that look great. But something like enamel needs renewal pretty much annually to keep looking good and working well.
Realistically, how much life do you want out of your paint? Figure up to 5 realistic years for basic one-part poly and 10 years for premium LPU (longer on cabin trunks, perhaps), at least in terms of the paint itself and barring any circumstances that otherwise prematurely harm the paint, and assuming appropriate maintenance.
Painting is part of any big restoration project, and a lot of people think good paint is a voodoo technique. It's not; it's all about careful preparation and careful application according to the package directions, and using some common sense. Careless prep will not lead to good results; unskilled or sloppy application will not lead to good results either.
Likewise, using a "lesser" paint, so to speak, doesn't mean that it'll be easier or more successful to apply; all it means is that one will have spent less to have a lousy paint job. A person can botch the application of any paint if they don't care to learn what's required to properly apply it. Again: the success of the paint job isn't nearly as much about the paint as it is about the prep and application. (Do you get the point I'm trying to drive home here?)
Painting skills can be learned, and there are enough coats of paint on a boat (between primer and topcoat) that most people for whom the restoration is possible can learn how to properly apply paint by the time the last coat comes around. Good paints make application easier since they flow and behave in certain and predictable ways. Super-thin LPU paints take a bit more of a learning curve, since they act differently than most people are used to, but it shouldn't take more than a coat or two to learn the ins and outs of the specific paint, as long as you're paying attention to what the paint is telling you and adjust your technique or the paint mixture accordingly.
This is where many of the application failures occur: a resistance on the part of the applicator to understand why the paint is (sagging, running, too thick, too thin, non-leveling, and so forth), and failing to make a change in the way the paint is being applied or mixed. It's different every single time, based on atmospheric and other influences, and with every paint. What worked one day may not be as successful another, and the applicator has to understand how to correct the paint each time the can is opened.
Sloppy work, whether on the prep or the application side, is completely unforgiving, so take the time to do it correctly. The success of your paint job will follow, particularly if you're patient, let the paint teach you, and are willing to learn. I think just about anyone can get good painting results if they pay attention. Too many people think it's like applying latex trim paint to their house, though, and the reality is that applying quality paint for any fine finish takes quite a bit more care--not to mention how differently these oil-based enamels and polyurethanes act compared to house paint. The people who are unwilling to learn what it takes will not achieve good results, but anyone who cares about it can certainly pick up the skills and knowledge required.
I am sure, Britton, that an acceptable paint job is well within the realm for you, unless you, like many others, have psyched yourself out so much that it's now impossible to get past the fear and nonspecific anecdotal horror stories to see the way clear for your own painting technique and success. So stop worrying about the paint, and concentrate on each task leading up to that point instead. One thing leads to another, and the paint is only a step in the process. Just be prepared to do what it takes to get the paint job that you want in the end.
---------------------------------------------------
Forum Founder--No Longer Participating
bcooke wrote:I will have pictures tomorrow but really the only thing new is that the gel-coat on the cabin top has been removed and the deck non-skid has started seeing the business end of a sander.
You say that as if that wasn't exciting progress. Come on, now. You're among a bunch of hopeless project geeks here, and seeing a boat in bare fiberglass is good stuff. Bring on the photos!
bcooke wrote:There are LOTS of tiny pinholes in the raw fiberglass under the gel-coat <sigh>
One of the hazards of removing gelcoat is that you expose the always-present pinholes and voids in the skin coat directly beneath. These aren't a flaw in the boat, but simply are a fact of life given the way most of these production boats are constructed. Unfortunately, you'll now have to fill, skim coat, and carefully fair everything, but in the end it'll be worth the effort.
---------------------------------------------------
Forum Founder--No Longer Participating
In watching project posts, I was unaware that some may have been removing all their gel coat. I thought the general process was to sand, fair and paint the faired gel coat.
Was I wrong or is there a benefit from removing all the gel coat that most retorations do not undertake?
rshowarth wrote:In watching project posts, I was unaware that some may have been removing all their gel coat. I thought the general process was to sand, fair and paint the faired gel coat.
Was I wrong or is there a benefit from removing all the gel coat that most retorations do not undertake?
Thank you,
It all depends on the condition of the gelcoat. Some of the 60s vintage Pearsons, in particular, have serious problems with their original gelcoat--deep and major cracking and flaking. Britton's Triton has some of this bad gelcoat. In these cases, the surface may be so poor as to require some sort of substantial treatment like gelcoat removal or encapsulation in an overlay of lightweight fiberglass cloth in order to provide a decent substrate for new paint or other coating.
Typically, gelcoat removal is not something that is required, or even encouraged.
---------------------------------------------------
Forum Founder--No Longer Participating
This was not a minor job, however 3 years out I haven't seen any print-through of the cracking/crazing, so it seems that it was effective for the severe crazing on my boat.
Britton: do you have areas of gelcoat coming up in chunks the way I did, or just the heavy crazing as shown in the photo of the cabin trunk?
No, I am not trying to remove all of the gel-coat; just the bad gel-coat.
The cabin sides were heavily crazed. The gaps in the gel-coat went clear through to the fiberglass underneath. I was afraid that just filling in the gaps with a filler would result in the gaps opening further in the next few years leading to more crazing. Therefore I bit the bullet and ground it all out until I couldn't see any crazing anymore - meaning I removed it completely. The gel-coat on the non-skid areas is in better shape. There were spots that needed to be removed but in general if nothing came loose when the 40 grit sandpaper was applied and there was no cracks or crazing then I assumed it would be safe to paint over. Thank God. Removing ALL of the gelcoat would be a big project. I only really need to remove enough to remove the molded non-skid pattern. The thickness of the non-skid gel-coat seems to vary widely so in some places there is quite a bit left and in other places I wound up removing all of it.
BTW, my weapon of choice so far is the DA sander with 40 grit paper. I tried 60 grit but it was going really slow. I tried my grinder with 80/60/36 grit and found I had a hard time preventing it from dishing out the surface. The DA is slower but seems to do a pretty good job. I will go over it again with 80 grit before I get serious about begining the fill/sand/fill/sand process I am so looking forward too.
do you have areas of gelcoat coming up in chunks the way I did, or just the heavy crazing as shown in the photo of the cabin trunk?
I have the early stages of what you had but nothing nearly so serious. In a few spots, notably along the sidedecks, there was some fine cracking and when I hit it with the sander small chunks started coming off. I mean really small chunks- like 0.050". More frequently, passing over the gel-coat with the sander revealed tiny champagne sized bubbles under the surface that weren't visible to begin with. In these areas I ground down until I had smooth gel-coat or the gel-coat was removed. I suspect my boat suffers from the same ailment as yours but the story goes that the PO kept the boat inside most of the year and only had it out for 2-3 months a year. Being better protected than most boats probably had a positive effect on the condition of the gel-coat. But then I have to explain the extensive crazing so maybe it was just the luck of the draw.
Thanks for the dissertation on the paint. I was under the impression that the cheaper paints were easier to apply with good effects but maybe not so much as I thought. I would definitely like to learn to apply LPU's I just wasn't sure I wanted to start on something so important to me. I am partially swayed by my neighbor who is having a hard time producing mediocre results with Awl-Grip. He is clearly not following directions but his results still spook me.
Oh, and as a final note, when one stops to look to see if the crazing is completely removed, and if the sander is held out with the power on, and if one is wearing shorts, then there is a very real possibility of the sticky sanding disc flying off and taking one's skin with it. This picture looks pretty good actually. When it happened, the 40 grit sandpaper disc left blood splatters and a nice red stream down my leg.
-Britton
-Britton
Work is overrated.
Most everything you read on the Internet is wrong.
bcooke wrote:When it happened, the 40 grit sandpaper disc left blood splatters and a nice red stream down my leg.
Ouch. I think anyone who's done any extended work of this sort has had one or more run-ins with coarse abrasives and the tools that love them. 40 grit can do a job on human skin.
---------------------------------------------------
Forum Founder--No Longer Participating
Yeah, I am pretty happy with the setup at this yard. It is actually cheaper to store a boat here too. Probably because the yard is not on the water and part of the launch procedure (included in the all inclusive price) is trucking the boat to the public boat ramp. An inconvenience which hasn't been a problem for me so far.
As an added bonus, being outside and with most of the other boats in the water, I can sand away and just let the wind clean off my decks. This job is creating LOTS of dust; big heaping piles of it. Obviously, nothing else is going to get done until I am finished with the sanding. It is simply too messy.
Unfortunately, nothing exciting happened this week. I made a call to my fiberglass supplier becuase the coring I ordered two weeks ago hadn't arrived. It turns out it arrived two weeks ago at my neighbor's place down the street. I continue to sand away. It is amazing how much time it takes and the zen like quality of the work. I think I have been sanding for an hour and then realize the sun is setting on an entire afternoon's work. Everything from the cabin forward is rough sanded. I have been filling small holes that I had forgotten about and re-found during the grinding process. I also removed the deck drain tubes and the fuel tank filler 'hump' molded into the deck. Next week should see the aft deck go back on, some more holes filled, and hopefully the rough sanding in the cockpit area completed. Then again, I have more cash work lined up and an offer to go sailing - in a sailboat on real water - so that will probably slow me up a bit.
What I really need is to be laid off so I can collect unemployment while I spend more time on my boat :-)
My thoughts on painting this week are : I really would like to try and see if I can work with Awl-Grip so I think I am going to give it a try. If that doesn't work out too well at least the prep will be done and I can truck it to a quality painter for a nice spray job. While daunting, if I can learn to work with Awl-Grip then it would be a nice skill to add to my collection. The outdoor conditions will be challenging though so I might plan on a spray job later in any case.
-Britton
-Britton
Work is overrated.
Most everything you read on the Internet is wrong.
OK that does it!
Cockpit lockers, better toerail, overhead liner, and now a perfectly sensible raised fuel fill.... the next time I buy a Triton, it's going to be a later model! ;)
Figment wrote:OK that does it!
Cockpit lockers, better toerail, overhead liner, and now a perfectly sensible raised fuel fill.... the next time I buy a Triton, it's going to be a later model! ;)
Glad to hear your going with Awl-Grp, Britton. I used Brightsides on the "skid" portions of my deck\cockpit\cabin sides as I was in the same boat as you, and hadn't done much rolling and tipping. It was easier than I thought, and came out well. If I had known that at the beginning, I definately would have gone with an LPU.
Those paints are incredible to work with. When brushing, I always end up with a finish that looks like I slapped it on with a broom, but the rolling and tipping turned out smooth as glass. Follow the advise on this forum, and you will do fine.
Maybe this should be obvious to me, but how do you mask off the beautiful tight radius turns and arcs for the nonskid around the fuel filler? Is the tape cut with a sharp pair of scissors before applying it to the deck? Do you go to the trouble to make a pattern first, or just cut it by "eye"?
I'm starting to pay more attention to these techniques as I get a little closer to painting.
Well, the new fill is about 18 inches further forward just in front of the cockpit lid gutter. I could just put an 'S' in the fill hose and call it good but the original fuel fill is also smack dab in the middle of the most convenient boarding point. Rather than stub my toe on that awkward fitting I thought I would move it forward while I have my deck ripped apart anyway.
the next time I buy a Triton, it's going to be a later model!
Like I have said before. "Early Tritons good. Later Tritons better" :-)
Deep bilge and encapsulated ballast, though....
You say that like it is a bad thing. While access to the bottom is a bit of a problem I like having the space for my 22 gallon water tank down there. :-P
Tim, that isn't an original fuel fill hump is it? I like it, though, and will probably copy it.
Thanks for the support for LPU's. I guess I need to think about ordering the stuff so it will be here when I need it.
And here is a technique that someone tried to sell me (as in do it for me) but I deemed it too expensive.
Paint the nonskid areas with epoxy and pour in large amount of grit until the epoxy can't hold any more. Then paint over it with Awl-Grip (in this instance sprayed on).
It seems like overkill to me but then again maybe my non-skid would stay looking "like new" for the next 20 years?...
-Britton
-Britton
Work is overrated.
Most everything you read on the Internet is wrong.
About those raised areas - such as around the fuel fill - I think they'd be a great idea for around chainplates, stanchion bases (where some boats do have them), etc. I noticed in another thread where someone mentioned making them, and another poster asked how -- but it was never answered.
How would you make those to add them? Lay them up separately (in the bottom of a margarine tub or something for shape) and then "glue" them to the deck? Shape them out of FRP board? Do they need cloth reinforcement or could they be just thickened epoxy? Or is it better to mold them right in somehow?
Not something I'm going to do soon, but I'd love to know.
jhenson wrote:...how do you mask off the beautiful tight radius turns and arcs for the nonskid around the fuel filler?
I use a compass (scribe) set to my chosen border width (1-1/2" here) to mark off the main border around all the fixed "edges" of the deck (toerail, cabin trunk, and, in this case, the fuel fill). So the dividers transcribe the main part of the arc around this fuel fill area.
I apply the tape to the scribed line, fairing it by eye. Then, to create the rounded corners, I have found that a quarter (the $0.25 coin) provides about the right radius for the corners, whether inside or outside. I place the quarter on the tape so that it's tangential to each side, and cut around the coin with a knife to create the curve.
---------------------------------------------------
Forum Founder--No Longer Participating
bcooke wrote:Tim, that isn't an original fuel fill hump is it? I like it, though, and will probably copy it.
Yes, it's original. There were several versions of the deck mold over the years, and this sort of "hump" was the version found in the mid-range Triton years, before they changed the deck mold radically for the last 60 or so boats. I think this is a third generation deck mold; yours is at least 4th gen, maybe even 5th.
I think the one in the late-model deck mold is less tall in profile, and also angled downward towards the toerail.
Rachel wrote:How would you make those to add them? Lay them up separately (in the bottom of a margarine tub or something for shape) and then "glue" them to the deck? Shape them out of FRP board? Do they need cloth reinforcement or could they be just thickened epoxy? Or is it better to mold them right in somehow?
I think it'd be easiest to make them out of the prefab board, and then epoxy and fillet them in place on the deck, creating a pleasing transition and permanent installation.
People have made them using the plastic tub approach, and this can work well too. I'd probably use some fibers in the thickened epoxy for some additional strength, but don't see a need for serious reinforcement for this use, at least not for platforms of moderate thickness. It might be more economical this way, or might not. It'd be a good way to use up "waste" mixed resin that you tend to end up with during one project or another, though.
There are a lot of different plastic tub shapes, but I think it'd be hard to find just the right one for a given piece of hardware, which might make it more attractive to use the prefab board and cut them to whatever shape was needed.
---------------------------------------------------
Forum Founder--No Longer Participating
Rachel wrote:Tangents seem to be attracting me lately...
About those raised areas - such as around the fuel fill - I think they'd be a great idea for around chainplates, stanchion bases (where some boats do have them), etc. I noticed in another thread where someone mentioned making them, and another poster asked how -- but it was never answered.
How would you make those to add them? Lay them up separately (in the bottom of a margarine tub or something for shape) and then "glue" them to the deck? Shape them out of FRP board? Do they need cloth reinforcement or could they be just thickened epoxy? Or is it better to mold them right in somehow?
Not something I'm going to do soon, but I'd love to know.
Rachel
I made these for my chainplate covers with the prefab FRP. Basically the same way Tim describes his approach. I used a dremel to "route" the corners over and rounded the corners by eye.
Instead of glassing them in, I finished them off with gel coat before I installed them and then caulked them down and screwed them in with the chainplate covers themselves. I did this because I didn't know if I would want to keep them or not and because I'm not to the point of painting my deck. I like them though and when it comes time to paint (or gelcoat) the deck, I'll mount them permanently.
Ceasar Choppy wrote:I made these for my chainplate covers with the prefab FRP. Basically the same way Tim describes his approach. I used a dremel to "route" the corners over and rounded the corners by eye.
Instead of glassing them in, I finished them off with gel coat before I installed them and then caulked them down and screwed them in with the chainplate covers themselves. I did this because I didn't know if I would want to keep them or not and because I'm not to the point of painting my deck. I like them though and when it comes time to paint (or gelcoat) the deck, I'll mount them permanently.
Now if there was ever a post that needed accompanying pictures...
Thanks. Not as pretty as the others that have been painted, but then again, it allowed me to easily cover up the cosmetic sins I committed re-glassing the chainplate holes. Looks even better from normal viewing distance. :)
Thanks Charlie, I like the raised chainplate thru-hole idea. I will have to borrow that one.
Not much happened on my boat this week. Work, weather, an invitation to sail for the first time in two years, and normal busy stuff left me with only about half a day to work on the boat this week.
While it would be easy to blame the day sailing for an entire day lost to my boat I must admit that the insite I gained was totally worth it. Other than the fact that I lost my cell phone (found in the next state the following day) it was a great day. I learned that I really miss sailing my boat, I don't have to have EVERYTHING finished to enjoy the boat, just getting the exterior paint on is really going to improve my enjoyment, I can't hold my liquor very well.
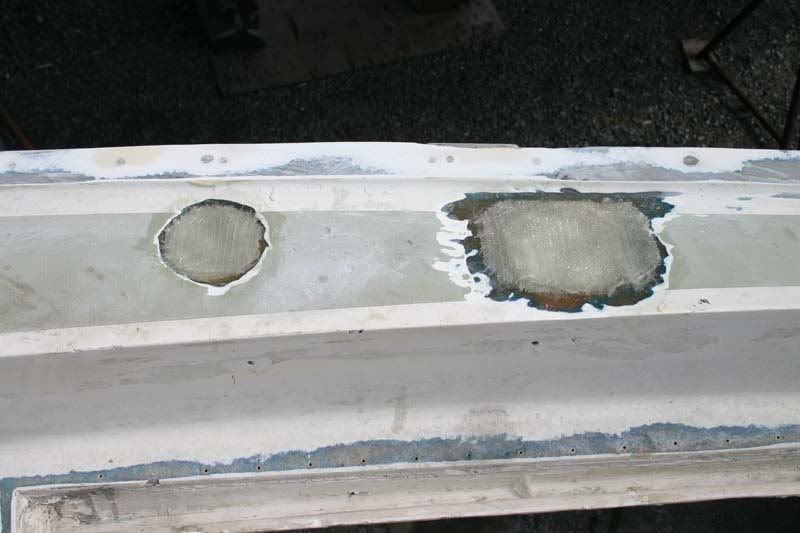
Today, I ground out the gel-coat in the curved edges around the house and outer edge of the deck and patched several holes that will be faired in the next week or two. My old fuel fill and deck drain holes after some initial patching...
Slow but moving forward.
-Britton
-Britton
Work is overrated.
Most everything you read on the Internet is wrong.
Was that you guys I saw Thursday sitting in the rain under your boom tent in the rain? I went in to fill up with water, at Handy's, and saw three to four people sitting in the cockpit in the fog & rain.. The boat looks great by the way!!
P.S. We're in a new boat this year so if you see us out there be sure to give a wave! If we're on the hook come by for a cocktail...
Last edited by Maine Sail on Sat Jul 21, 2007 7:54 am, edited 1 time in total.