Page 1 of 1
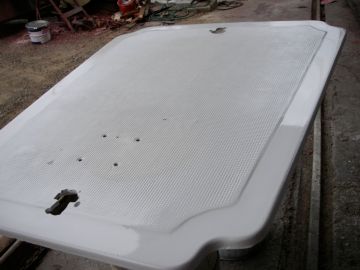
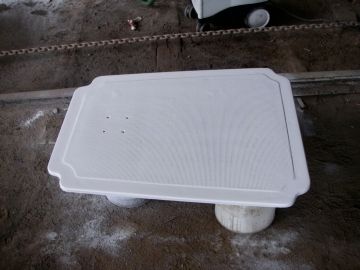
Westsail 32 cockpit floor
Posted: Wed Dec 17, 2008 8:27 pm
by BALANCE
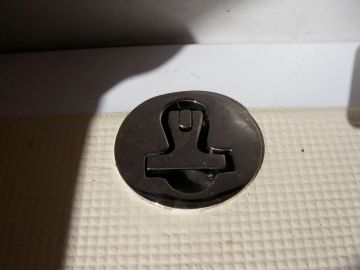
They can be lifted allowing an excellent second entrance and vantage point to the, em, engine room. Instead of it being bolted down and there for a project preceeding the project I'm installing some perko flush mount T latches. I'm going to have to afix some wood to fiberglass to make it flush underneath.
It's the 'afixer' I'm asking about. How would you do it?
Posted: Wed Dec 17, 2008 8:37 pm
by David
Can we see some pictures?
Posted: Wed Dec 17, 2008 8:55 pm
by BALANCE
Posted: Wed Dec 17, 2008 10:20 pm
by Rachel
Let me see if I'm thinking of this correctly: You're going to be fastening blocks to the underside of the rim that's part of the boat, because those latches have revolving "tongues" that hang down a set distance and if you don't have the blocks there they won't "catch" the rim of the boat?
If that's the case, I think I'd prep the surface and then mount some pre-made fiberglass blocks by bedding them in thickened epoxy.
As a variation, the way that section was held down on the Westsail I sailed on (and I'm not saying I would necessarily do it this way; but it came this way from the PO) was about 8 machine screws (maybe truss headed?) that had rubber washers and went down through the top of the lid and seated in 8 nuts that were epoxied in place (so they couldn't turn) under the boat part of the lip.
The trouble we had was in getting a gasket that would make a good seal -- seawater had a habit of dripping past and down onto the Yanmar <cross expression> Of course by the time we realized we needed a good solution we were out of range of Internet and catalogs.
Rachel
Posted: Thu Dec 18, 2008 10:26 am
by BALANCE
Rachel, yes, thank you for making it clearer. That sounds like an interesting idea too. as you can see I can use the holes already there. Now I have to go google myself to death to truly understand exactly what you are talking about in terms of hardware.
As for setting the nuts, or the wood, guidance on the west system proportions would be much appreciated in temps below 30 degrees?
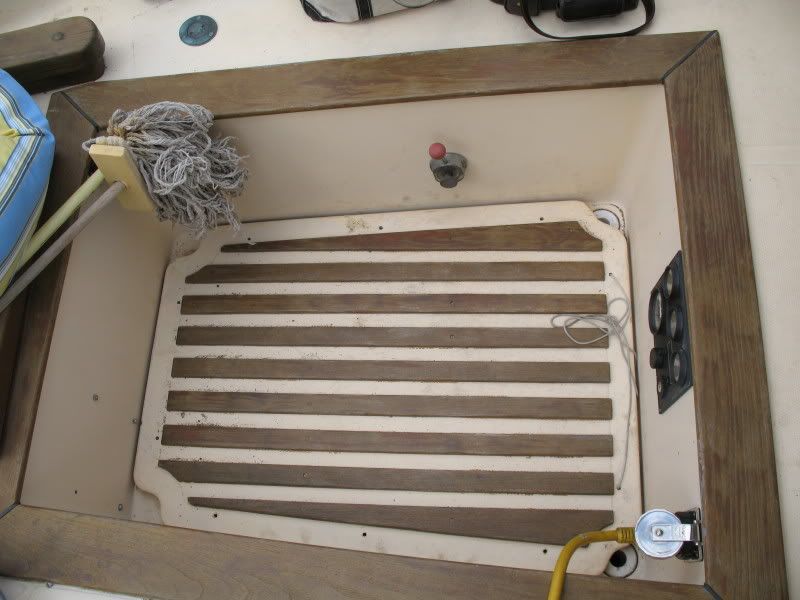
The entire perimiter of the floor underneath has a 1.5" hose type gasket at the suggestion of the same WSer who used the t latches. I put that on in the spring and after that, if I put my feet on opposite edges, I could rock the floor a little. To this day, I still get some seepage of fresh water. I'm hoping that once it is snugged up and the gasket is smushed (nice nautical term!), this will stop.
Posted: Thu Dec 18, 2008 10:44 am
by David
30 degrees is too cold for using West epoxy or any type of epoxy I know of. Unlike polyester resin, you cannot adjust the proportions of resin to hardener to compensate for temperate or pot life. Epoxy has a set ratio of resin to hardener and you can't really tamper with it.
Posted: Thu Dec 18, 2008 10:54 am
by Hirilondë
Rachel wrote:
If that's the case, I think I'd prep the surface and then mount some pre-made fiberglass blocks by bedding them in thickened epoxy.
I see no reason to get any more complicated than this. As a matter of fact, I would use wood, which is easier to mill to the proper dimensions. The cockpit sole access hatch isn't used a lot and wear probably isn't an issue. If it ever becomes one, adding a stainless or bronze chafe piece later is easy. Use a heat lamp for gluing if temperature is an issue.
By the way, its a sole, not a floor. The hardware are called dogs. I don't make this comment to be critical, just that discussion is more accurate with proper terms.
Posted: Thu Dec 18, 2008 11:11 am
by David
Frankly, if screwing the hatch down has not kept it from wobbling on the spongy gasket and still allowed water from the cockpit to pass, I doubt seriously that using a latch at each end will make the hatch more secure and less likely to leak. To make it seriously watertight, it should be forced down against the gasket around the entire perimeter. Perhaps the gasket is causing part of the problem.
Does the hatch opening in the sole have a raised lip and is there a corresponding lip around the edge of the hatch so it fits down over the top of the raised lip in the sole?
Posted: Thu Dec 18, 2008 1:31 pm
by BALANCE
The cockpit SOLE has not been screwed down or DOGGED since I've owned the boat (8 months).
:)
Posted: Thu Dec 18, 2008 1:40 pm
by David
I see. So the holes around the perimeter of your hatch are there to screw it down but you haven't yet?
Posted: Thu Dec 18, 2008 2:57 pm
by BALANCE
Yes David, the PO removed them. I chose not to put them back in search of a better way that allowed me to raise it alone. Otherwise it's a two person job and laborious at that.
Am I on Candid Camera?
Posted: Thu Dec 18, 2008 3:24 pm
by David
I understand.
In my view, I think an engine access hatch in the cockpit like yours needs to be completely watertight so that you could fill up the cockpit and not get one drop below. For that sort of seal I think Rachel's suggestion of stainless nuts epoxied into the frame so that you can run machine screws into them is the better approach.
Posted: Thu Dec 18, 2008 11:45 pm
by Rachel
And if you do go with something like that, I don't think you would have to wait for spring. The reason I say that is that you only need to keep a small area warm while the epoxy "kicks," not the whole boat. So if you wanted to work on it before then, you could.
It's amazing what you can keep warm with just a light bulb, if you keep the wind off and provide a bit of insulation (just ask my former Minnesota pump-house, which I did heat with two simple light bulbs and the "off at 42 degrees; on at 36 degrees" plug in outlets you can get at farm stores. Two light bulbs was just in case one burned out.)
I actually think the nuts in question were bedded in Marine Tex; although I might have chosen thickened epoxy.
Edited to add: By the way, in case the description isn't making you visualize it, with the nuts affixed in place, you only need one person to fasten and unfasten the sole. That's because the epoxy is like the second person down there holding the wrench on the nuts, and you only need to be up top turning the screwdriver (picture machine screws like bolts but with smoother heads and slots that you can put a screwdriver in).
I can't make the hatch any lighter though :D
Rachel
Posted: Sat Dec 20, 2008 11:42 am
by Zach
Rachel,
Good tip on the epoxy second person. Beats having them locked under the sole till you need to lift the lid. (Grin!)
Zach
Posted: Sat Dec 20, 2008 2:48 pm
by Rachel
"I think you'll really enjoy the 'aft cabin,' -- go on in and make yourself at home."
Posted: Sun Dec 21, 2008 11:56 am
by BALANCE
Exactly, those epoxied bolts are the second person! And Rachel, I've spent many hours in that 'aft cabin'. Thank goodness for all the comfy perches!
Posted: Sun Dec 21, 2008 4:02 pm
by Rachel
It is a really nice engine room, once you get the cockpit sole removed. We were constantly fighting a "bow heavy" problem, and so always trying to figure out what we could
put in that space. But it just doesn't lend itself very well to stowage.
I was just thinking that perhaps T-nuts would work well here. T-nuts are like female threaded tubes with a flange on one side. In this case you'd probably want the flange on the underside, with the threaded part up (which I think is backwards to how they're usually used). The flange might lend itself better to epoxying. You might have to remove the gripper points. Or maybe a helicoil? You would need a certain amount of depth for either of these, so maybe the original nut idea isn't a bad one, but these might be some options.
A good way to see these various fasteners (and to buy them), is to put their names in the search box at
www.mcmaster.com Here, for example, is a link to their page with stainless tee nuts (but search from the main page):
http://tinyurl.com/85enex
And an image from their catalog, which is packed with information, and on my Ten Books to Take When You Know You're Going to be Stranded on a Desert Island™ list:

Helicoil:

Posted: Thu Jan 08, 2009 4:29 pm
by BALANCE
The self sealing nut looks interesting.