Ok...
I am taking 10 days off to work on Pylasteki.
I will be using this space to document my successes, failures, and blisters. (well maybe not blisters...)
To get started...
I have ten days on the hard starting tomorrow, the maximum the boatyard around the corner from Noel will allow... they are the Zach priced boatyard.
I have to:
Recore lower dog house, and push it back into shape.
Replace main bulkhead
Build new mast beam
Fill 4 through hulls
Install a sea cock on sink
Fill shaft tube
Grind, prep, and paint the bottom.
And... whatever else ends up springing up.
Wish me luck,
Zach
The Great Grinder War of 2009
-
Zach
- Boat Obsession Medal Finalist
- Posts: 684
- Joined: Wed Jan 25, 2006 6:28 pm
- Location: Beaufort, North Carolina
- Contact:
The Great Grinder War of 2009
1961 Pearson Triton
http://pylasteki.blogspot.com/
1942 Coast Guard Cutter - Rebuild
http://83footernoel.blogspot.com/
http://pylasteki.blogspot.com/
1942 Coast Guard Cutter - Rebuild
http://83footernoel.blogspot.com/

Re: The Great Grinder War of 2009
I'm glad you're going to post how it goes, and I hope we can help to motivate you. Will we get daily reports? That would be kind of neat - like standing on the sidelines of a marathon.
I'm wishing you great luck and efficient progress :)
Let the marathon begin! :rousing cheer!:
R.
I'm wishing you great luck and efficient progress :)
Let the marathon begin! :rousing cheer!:
R.
-
Chris Campbell

- Candidate for Boat-Obsession Medal
- Posts: 422
- Joined: Tue Jun 06, 2006 9:18 am
- Boat Name: Luna
- Boat Type: Yankee 30
- Location: Chester, NS
- Contact:
Re: The Great Grinder War of 2009
Yes, good luck indeed! An ambitious undertaking, but it sounds like you're up for it. We will indeed root and cheer from the sidelines, and offer what we can by way of solutions, should mysteries present themselves.
May it all go smoothly!
May it all go smoothly!
-
Zach
- Boat Obsession Medal Finalist
- Posts: 684
- Joined: Wed Jan 25, 2006 6:28 pm
- Location: Beaufort, North Carolina
- Contact:
Re: The Great Grinder War of 2009
Boat was hauled out and blocked at 9:41 am. I had to steer from the aft deck, as she is sitting so high out of the water the outboard was cavitating... grin.
Lunch break was spent sanding bottom paint... Mast won't come off till tomorrow.
Worked till 9:00 on Noel... (Guess the days start tomorrow? Grin.)
Port side is mostly done, as of 10:00 pm. Ran across the purple shi... stuff under two layers of blue. It turns to goo if machined to heavily... Appears to be bottom paint, but closely resembles barely cured epoxy with not enough ballons applied in winter... Had to try a bunch of different paper before finding one that it took to. 36 Grit Norton Bluemag on a 7 inch grinder, 6 inch pad... turning real slow. Clogged up 16 grit closed coat... my zirconium flap disc... and every hook and loop and psa pad I had around, which is saying something.
Not the tools of choice... but I need all the bottom paint off today, or as it were... yesterday... to see if I have to shift priorities.
Casualties... 7 inch grinders brushes are worn slap out, will have to break out the brown out box (dimmer switch in a 2 gang electrical box, with an outlet beside it) as it doesn't work upside down...
Zach's gonna pass out after finishing a peanut butter sandwich.
More tomorrow.
1961 Pearson Triton
http://pylasteki.blogspot.com/
1942 Coast Guard Cutter - Rebuild
http://83footernoel.blogspot.com/
http://pylasteki.blogspot.com/
1942 Coast Guard Cutter - Rebuild
http://83footernoel.blogspot.com/
-
bcooke
- Master of the Arcane
- Posts: 2272
- Joined: Sat Oct 04, 2003 10:55 pm
- Boat Name: Jenny
- Boat Type: 1966 Pearson Triton
- Location: Rowley, MA
- Contact:
Re: The Great Grinder War of 2009
ummm.... you are working on the wrong boat.Worked till 9:00 on Noel...
-
Zach
- Boat Obsession Medal Finalist
- Posts: 684
- Joined: Wed Jan 25, 2006 6:28 pm
- Location: Beaufort, North Carolina
- Contact:
Re: The Great Grinder War of 2009
Day 2:
Finished up on Noel at Noon... Had the mast pulled at 1:00.
Once the mast was down, I cut out a 12 x 24 inch section of the top skin. The inner skin was cut on each side of the deck beam by compression on both sides, I taped the crack to keep from gluing the old beam to the skin. I tacked a nail to hold down the junk inner skin flap (technical terminology...) and propped up the skin on both sides until it was in a fair curve. I pulled out the balsa core, routed out the punky stuff (starboard side) and cleaned up the good balsa around the peremiter. I packed the gap full of thickened epoxy (cabosil) and proceeded to lay in 4 layers of 1708. When that had kicked and was starting to cool off, I laid down 4 more layers. 8 layers is just a touch under 13/16ths of solid fiberglass and epoxy. Heavy, but compression shouldn't ever be an issue again...
I pulled out the through hulls in the head. One was a ball valve threaded onto a flush mount through hull fitting. Since I'm flying solo... I unthreaded the backing nut, gave it a whack with a hammer to generate some clearance and slipped in a sawazall... The other was a 60's Pearson special... solid 13/16ths or so block of mahogany, fiberglass encapsulated over a fiberglass tube/mound with the sea cock smushed in to the polyester resin and stuck forever...
I used a cut off wheel on my angle grinder to cut through the fiberglass around the edges. I used a chisel to clean off the area around the bolts. 3 came out, 1 broke. Then I used my chisel to wedge the old fiberglass off of the wood. Once it was free on one corner, I put a pipe over the end of the through hull, and performed a ABYC (American boat and Yacht Council) test... to see if I could hang my body weight off of it without it breaking loose. It did...
Then I used my sawzall to cut the rest of the fiberglass off of the block, and a chisel to clean out the wood. I changed my angle grinder from a cement cutting disc (They last forever on fiberglass...) to a 36 grit flap disc, and cleaned up the inside... Then went outside and ground down both holes prepping them for glass in the morning. I've got it in my mind to set up a wet out station and do all four at once, wetting out on the bench and carrying over to the hole... my glass is all pre-cut, did that earlier this week.
Also got the old speedometer fitting out. That little plastic booger was really in there. Wouldn't budge... so I cut off the flange on the outside, cut off the guts on the inside... and cut the tube into 4 pieces. I'm not sure what sealant was used... but it took almost as long to clean that out as it did to remove the fitting.
Then it was 10:00 pm, and I decided the day was done.
Zach
P.S. I love my full face respirator and carbon filters... beats the heck out of the N95 and P100 cartridges I've used on a 3m half face up till now.
P.P.S. Pictures on blog.
1961 Pearson Triton
http://pylasteki.blogspot.com/
1942 Coast Guard Cutter - Rebuild
http://83footernoel.blogspot.com/
http://pylasteki.blogspot.com/
1942 Coast Guard Cutter - Rebuild
http://83footernoel.blogspot.com/
Re: The Great Grinder War of 2009
Wow, you're cruising! Go you!
I can't wait to hear about day 3 :)
Rachel
I can't wait to hear about day 3 :)
Rachel
-
Oscar
- Candidate for Boat-Obsession Medal
- Posts: 320
- Joined: Thu Aug 16, 2007 6:54 pm
- Boat Name: Lady Kay IV
- Boat Type: 1990 Dragonfly 25
- Location: Bethlehem, PA
- Contact:
Re: The Great Grinder War of 2009
All out assault..... love it. Go man, go!
I noticed that......pleasant surprise.a cement cutting disc (They last forever on fiberglass...)
Out there, alone, there is only truth.
-
Zach
- Boat Obsession Medal Finalist
- Posts: 684
- Joined: Wed Jan 25, 2006 6:28 pm
- Location: Beaufort, North Carolina
- Contact:
Re: The Great Grinder War of 2009
Day 3... The saga continues...
So the weather report says today was my last sunny day.
I took advantage of it, and set up staging on the port side to recore the side deck.
Started up at 8 am, finished around 7:00pm... Cut off the top skin with a circular saw, snipped the edges it couldn't cut with a cut off wheel on the grinder. Peeled off the top skin. Pulled out the balsa, routed out the stuff under the lip. Fired up the Fein Multimaster with a scraping blade to get rid of the solid balsa at the aft end and under the edges.
Once that was done, I prepped the inner skin by grinding off all the old balsa remnants, and working sand paper under the lip on top and bottom. This is the most tedious part of the process... as you continually find another sliver of wood and have to resort to fishing a chisel or 5 in one tool under the edge to get the last of it...
Then I ground the bevel on the edge around the edge so that the new glass would have the same contour as the old deck, and there would be no hard spots to flex. I'm still on my original 36 grit flap disc... looks the same as when I started.
After that, I vacuumed everything and wiped down with acetone. I took out my sheets of end grain balsa coring, and cut them to fit with a fillet knife, notching the top by pushing down till the blade left an impression, then rotating the blade so it splits along the grain.
After that I cut my fiberglass to shape. 2 layers of 1708 biax, 8 feet long and 17 inches long at the wide end... but you have to start out with one almost two feet wide to follow the contour of the hull. I've never had luck starting with a straight cut piece and pulling it into shape... it always wants to bunch up somewhere or form a bubble that never wets out, so I make some scrap.
Then I cleared everything out, and started mixing pots of epoxy and cabosil filling the gap around the deck. I used a silicone spatula... sweeeet!
Once that was done I went back and took a chisel to any lumps that ended up anywhere so the balsa would lay flat.
I wet out the balsa with my cheapo 2 inch chip brush that I keep in a little bit of acetone... Gotta fill up all the joints in between blocks of balsa to get full strength and rot resistance. As each piece was wet out, I mixed up a pot of thickened epoxy with cabosil, and used a notched spreader to give some goop for the balsa to bed down in. I then went around with my fillet knife and trimmed any balsa that contacted the now filled gap...
More thickened epoxy went in around any gaps...
Then a layer of 1708... and another...
1 gallon of epoxy and 11 hours on a 2 x 10 later... and she be done!
Zach
1961 Pearson Triton
http://pylasteki.blogspot.com/
1942 Coast Guard Cutter - Rebuild
http://83footernoel.blogspot.com/
http://pylasteki.blogspot.com/
1942 Coast Guard Cutter - Rebuild
http://83footernoel.blogspot.com/
Re: The Great Grinder War of 2009
I'd say Day Three of the Great Grinder Battle went pretty well, to put it mildly.
I like that you're adding all the detail about which tools and attachments you used along the way, and how they worked. Thanks.
Onward :)
Rachel
I like that you're adding all the detail about which tools and attachments you used along the way, and how they worked. Thanks.
Onward :)
Rachel
-
Chris Campbell
- Candidate for Boat-Obsession Medal
- Posts: 422
- Joined: Tue Jun 06, 2006 9:18 am
- Boat Name: Luna
- Boat Type: Yankee 30
- Location: Chester, NS
- Contact:
Re: The Great Grinder War of 2009
I'm in awe. My recore has dragged on for a month with me fearful of screwing it up at every step - you managed in a long day more than I have to date! Wow. And thanks for the detailed description of everything you did - others performing the same job will have a much easier time because of it.
Congratulations, and good luck with the continuing effort!
Congratulations, and good luck with the continuing effort!
-
Zach
- Boat Obsession Medal Finalist
- Posts: 684
- Joined: Wed Jan 25, 2006 6:28 pm
- Location: Beaufort, North Carolina
- Contact:
Re: The Great Grinder War of 2009
Day Four:
I started out today with the threat of impending thunderstorms... So in a clear patch I glassed in the three through hull fittings. It was only about 85 degrees, and they were in the shade with slow hardener.
2 I did pretty much in one shot. 6 or so layers thick... Start off by taking a 2 inch wide chip brush (cheap if you buy them bulk...) and wet out the bevel you ground in the hull a few minutes before you get started. The key to getting a lot of layers to stay together is to wet them out in something flat... I use a paint roller tray with a plastic liner. Wet out each disk, flip over and hit resin on the back side. Stack them up three or four deep, and roll them out in the pan, lightly. You want them gooey when stacking, and once rolled act like a cohesive layer.
Now stick them to the hull with a gloved hand. Those sleeve covers help to keep the epoxy from drooling down your elbows... Roll out one corner, from the center up or out. Work from the left and right, so drips don't hit ya... You should have a fair bit of drool... you've got enough resin to push the air pockets out, and once the excess resin is out, you can hit it with acetone and wipe it up.
I goofed, and forgot to tape over the backside of 2 of the holes... so I've got one that I did pretty nicely, and one thats a 1/4 inch tall mound coming inside the boat... If I had been on my toes I would have done it from the inside out, as there would be less fairing to do afterward. Shrug...
When that was done, I took a vacuum to the inside. I donned my respirator and tyvec suit... There was so much dust it was starting little avalanches sliding down the sides of the hull.
After it was slightly less dusty, I got started removing the mast beam. I pulled down the front block, that the mast step bolted to. Then I unbolted the beam from the bulkhead. Well, the bolts snapped off... then I tapped them back through with a bent screwdriver and a hammer. (What ya think this is a high budget operation do ya... drift pins... sheesh. Grin.)
The mast beam came off in two pieces. I did not pry hard enough to crush any wood or damage the paint... I believe I may have been sailing with mast beams, plural, and not singular... Though there was a nice steel reinforcement that someone added in the past carrying the load.
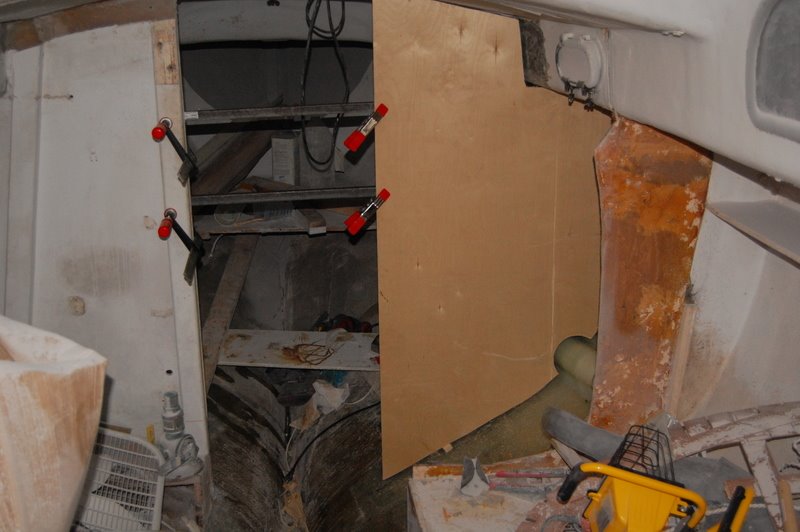
After that I pulled the curve of the cabin top. I use luan plywood, or what are known as door skins... as they have one good side, and wind up on real crappy hollow core doors. I run them through a table saw into 2 inch wide strips. Generally I have a stack of strips that I have cut down into 2 and 4 foot lengths... along with a load of small cross cuts 2 and 3 inches long. This beam needed one 53 inches wide, and a lot of long pieces... Joined with a hot glue gun, and glued lighty to the bulkhead. See picture... No math required, no tick sticks... and the pattern has enough points of contact to pull a smooth curve. Sweet! (Thanks go to my friend Matt who shared that idea with me...)
I then went over to Noel and finished planing a bunch of Ash from half inch down to 3/8ths. It started out 13/16ths... I've been working it down when I get the chance. Only been planing one side though, allowing nature to induce some curve in the direction I want to go. Planning to do a dry run one day before the final gluing, and wet them down nicely so they'll take the curve even more... I don't like to work hard.
I took inventory of my clamps. So far I've bought nine of them to do the beam... Noel has mostly sawn frames, so I haven't had much reason for more than two or three... Ouch. This will be an expensive piece of wood...
Then I went to lowes. Twice. Supply runs... Thought I had a big piece of fiber board, but didn't... and had some ideas that you'll see tomorrow...
After that, it was back to the grind. Literally. I ground out the old tabbing on the front of the starboard main bulkhead. Still on my 36 grit flap disc... It ground out the V berth tabbing, 3 through hulls, did 1 side deck recore... and continues to look like new. I started out using my cut off wheel to get to plywood, as I always feel antsy about grinding near the hull into places I can't really see.
I ran into a load of barney powder. Purple thickened polyester resin... I have no idea what they added, but by golly it almost glows in the dark.
All for now...
Zach
I started out today with the threat of impending thunderstorms... So in a clear patch I glassed in the three through hull fittings. It was only about 85 degrees, and they were in the shade with slow hardener.
2 I did pretty much in one shot. 6 or so layers thick... Start off by taking a 2 inch wide chip brush (cheap if you buy them bulk...) and wet out the bevel you ground in the hull a few minutes before you get started. The key to getting a lot of layers to stay together is to wet them out in something flat... I use a paint roller tray with a plastic liner. Wet out each disk, flip over and hit resin on the back side. Stack them up three or four deep, and roll them out in the pan, lightly. You want them gooey when stacking, and once rolled act like a cohesive layer.
Now stick them to the hull with a gloved hand. Those sleeve covers help to keep the epoxy from drooling down your elbows... Roll out one corner, from the center up or out. Work from the left and right, so drips don't hit ya... You should have a fair bit of drool... you've got enough resin to push the air pockets out, and once the excess resin is out, you can hit it with acetone and wipe it up.
I goofed, and forgot to tape over the backside of 2 of the holes... so I've got one that I did pretty nicely, and one thats a 1/4 inch tall mound coming inside the boat... If I had been on my toes I would have done it from the inside out, as there would be less fairing to do afterward. Shrug...
When that was done, I took a vacuum to the inside. I donned my respirator and tyvec suit... There was so much dust it was starting little avalanches sliding down the sides of the hull.
After it was slightly less dusty, I got started removing the mast beam. I pulled down the front block, that the mast step bolted to. Then I unbolted the beam from the bulkhead. Well, the bolts snapped off... then I tapped them back through with a bent screwdriver and a hammer. (What ya think this is a high budget operation do ya... drift pins... sheesh. Grin.)
The mast beam came off in two pieces. I did not pry hard enough to crush any wood or damage the paint... I believe I may have been sailing with mast beams, plural, and not singular... Though there was a nice steel reinforcement that someone added in the past carrying the load.
After that I pulled the curve of the cabin top. I use luan plywood, or what are known as door skins... as they have one good side, and wind up on real crappy hollow core doors. I run them through a table saw into 2 inch wide strips. Generally I have a stack of strips that I have cut down into 2 and 4 foot lengths... along with a load of small cross cuts 2 and 3 inches long. This beam needed one 53 inches wide, and a lot of long pieces... Joined with a hot glue gun, and glued lighty to the bulkhead. See picture... No math required, no tick sticks... and the pattern has enough points of contact to pull a smooth curve. Sweet! (Thanks go to my friend Matt who shared that idea with me...)
I then went over to Noel and finished planing a bunch of Ash from half inch down to 3/8ths. It started out 13/16ths... I've been working it down when I get the chance. Only been planing one side though, allowing nature to induce some curve in the direction I want to go. Planning to do a dry run one day before the final gluing, and wet them down nicely so they'll take the curve even more... I don't like to work hard.
I took inventory of my clamps. So far I've bought nine of them to do the beam... Noel has mostly sawn frames, so I haven't had much reason for more than two or three... Ouch. This will be an expensive piece of wood...
Then I went to lowes. Twice. Supply runs... Thought I had a big piece of fiber board, but didn't... and had some ideas that you'll see tomorrow...
After that, it was back to the grind. Literally. I ground out the old tabbing on the front of the starboard main bulkhead. Still on my 36 grit flap disc... It ground out the V berth tabbing, 3 through hulls, did 1 side deck recore... and continues to look like new. I started out using my cut off wheel to get to plywood, as I always feel antsy about grinding near the hull into places I can't really see.
I ran into a load of barney powder. Purple thickened polyester resin... I have no idea what they added, but by golly it almost glows in the dark.
All for now...
Zach
1961 Pearson Triton
http://pylasteki.blogspot.com/
1942 Coast Guard Cutter - Rebuild
http://83footernoel.blogspot.com/
http://pylasteki.blogspot.com/
1942 Coast Guard Cutter - Rebuild
http://83footernoel.blogspot.com/
-
Oscar
- Candidate for Boat-Obsession Medal
- Posts: 320
- Joined: Thu Aug 16, 2007 6:54 pm
- Boat Name: Lady Kay IV
- Boat Type: 1990 Dragonfly 25
- Location: Bethlehem, PA
- Contact:
Re: The Great Grinder War of 2009
Cool....OK, I'm stumped....where are we going with this luan fishbone? 
Out there, alone, there is only truth.
Re: The Great Grinder War of 2009
Understatement of the year award.Zach wrote:All for now...
Zach
Oscar,
I don't see the pics of the "fishbone," (maybe they are on the blog), but I bet I know what it's for: He's used the long piece horizontally across the main bulkhead area (think like a shower curtain rod across there) and then glued stubby pieces of the door skin to that while holding them up against the underside of the deck. This fishbone will give him a model for the curve of the cabin top; so he'll trace the curve for his new mast-support beam from it. It's kind of like a live-action tick stick :)
Rachel
-
Oscar
- Candidate for Boat-Obsession Medal
- Posts: 320
- Joined: Thu Aug 16, 2007 6:54 pm
- Boat Name: Lady Kay IV
- Boat Type: 1990 Dragonfly 25
- Location: Bethlehem, PA
- Contact:
Re: The Great Grinder War of 2009
Aaaaaaaaahhhhhhhhhh. Gotcha.
Yes the pic was on the blog.
Yes the pic was on the blog.
Out there, alone, there is only truth.
-
Zach
- Boat Obsession Medal Finalist
- Posts: 684
- Joined: Wed Jan 25, 2006 6:28 pm
- Location: Beaufort, North Carolina
- Contact:
Re: The Great Grinder War of 2009
Day 5
I started out my day doing some work on Noel till about 10:00.
Then went to Atlantic Veneer (NC locals... They stock Marine Grade plywood... BS 1088...) and bought two sheets of 3/4 Marine Ply. 96 bucks a sheet... and 14 board feet of ash. I planed it down to 3/8ths thick, and ripped two strips 6 feet long by 3 1/4 wide out of it. I've got 31 board feet of ash invested in this mast beam, as you can't get flat cut lumber... but you can cherry pick straight vertical grain pieces out of boards. With my wallet much lighter...
Then I went back to Pylasteki and did some vacuuming, then measuring. I'm widening the passageway through the main bulkhead by two inches. My shoulders get stuck going through, without the door frames on. Stock it is 19 3/8ths wide. Wandering through lowes the other day, I saw a roll of thick brown paper... 35 inches wide. The stock bulkhead measures 36. I took a straight edge and marked off an inch with a sharpie... and taped it up. Last night I ground off all the tabbing on the hull and bulkhead on the forward side... minus the rotten spot where the wood behind it is missing, there it is just down to the mat... Then I took an exacto knife and trimmed out my pattern. I cheated... Grin.
The boat tapers from the bow out to amidship... The forward side is tighter than the aft side of the bulkhead... So I wanted the pattern off of the forward side of the bulkhead to get a tight fit.
Once I had this... I folded it up and stuck it in a trash bag... and raced back to the truck to go to the hardware store and get a jelly roll of 2 part epoxy putty. One of the holes I filled on day three, wasn't... and in the deluge turned into a solid stream of water. I had to practice some boat builders yoga to keep the paper dry while folding it up. I ran back to the boat, and filled the hole... and tapped the starboard chain plate up and out. Pylasteki is blocked funky, she is sitting a touch bow down, so there is water sitting on the chain plates... I will need it dry there for tomorrow as I cut out the bulkhead.
I then went back to Noel and unloaded my sheets of plywood, and one piece of 3/4 inch press board underlayment.
I took my luan fishbone... and laid it on a sheet of 3/8ths plywood. I then played connect the dots, as the largest gap was about 3 inches... and did away with the need for bending a fair curve with a batten.
I cut it out with my jig saw, set as fast as it'd go. I try to shave my pencil lines, but leave them on the piece... Meaning a Stanly sureform plane will take off the high spots, and I don't often have to wish for anything to grow back.
I laid it up against the bulkhead and decided it was ok. You might have noticed that the new pattern is pictured on the front of the bulkhead rather than the aft side... I'm moving the mast forward a smidge, and doing some interior redecorating. (grin)
Once I had my pattern... I went to the band saw and made a block 2 and 7/8ths wide, with a lip on one side... My carpenters pencil out of the handy dandy sharpener has the lead an 1/8th inch away from the side... with some repeatability. I don't much care for trying to hold a compass 90 degrees off a curved surface, so this is an easy one to transfer a line... Worse yet is having to sharpen said pencil in compass, and radically change the radius, tough to erase a line off a dusty piece of scrap plywood... grin.
Why did I have to redraw the line? Well... The new beam will be a smidge over 3 inches thick... but my jig goes on the inside of the curve... which is a smaller radius.
Then I cut out my pattern and made a 3/8ths thick mast beam. Weee. If I tab it in real good it'd do...
Then I took my paper pattern out, and laid it on a piece of junky AC 3/8ths. It was at this moment I discovered I only needed one sheet of 3/4 ply for both bulkheads. Oops. Well... If I screw both up I've got spare lumber. Grin.
After that I carried my saw horses down the stairway to heaven as the florida bow thruster guys called it... It's the most rickety stairway in the history of sawn timber... and ripped my underlayment into two pieces. I don't have a flat floor or work space resembling plumb, level or anything else... So I have to create it when I need it. The great thing about press board it is that its flat. Always, until you get it wet and turn it into a pile of mush... 2 pieces screwed together it doesn't wobble around. I then carried my saw horses back up the stairs, and my half sheets... Then laid a piece of 3/4 ply (not marine grade... it's my work bench!) on top of the horses, followed by the underlayment. Noels deck is curved, with about 6 inches of rise in the center over 16 feet. She's sitting on a railway at the moment, so her stern is running way down hill... but it does that anyway in the water. I sighted down my saw horses and shimmed them till they were inline... then lifted, prodded, pushed and fiddled with the stack of three sheets till my 8 foot straight edge had 6 feet of flat. I then screwed the three together, and transferred my lines from the pattern.
After some goofing around, I discovered that my 53 inch wide beam was evenly divisible by 9 inches. Well... close enough for it to click that I could use 3 1/2 inch spacing anyway. So I marked it out and adjusted the curve slightly till it looked right, and started screwing down bits of 2x4. 2x4's have gotten junkier lately, as I had to pre-drill the holes... so they didn't explode... I think I'm becoming a snob for higher grade materials. Once I had a few down I decided to test out my clamps. This is where I goofed. I bought two pounds of 2 inch screws, not 1 pound of 2's and 1 pound of 3's... So my blocks wanted to shift.
That was 7:10... So I went to lowes. 40 minutes or so round trip driving. Had dinner... and bought some 4 inch PVC sewer pipe, as I've been dreaming of adding some longitudinal stringers to Pylasteki... that don't stop and start at the bulkheads.
Back to the boat I unscrewed all the 2 inchers, and added the 3's. I did a trial run, and ripped my scrap pieces of ash into the same size as the real deal... I figure I'll glue up the junk and give it a try to test for spring back and fitting before using the good stuff. First laminated beam I've done, so I want the one going into the boat to be right.
I then assembled and disassembled my rig, till I had the right clamps in the right places... and added 2 blocks to keep the ends tight. The secret is to put the big motha's on the outside, and the wimpy ones in the middle. Start out with the clamps all the way unscrewed, and slide them till they are tight. The outer edges get re-adjusted to take up the slack, as there is more curve than they have threads.
Zach
1961 Pearson Triton
http://pylasteki.blogspot.com/
1942 Coast Guard Cutter - Rebuild
http://83footernoel.blogspot.com/
http://pylasteki.blogspot.com/
1942 Coast Guard Cutter - Rebuild
http://83footernoel.blogspot.com/
-
Zach
- Boat Obsession Medal Finalist
- Posts: 684
- Joined: Wed Jan 25, 2006 6:28 pm
- Location: Beaufort, North Carolina
- Contact:
Re: The Great Grinder War of 2009
Day 6...
Cut out starboard main bulkhead. Ground all the tabbing off the aft side on the hull, but left the little leftovers on the front side to serve as a visual indicator (fancy speak, eh...) for my template.
Fit my pattern I cut out in, and used it as a story board to fix the couple spots I missed with the paper template. I then got the passageway (door frame? no door going back in...) to an 1/8th inch all the way around... plane down here, plane down there... then pondered... "Self... aren't you going to put a foam pad under this bulkhead?"
It was at that point I decided I wasn't going to cut a 96 dollar sheet of plywood undersize by the wrong amount... today. (Grin, gotta leave room for future expectations!)
I glued up my trial mast beam. Used mini pumps on west systems... slow hardener. 12 hours later it was bubble gum. Mixed up a test batch, kicked in three hours. Decided I'd try again after dark... hardener came out of the can creamy, moisture. I need to figure out what the cause of the moisture is, as the drum at the boat yard is a new one... I blamed the last dregs on my side deck bubble gum a few weeks ago....
Though it is perhaps possible that it's the cosmos way of telling me not to spend time and energy making stuff with poor materials.
After that discovery it was time for a shower and dinner.
Went back to Noel afterwards to check on my test batch, that kicked... and decided to rip my 4 inch PVC down to size. 2 fences on a band saw, and a line drawn on the top following the text did the trick. I didn't run the fences parallel to the blade, 4 1/4 at the front of the table and 4 1/2 at the back... dropped the top guide down just close enough to the top of the tube to have some clearance... and went to town. If this evil plan works out, I'll use PVC pipe in a way other than directed... grin.
With that done, I headed over to Pylasteki and tested out my new carbide scraper. Read about it on the forum somewhere.... quite nice. A decent workout, but not a whole lot of dust, and it peeled off T.P.S. without melting it.. grin.
Zach - Has had one of those days...
1961 Pearson Triton
http://pylasteki.blogspot.com/
1942 Coast Guard Cutter - Rebuild
http://83footernoel.blogspot.com/
http://pylasteki.blogspot.com/
1942 Coast Guard Cutter - Rebuild
http://83footernoel.blogspot.com/
-
Hirilondë
- Master of the Arcane
- Posts: 1317
- Joined: Thu Dec 28, 2006 8:50 am
- Boat Name: Hirilondë
- Boat Type: 1967 Pearson Renegade
- Location: Charlestown, RI
Re: The Great Grinder War of 2009
Yak yak yak yak yak, where are the pictures?
Dave Finnegan
builder of Spindrift 9N #521 'Wingë'
--------------------------------------------------------------------------------------------------------------------------------------------------------------------
Gresham’s Law of information: Bad information drives out good. No matter how long ago a correction for a particular error may have appeared in print or online, it never seems to catch up with the ever-widening distribution of the error.
-
Oscar
- Candidate for Boat-Obsession Medal
- Posts: 320
- Joined: Thu Aug 16, 2007 6:54 pm
- Boat Name: Lady Kay IV
- Boat Type: 1990 Dragonfly 25
- Location: Bethlehem, PA
- Contact:
Re: The Great Grinder War of 2009
The visual evidence is on his blog......see link at bottom of his posts.
Done that.....cut them in half and used them as faux columns framing a bathtub, painted them to look like bamboo and hold up a cauldron (event decoration). There were others.....love the stuff.I'll use PVC pipe in a way other than directed... grin.
Out there, alone, there is only truth.
Re: The Great Grinder War of 2009
And they make nice clamps. And horizontal awning poles. Also outboard-motor tiller extensions. Isn't it great when something so easily available is so versatile?
Rachel
PS: Go Zach, go!
Rachel
PS: Go Zach, go!
Re: The Great Grinder War of 2009
11:32 p.m. and eagerly awaiting the progress report for Day 7.... :D
(I'm hooked on them, as you can see.)
Hope it went well!
Rachel
(I'm hooked on them, as you can see.)
Hope it went well!
Rachel
-
Zach
- Boat Obsession Medal Finalist
- Posts: 684
- Joined: Wed Jan 25, 2006 6:28 pm
- Location: Beaufort, North Carolina
- Contact:
Re: The Great Grinder War of 2009
Day 7...
Today I pulled the bubble gum beam out of the jig. My two test batches measured by volume kicked off... one melted the mixing pot. I've deduced... that there is some junk keeping the piston from giving a full squirt of hardener. I've decided I'm never gonna use mixing pumps again if I can help it...
Since I had a beam that acted and felt like the real thing, I power planed off the excess glue on the top and two sides. Then I ran it through the planer, and took it over to Pylasteki for fitting. I goofed following the sides of the cabin top... and it had next to no spring back, so my extra arch in the center touched the deck and not much else. I noted this, on the beam with a sharpie... Then set it aside.
After that, I went to lowes and bought two pieces of angle iron, and a flat piece of bar stock. It hurts me when I do this, as theres about four cents worth of steel in that sentence, and 20 dollars soon parted. My bulkheads were plumb, and square... So I'ma gonna use the port one as a jig for the starboard one, with blocks spacing out the gap between them while it hangs in "Foam space" around the outer edge.
I then had to go spend some time on Noel looking over quotes for hydraulics and new shafts...
I borrowed a three jaw gear puller, and went over to Pylasteki and pulled the shaft coupling, turned the rudder all the way to one side and slid out the shaft with the prop still attached.
Returned tools to rightful owner (With free 1/2 inch socket lodged forever on the end of the puller...) and got to work cutting out my bulkhead pattern, which is exactly 5/8ths smaller than the pattern I made yesterday that fit perfect. 3/4 inch squishy foam... figure it ought to be about right for proper "stiction" so it's neither wagging around in foam space, nor 11 pounds of potatoes in a 10 pound bag.
With that done, I went over to Pylasteki (Notice a trend here... the two boat yards are around the corner from each other..) and pondered my PVC pipe installation. 4 inch sewer pipe, split long ways in 10 foot sticks. I twisted and warped an 8 foot piece in under the V-berth to see how it'd lay to the hull, and chopped off a 2 foot length. Set that aside, and found the perfect line that intersects the underside of the V-berth, top of the settees... and prepped the surface for glass. (Grinder > Random orbit sander with 40 grit> Acetone > Hot coat of epoxy...> I took one of my 64 inch long, 8 inch wide strips of 1708 biax tabbing and laid it to the hull. Then I took my PVC pipe, and hot glued it in place on my marks, mixed up a bunch of cabosil thickened epoxy and did a fillet... then put 3 layers of 1708 over it, staggering outside of my projected bulkhead tabbing.
Somewhere in here I went to lowes again and bought more clamps (Can never have enough clamps... reminds me of metal working... but somehow i don't think vice grips fit the bill...) a sheet of foam board, and a 6 foot folding table...
With that done... I collected my resin, gloves, acetone, and sander... loaded up the truck and went around the corner to Noel, where I adjusted my mast beam jig with my new findings... and prepped my "Good ash" by sanding with 60 grit till it was smooth, with no scalloping or burnish marks from the planer. I cut out my polyethelyene sheet, wide enough to put a wrap and a half around the stack... then wet out with 20 ounces of resin, everything but the bottom of the bottom board. You see... Noel is sitting on an incline... which I probably should measure... But while wetting out and flipping boards, the top two on the stack float slowly down hill, an inch or two every ten seconds... The marvels of a work surface thats that far out...
After that, it was a half hour ago and I took a shower.
Goodnight.
Zach - Tomorrow, I use a compass.
1961 Pearson Triton
http://pylasteki.blogspot.com/
1942 Coast Guard Cutter - Rebuild
http://83footernoel.blogspot.com/
http://pylasteki.blogspot.com/
1942 Coast Guard Cutter - Rebuild
http://83footernoel.blogspot.com/
-
Oscar
- Candidate for Boat-Obsession Medal
- Posts: 320
- Joined: Thu Aug 16, 2007 6:54 pm
- Boat Name: Lady Kay IV
- Boat Type: 1990 Dragonfly 25
- Location: Bethlehem, PA
- Contact:
Re: The Great Grinder War of 2009
So.....what did you do with the steel?
As far as pumps, I have learned to pump slow and deliberately, especially "helping" it up messes things up.
As far as pumps, I have learned to pump slow and deliberately, especially "helping" it up messes things up.
Out there, alone, there is only truth.
Re: The Great Grinder War of 2009
Glad you asked; I was wondering too.Oscar wrote:So.....what did you do with the steel?
Rachel
-
Oscar
- Candidate for Boat-Obsession Medal
- Posts: 320
- Joined: Thu Aug 16, 2007 6:54 pm
- Boat Name: Lady Kay IV
- Boat Type: 1990 Dragonfly 25
- Location: Bethlehem, PA
- Contact:
Re: The Great Grinder War of 2009
Zach, the suspense is killing us !!!!!
Out there, alone, there is only truth.
-
Zach
- Boat Obsession Medal Finalist
- Posts: 684
- Joined: Wed Jan 25, 2006 6:28 pm
- Location: Beaufort, North Carolina
- Contact:
Re: The Great Grinder War of 2009
Day 8...
I went over to Noels boatyard and topped up my resin supply. I was the first one at the yard... by a few minutes. (Surprising as I much prefer working late than an early morning...) I then swung by ace, and napa... Spent a little time talking hydraulics, and figuring out how to plumb her. (Wrong boat... bad Zach!)
I did some yachtrodding... Or at least pulled some hotrodding tricks out working on the boat.
Once at the boatyard, I glued up a stack of polystyrene sheet with 3m 77 spray adhesive. (Not recommended for longevity, but long enough to make a form...)
I took my stack and cut it out to fit the prop aperture. I used a Stanley Surform plane... (Same one I use for planing end grain of plywood, and working with luan....) and worked it down to a shape that was fair to the keel, and the same thickness as where the rudder rests.
I then took a 1/4 inch off, everywhere. Which wasn't quite enough... and covered the thing in biax scraps. The last time I did this I was making car parts, and had to cover the piece in Mylar as I was working with polyester resin.... and 1.5 ounce mat. The surform works, but an autobody file (big cheese grater) works wonders. I also built an electric hot wire to do it, but all that stuff is stashed at my folks house 250 miles away.
I cooked some polystyrene., but the outer shell is there. I'll probably end up filling it up with acetone to dissolve the foam then troweling in a putty of thickened epoxy with milled glass fiber and grinding it to fit where needed. The other alternative is to cut it in half, and glass it as two clam shells, stronger, but more work for what is really just a glorified fairing.
I took a wooden dowel, 1 inch in diameter, and wrapped in aluminum foil (Used it as mold release in the past... Crinkled up, didn't let go of my half round. You see, the aft end of my keel has a fairing strip running each side of the rudder shaft that I want to replicate, as I' haven't decided when I rebuild the rudder if I'll use a 1 piece shaft and a massive gudgeon, or keep something similar to the stock setup. I tossed the aluminum/epoxy composite form (Hehe...) off to the side in the junk pile. I then took some waxed paper and wrapped said dowel...
I used wax paper as the release to keep my foam hunk from getting glued to my new table. Didn't work... epoxy got hot enough to melt to the wax paper... I sliced off the edge on the bandsaw to keep from grinding wax into the part.
(That wasn't chronological...)
While I had the fiberglass out, I laid another layer of 1708 biax over the starboard side. I did the starboard side while she was floating, and only got one layer down before haul out. I was stuck in first gear, not wanting to grind through the glass, but also wanting to rough it up... I spent 15 minutes with a random orbit going nowhere fast, before going out to the truck and getting my grinder with worn out brushes. It has a soft 6 inch pad... a thing of beauty, takes adhesive backed sand paper discs... I held down the switch, and spun the pad... and she worked. In the first minute I did more with that 40 grit disc than I did in the previous 15... I got almost done, until she would run no more. The rest I did by hand chasing down shiny spots along the corners and resin lumps. I did the whole 8 feet in one shot. Mixed up 16 ounces of resin, brushed on a hot coat, unrolled the fabric and got to wetting out. Once I got that on, I hopped off the staging, mixed up another batch... Stirred with one hand, and rolled what I wet out with the other. When everything was wet, and the excess pushed all the way aft into a puddle on the gel-coat... I put up a tarp and hung around chasing air bubbles and excess resin out. My tarp didn't cover the forward foot, so I have a few bubbles... I'll grind that back and do it again when I rework the chainplates.
Yeah, it'd be fine to have a dime sized air bubble... but that just bugs me till I fix it.
With that done, I took a piece of oak dowel and popped out the cutlass bearing. It was held in with marinetex... sweet. I took a piece of adhesive backed sandpaper and slipped it around the dowel to ream out the stern tube. After sufficient sanding, I ran an acetone soaked rag through till I was satisfied it was clean. I mixed up some tickened epoxy, and took a small piece of dowel and a little bit of glass. I wrapped up the external part of the stern tube (bummer, as I already sized my ear shaped aperature filler... have to modify it...) in glass. I slid in the dowel till it stopped, on the shoulder that indexes the cutlass bearing. I packed it full of epoxy, and put my little disc of fiberglass over the end of the hole. I don't want whatever I do as far as the engine-dectomy goes to be overly permenant in the event I want to put an inboard in the future. I'm not going for a "Never had one" rather a buttoned up "blank slate."
At this time, I noticed that my four ounce pot of thickened epoxy was smoking... and decided I might have mixed a little bit to much.
After that it was lunch time. (Around 3:00...)
I did some grinding on my through hull patches to get them started fair to the hull. I need to cut a new batten to follow the curve... but as with everything I do, I went way thick on the first few layers so there is plenty of meat to start with. If the weather holds I'm going to get rid of the rest and swap out my sink through hull for a seacock. (I want to move my cockpit drains above the waterline... lately i've been thinking of a redesigned cockpit....)
I got back, and started fitting my bulkhead. I took my length of steel angle iron and cut it into two 3 foot pieces, and ground down the ends so there would be no sharp parts. (don't want the boat getting hurt.)
I took 2 of my big clamps, and clamped them to the port bulkhead, and used spring clamps to hold the starboard floating free in the air... perfectly aligned with the starboard bulkhead. I took my 5/8ths blocks (don't cross cut stuff that skinny on a table saw.... Caboom... hit with a pile of toothpicks. (Grin)
I measured down the hull to my reinforcing stringer, and measured down my bulkhead template, took my compass and pulled a curve. I took my jigsaw and cut it out, then dropped it in place. I went around the stringer with my compass set to a 1 inch radius, marked it, and followed the contour under the deck, which had a 1/2 inch clearance at the cabin top, and 1 inch at the deck height.
I took this information, and cut another. I took my 1 inch radius marked out for the stringer, and made a few concentric rings from its center in half inch intervals... Cut the smallest, second one was the charm. Bulkhead dropped right in place with 5/8ths clearance the whole way up. The deck was a little tight, so I took a paint stirrer and held it to the edge, tracing a line 1/8th inch plus a pencil... 2 passes with the jig saw and it was perfect. (Imagine french chef making kissing noise)
My new beam set up rock solid... Another thing out of the way.
The inch and a half piece of flat bar I'm going to grind down to fit my through hulls, and turn with two crescent wrenches. Doesn't take long to grind, though don't lean on the grinder so hard that it anneals the steel... grin. If she turns purple, ya got to hot! I learned my art of grinding doing sheet metal repairs... Done my share of finding air on the other side of fenders and such... it takes light touch or everything in the world goes wavy, and thins out. Fiberglass is cooool, cause it has layers to tell ya when to stop.
That's about it for today. Tomorrow I'm satisfied to cut out my marine grade BS1088 3/4 plywood and turn them into a bulkhead. I'm crossing my fingers that the work done with the starboard pattern will transfer over fairly nicely.
All for now,
Zach
1961 Pearson Triton
http://pylasteki.blogspot.com/
1942 Coast Guard Cutter - Rebuild
http://83footernoel.blogspot.com/
http://pylasteki.blogspot.com/
1942 Coast Guard Cutter - Rebuild
http://83footernoel.blogspot.com/
-
Zach
- Boat Obsession Medal Finalist
- Posts: 684
- Joined: Wed Jan 25, 2006 6:28 pm
- Location: Beaufort, North Carolina
- Contact:
Re: The Great Grinder War of 2009
Today my dad came down and helped mix epoxy… Though I had him wait… as I had to do some prep work. A lot… before getting the bulkhead in.
I used the angle iron to hold things in place. One about level, the other running up hill, in the event that my plywood had any bow to it or wanted to float at an angle…
If you look real close I have a 5/8ths thick wood block supporting the weight. I used that to draw lines on the hull by laying a sharpie on the plywood on each side. I then pulled the ply back out, and unrolled my ¾ inch thick weather stripping down the middle.
With the weather stripping in place, I epoxy coated the edge of the plywood and dropped it in place. I popped my wooden block just barely under one side of the wood and clamped everything square.
I then put two 20 and 3/8ths long 2x4’s down the passageway and squared up the opening till they hung with no support in the gap.
I took a straight edge for the last time to see that it was perfect… and we started mixing thickened epoxy. I wrestled with the idea of using milled glass in the mix, but decided that if things get to flexing enough that its needed I have bigger problems… so cabosil.
It was a new experience for me, putting a fillet on a surface tighter than 90 degrees, on a curve… with a pipe in the middle. Normally I use a piece of 1/4 th inch polyethylene cut on the bandsaw to whatever is needed… raked at an angle smaller than 90 on the wall side, and dead flat on the floor side, 4 to 6 inches long. Held at an angle less than 90 in the direction of travel it cleans up for you as you go… nothing really to sand. This time I made a little tool out of luan, and broke it into shorter and shorter lengths. The front side was 3 fingers wide, with my ring finger doing the job of cleaning up the pass as it went up hill… The aft side worked best about 2 inches long.
With the fillets in on both sides, I started glassing the aft side of the bulkhead with a 4 inch tab (8 inches wide piece of glass) and discovered that glass doesn’t lay smoothly around the radius of my sewer pipe. I’ll have to cut a dart on each side for it to lay over.
I discovered however… that my fillet on the aft side wasn’t quite large enough to cover the outermost edge of foam. I thought it was smooth, but it wasn’t… making it impossible to wet out without a bubble forming along the corner of the foam… So I took the 64 inch long strip back off, and tossed it on the scrap pile. After that act… which always feels satisfying… I added more meat to the fillet by rotating the angle against the hull allowing more goooo to pass under the fillet stick.
(Wipes sweat off brow…)
Casualties: Burned up shop vac.
Innovations: 3M Paint and rust remover, looks like a black spider web of really abrasive stuff that you chuck in a drill… Works beautifully to sand the inside of fillets, and inside corners of the cabin top. It has enough guts to clear out fiberglass too, which I discovered trying to use it to remove paint from the hull… whilst it smoothed out the roving. I’m running it in a right angle drill. Sweeet tool of the day.
Finally toasted my 36 grit flap disk. Swapped it out for an 80… Don’t think it is going to last as long as the cutting speed reduced quickly from new. Though the reduction probably seemed more severe, as the new 36 grit flap disk acts about like a plasma cutter to steel…
Zach - My arms are getting tired of grinding overhead... Need another cheeseburger to continue.
1961 Pearson Triton
http://pylasteki.blogspot.com/
1942 Coast Guard Cutter - Rebuild
http://83footernoel.blogspot.com/
http://pylasteki.blogspot.com/
1942 Coast Guard Cutter - Rebuild
http://83footernoel.blogspot.com/
-
Zach
- Boat Obsession Medal Finalist
- Posts: 684
- Joined: Wed Jan 25, 2006 6:28 pm
- Location: Beaufort, North Carolina
- Contact:
Re: The Great Grinder War of 2009
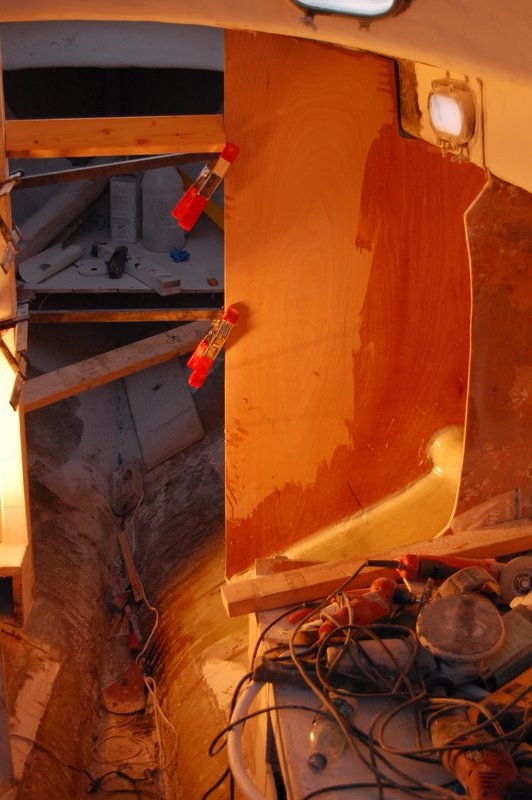
Tada'r...
I miss my big grinder. I tried using a one speed (Full tilt boogie) grinder that weighs 20 something pounds. Did the entirety of the prep work on the hull in about 2 minutes (scuffing the epoxy work from the other day...) but it spins so bleeding fast that I went through 2 40 grit PSA discs in the same time... overheated the adhesive, rolled them up... and destructed them like a poof of a cotton ball being lit on fire.
I ground back some tabbing from the shelf with my 4.5 inch grinder (Milwaukee with a paddle switch... love it!) and found a hunk of yellow production paper wedged up in a dry spot from that thing.
Perhaps I'll grab my brownout box... (Dimmer switch in a two gang electrical box with a receptacle beside it) to detune the RPM, as it's the equivelant of a portable metal cutting chop saw. Like walking a massive german shepard, or an outboard on an iceberg... ya only influence where its headed, not where it ends up.
(I'm floored to have found a tool of such total overkill for a task... but then again I'm a toll whore.)
1961 Pearson Triton
http://pylasteki.blogspot.com/
1942 Coast Guard Cutter - Rebuild
http://83footernoel.blogspot.com/
http://pylasteki.blogspot.com/
1942 Coast Guard Cutter - Rebuild
http://83footernoel.blogspot.com/
Re: The Great Grinder War of 2009
You finish halfway through the night, after nine days of Grinder War, and you still find the energy to post a log. :D
R.
R.
-
Zach
- Boat Obsession Medal Finalist
- Posts: 684
- Joined: Wed Jan 25, 2006 6:28 pm
- Location: Beaufort, North Carolina
- Contact:
Re: The Great Grinder War of 2009
Cry for help:
What page in Skenes is the table on chain plates and how far from the edge/what size the hole needs to be? I know it's in there, but I can't find anything but the strength of cables.
A source for silicon bronze in strap stock? I'm thinking 2 inches wide by 3/8ths thick and a foot long ought to be enough overkill. I'm moving them to the hull.
Anyone have a copy of Brion Toss book that wouldn't mind scanning the page on chainplates? (My copy is in a box 250 miles away... didn't think to ask my dad to bring it down. Derr...)
Otherwise I'ma bolt a big heavy piece of angle iron to the outside of the deck with a hole drilled in it so I can get the stick up and back overboard if I gotta... but rather do work once than half ass it once on the way to knocking it out of the park. Full ass all the way, ya know...
1961 Pearson Triton
http://pylasteki.blogspot.com/
1942 Coast Guard Cutter - Rebuild
http://83footernoel.blogspot.com/
http://pylasteki.blogspot.com/
1942 Coast Guard Cutter - Rebuild
http://83footernoel.blogspot.com/
-
Chris Campbell
- Candidate for Boat-Obsession Medal
- Posts: 422
- Joined: Tue Jun 06, 2006 9:18 am
- Boat Name: Luna
- Boat Type: Yankee 30
- Location: Chester, NS
- Contact:
Re: The Great Grinder War of 2009
Hi Zach,
I don't have the page in Skene's, but this page on RigRite's site is probably useful, given that you know your clevis pin size - it gives the size of the chainplate they sell for each pin size, and its material.
I know once Rachel sees this she'll have a better reference for you, and I'll keep looking, but this is better than nothing, hopefully!
Good luck! And thanks for keeping us in the know about your amazing 10 days of boat work - great job!
Cheers,
Chris
-
Chris Campbell
- Candidate for Boat-Obsession Medal
- Posts: 422
- Joined: Tue Jun 06, 2006 9:18 am
- Boat Name: Luna
- Boat Type: Yankee 30
- Location: Chester, NS
- Contact:
Re: The Great Grinder War of 2009
Actually, I do have the page in Skene's - but is your copy the 8th edition? In mine (8th edition), it's on page 188.
Here's a rundown of the numbers that might apply to you, from reasonable through overkill:
Order of numbers is: wire diameter, breaking strength, pin diameter, radius of remaining metal outside of pin hole, offset (don't get that one - the hole is larger than the pin?), and thickness.
So your 3/8" x 2" wide should be very much overkill, as long as you keep the radius of the remaining metal around the hole between 11-13/16". Make sure your turnbuckles have deep enough forks for that, though, or you may need new (large) turnbuckles!
Good luck!
Cheers,
Chris
Here's a rundown of the numbers that might apply to you, from reasonable through overkill:
Order of numbers is: wire diameter, breaking strength, pin diameter, radius of remaining metal outside of pin hole, offset (don't get that one - the hole is larger than the pin?), and thickness.
Code: Select all
7/32"    6,300  7/16"  9/16"  1/8"   1/4"
1/4"     8,200  1/2"  11/16"  1/8"   1/4"
9/32"   10,300  1/2"  11/16"  1/8"   5/16"
5/16"   12,500  5/8"  13/16"  3/16"  5/16"
3/8" 17,600 5/8" 7/8" 3/16" 7/16"Good luck!
Cheers,
Chris
Re: The Great Grinder War of 2009
No scanner at home, so this photo is the best i can do. Good luck!

Ryan
Ryan
-
Tom Javor
- Master Varnisher
- Posts: 100
- Joined: Tue Sep 16, 2008 5:06 pm
- Boat Name: Pandalus
- Boat Type: 1964 Sailmaster 22D hull #3
- Location: Warwick,RI
silicon bronze strap stock
you might try JIm Reinecke (bronzeblocks.com) or Bristol Bronze - either may have it or be able to direct you
TJ
Re: The Great Grinder War of 2009
Another potential source is Alaskan Copper, at www.alaskancopper.com
A shame one even has to delve for bronze. :mutters about "stainless" taking over:
Rachel
A shame one even has to delve for bronze. :mutters about "stainless" taking over:
Rachel
-
Zach
- Boat Obsession Medal Finalist
- Posts: 684
- Joined: Wed Jan 25, 2006 6:28 pm
- Location: Beaufort, North Carolina
- Contact:
Re: The Great Grinder War of 2009
Thanks guys!
Today... Sucked.
I got an early start, but had to top up my resin and cabosil... and make a supply run to get more gloves, paint brushes... so 7:30 turned into 8:30... turned into 9:00. It rained last night, so I had to pump out the bilge (backed up cockpit drain...) and clean up the boat. Turned into 9:30...
I decided to take on the port bulkhead and glass in the PVC pipe/starboard tabbing in one shot then move outside the boat.
I had the port bulkhead out around 1:00, and the bulk of the tabbing gone at by 2:00. I used the 7 inch grinder which I have nicknamed... "The beast" as its 13.5 pounds, 8000 rpm... and 4 horsepower. I put a 40 grit italian made flap disk on it, and took the tabbing down to the first layer of mat. (I've used a half dozen of these particular disks on that grinder on Noel, so no sweat on putting scars anywhere... My dad said that when he came to the boat, it looked like it was on fire as dust was coming out of the forward hatch in puffs like smoke. I knocked over my fan and experienced a total white out...
Today was the first time I've ever tasted styrene through an organic respirator... and the second time I've found myself quite tired... and vision going funny, as the pre-filters on my respirator got so totally blocked with glass dust I was working at an altitude higher than sea level...
The bad news, is my big shop vac died... inhaled a glove, and I had not turned the set screw to tighten the filter in place... wound up in the fan. Got the glove out, but no motion... must have popped an internal fuse or fried the motor. I use this big shop vac to suck up most of the dust, by grinding in directions toward the hose... when its not trying to tear my tyvek suit ioff me... So I had to vacuum the boat three times, for my own sanity. I stepped on my sawzall, which was hiding in the dust in the bilge... then I couldn't find my 4.5 inch grinder...
I'm somewhat messy, though not dis-organized... but one thing I can't handle is a heavy layer of dust coating everything, as my mind works visually... Don't think straight when the world is shielded... Probably why I'm not much for snow. (Grin)
That was the relative success.
I shot myself in the foot. I did the bulkhead removal prior to sanding the fillets I did on the starboard side. The epoxy work I did last night blushed worse than I've ever had it, and I mix 5 to 10 gallons a month... you could have used the hull as a slip n slide... if it were not for the razor sharp peaks of thickened mix here and there... so it took a while as my scotchbrite became smaller and smaller, and the chunks coming off larger and larger... till finally it was blush free. Epoxy when it cures has a tendency to have the free floating amines in the mix float to the surface, leaving a waxy like substance that nothing will stick to... Luckily it dissolves in water and gets somewhat easily removed with scotchbrite.
Since... I started hand sanding my fillets almost 24 hours after they were done... the epoxy was well past green, and nothing soft about it. I spent three hours cleaning them up, as my little ridge had re-amerged as a slightly smaller little ridge. I also had to get rid of the waves that were in it, having not yet mastered the art of vertical, curved, acute corners...
Effectively, my day was done at 1:30... though I didn't leave the boat till 10:00 pm. A frustrating day, but tomorrow I have a little more grinding to do, and then the glass goes in.
Zach
1961 Pearson Triton
http://pylasteki.blogspot.com/
1942 Coast Guard Cutter - Rebuild
http://83footernoel.blogspot.com/
http://pylasteki.blogspot.com/
1942 Coast Guard Cutter - Rebuild
http://83footernoel.blogspot.com/
-
Oscar
- Candidate for Boat-Obsession Medal
- Posts: 320
- Joined: Thu Aug 16, 2007 6:54 pm
- Boat Name: Lady Kay IV
- Boat Type: 1990 Dragonfly 25
- Location: Bethlehem, PA
- Contact:
Re: The Great Grinder War of 2009
A plateau, it's unavoidable. This is where you gear up for the sprint home.
Out there, alone, there is only truth.
-
Chris Campbell
- Candidate for Boat-Obsession Medal
- Posts: 422
- Joined: Tue Jun 06, 2006 9:18 am
- Boat Name: Luna
- Boat Type: Yankee 30
- Location: Chester, NS
- Contact:
Re: The Great Grinder War of 2009
Sorry the day got turned around on you - rest assured, though, for a sprint like this you're setting new records that a single day's slowdown can't erase!
Good luck for today!
Good luck for today!
Re: The Great Grinder War of 2009
Well so far, your "bad" day is still better than one of my good ones...
I'm just hoping there's going to be an extension; I'm hooked on the daily reports coming in from the front line :D
R.
I'm just hoping there's going to be an extension; I'm hooked on the daily reports coming in from the front line :D
R.
-
Zach
- Boat Obsession Medal Finalist
- Posts: 684
- Joined: Wed Jan 25, 2006 6:28 pm
- Location: Beaufort, North Carolina
- Contact:
Re: The Great Grinder War of 2009
Day 11...
Today I finished grinding.
I don't like bonding stuff to dry polyester resin and clumps of mat... so I took it down till almost all the pits were gone in the original roving of the hull. Then I laid an 8 inch wide strip of 1708 over the path just in the event I lost any strength... The port side was especially flaky, with lots of air pockets... So I want to grab hold of hull!
I put down two layers of fiberglass on each side of the starboard bulkhead. Each side on the hull got a 4 inch wide tab 8 inch swath of glass and an 6 inch tab which means a 12 inch wide strip. I had cut a 16 inch wide thinking about overkilling, but I got to thinking that the original tabbing was roving and mat of the dimensions I laid down... and I replaced it with epoxy and biax, even I at times find overkill for the sake of overkill to get over the top. Write down the date, I said it...
The deck has a double layer of 6 inch wide tabbing. I replicated the original installation and didn't put a fillet on it, as it makes sense that the beam ought to tuck up extra tight to the bulkhead without having a 2 inch radius missing from its backside.
Speaking of backsides... I've worked my ass off, literally... pants don't fit anymore. Had to drill a new hole for my belt!
I picked up two quarts of fast hardener the other day for doing the tabbing, as I had dreamed up getting the starboard locked in place... then in close succession doing the port, not wanting to wait dfor the slow stuff to set up... This was a mistake, as I mis-cut one tabs dart (had to cut a dart to get it to conform over the new stringer tube...) and didn't have enough time to correct it before the pot started smoking.
The aft side was a piece of cake to lay up, the forward side fought me a bit... melted two pots (one of them in half...) when I wet out 12 ounces of a 16 ounce pot. I should have mixed a few smaller batches... but having just done the aft side without a hitch, I was feeling ballsy...
With that done, it was dinner time. I've been going to Hardees for dinner most nights out of this saga... as its right around the corner from the boat yard. 12 minutes, and 5 bucks later I'm refueled...
I got back, and laid up the 8 inch wide strip on the port side, and positioned my PVC tube. I didn't grind back the paint quite far enough on the forward side to glass over it... So I called it quits and will check my bulkhead template to make sure everything fits. (Per my measuring it ought to... but boats aren't symmetrical!)
About it for now...
Though Question:
Laminating compression posts vs solid stock? I'm deciding if I want to laminate, and if so which direction... athwart ship or fore and aft. Fore and aft would be a cool visual, but the shape of the beam would make em want to split if I'm looking at it right... Figuring 3 by 3 on the two either side of the bulkhead, and maybe a little less on the ones running down at an angle...
Any of the other alberg designs/sail boats have the cattywampus ones? (Always liked that word... grin)
Zach
1961 Pearson Triton
http://pylasteki.blogspot.com/
1942 Coast Guard Cutter - Rebuild
http://83footernoel.blogspot.com/
http://pylasteki.blogspot.com/
1942 Coast Guard Cutter - Rebuild
http://83footernoel.blogspot.com/
-
Zach
- Boat Obsession Medal Finalist
- Posts: 684
- Joined: Wed Jan 25, 2006 6:28 pm
- Location: Beaufort, North Carolina
- Contact:
Re: The Great Grinder War of 2009
Idea I dreamt of in the shower...
When laminating a beam, put a sheet of 1/8th inch, or 1/4 inch polyetheylene or polypropelene on the inside of the curve... then it'll have a glue line on it instead of blobs to sand off.
When laminating a beam, put a sheet of 1/8th inch, or 1/4 inch polyetheylene or polypropelene on the inside of the curve... then it'll have a glue line on it instead of blobs to sand off.
1961 Pearson Triton
http://pylasteki.blogspot.com/
1942 Coast Guard Cutter - Rebuild
http://83footernoel.blogspot.com/
http://pylasteki.blogspot.com/
1942 Coast Guard Cutter - Rebuild
http://83footernoel.blogspot.com/
-
Quetzalsailor
- Master of the Arcane
- Posts: 1100
- Joined: Fri Aug 26, 2005 9:53 am
- Boat Name: Quetzal
- Boat Type: LeComte North East 38
- Location: Philadelphia, PA
Re: The Great Grinder War of 2009
Truly, one of the epic tales of renovation! Congratulations!
Certainly, a laminated post would be fine. The idea is to distribute defects. You would have all the grain vertical but would shuffle the pieces to get as much balance (in the warped pieces; not much point in stacking the lamina back the way that they were bent)and as much crossing grain as possible. You could conceal the laminations, if desired, by adding lamina onto the faces which show the edges of the stack; then you'd have only two joints showing on two faces.
Certainly, a laminated post would be fine. The idea is to distribute defects. You would have all the grain vertical but would shuffle the pieces to get as much balance (in the warped pieces; not much point in stacking the lamina back the way that they were bent)and as much crossing grain as possible. You could conceal the laminations, if desired, by adding lamina onto the faces which show the edges of the stack; then you'd have only two joints showing on two faces.
-
Zach
- Boat Obsession Medal Finalist
- Posts: 684
- Joined: Wed Jan 25, 2006 6:28 pm
- Location: Beaufort, North Carolina
- Contact:
Re: The Great Grinder War of 2009
Day 12
Today... I got a late start.
Did some working and talking on Noel till 10:00 or so, then refilled resin and loaded up my template to the boat. First I swung by atlantic veneer, and picked up a boat load of ash... sifting through till I found the perfect two boards. 5/4 10 inches wide and 14 feet long.
I like ash, its a nice looking wood... but its also cheap enough at 2.50 a board foot, for me to pick through and throw away anything less than perfect.
So, I've got enough lumber to make the 4 compression posts that take the load from the mast beam. Which I hope to glue up tomorrow. I'll have to figure how many clamps it'll take. I may try and do them all in a row divided by polyethelyene sheet, as I don't have quite enough clamps to do all of them at once.
I'm thinking to do 2.5 by 3 inch posts, as that is what was factory. Since I am laminating, it ought to be 20% stronger than if it were a sawn post... though I bought enough to do 4 3x3 posts. Decisions decisions, weight savings vs overkill...
If I had more time I'd consider doing something fancy like a box strut on each side of the door way, so the cross section might be larger... but the weight would be much much less. Or a pair of aluminum tubes...
Sometimes though, I take the weight weenie thing to extremes. (Grin.)
After I got my wood, it was time to get back to the boat. Test fit my template... good good. Laid glass over the pvc tube, went to Noel and cut out my bulkhead. Went back to Pylasteki and foam stripped my bulkhead. Learned from the other day, put the foam on the bulkhead not the other way around... then ya don't have to fight with it to get it centered.
I then took some time shaving here and there to get it to fit properly. My index is from the center walkway, so the port side deck is about a half a touch taller than the starboard, and the cabintop just a tick tighter angled... It's a boat, everything is hand fit, building it or rebuilding it. What looks fair, what looks right... is... Throw away your square, level, plumb bob... just keep your straight edge and bendy battens handy!
With that done, I filleted the bulkhead, and glassed it in place.
That one line, seems so anti-climatic... but here are the pictures.
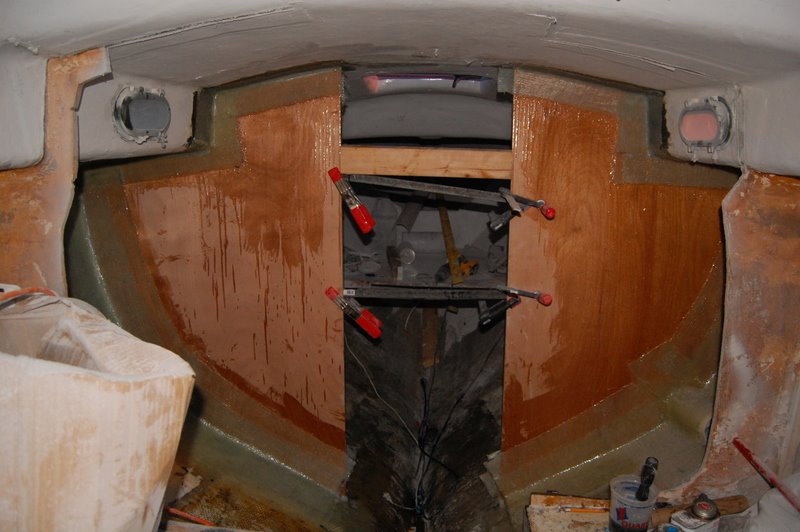
1961 Pearson Triton
http://pylasteki.blogspot.com/
1942 Coast Guard Cutter - Rebuild
http://83footernoel.blogspot.com/
http://pylasteki.blogspot.com/
1942 Coast Guard Cutter - Rebuild
http://83footernoel.blogspot.com/
-
Zach
- Boat Obsession Medal Finalist
- Posts: 684
- Joined: Wed Jan 25, 2006 6:28 pm
- Location: Beaufort, North Carolina
- Contact:
Re: The Great Grinder War of 2009
Oh... and as you can see, on the port side I learned how to cut a dart around the tube..
Tonight I went up the hobby shop and bought a set of singer scissors. I'm tired of fighting with my resharpened chicken farm scissors that everybody swears by down here... you get about a 1/4 inch that really cuts like a knife on the whole width. 30 bucks and they only fit two fingers (I've got huge hands...) but if they do the trick...
Should have bought another rotary cutter... I tossed it in the bucket of acetone after making a cut on some wet glass. Acetone turned blue as it dissolved the plastic... yummy.
Zach
1961 Pearson Triton
http://pylasteki.blogspot.com/
1942 Coast Guard Cutter - Rebuild
http://83footernoel.blogspot.com/
http://pylasteki.blogspot.com/
1942 Coast Guard Cutter - Rebuild
http://83footernoel.blogspot.com/
-
Oscar
- Candidate for Boat-Obsession Medal
- Posts: 320
- Joined: Thu Aug 16, 2007 6:54 pm
- Boat Name: Lady Kay IV
- Boat Type: 1990 Dragonfly 25
- Location: Bethlehem, PA
- Contact:
Re: The Great Grinder War of 2009
Looking good! Are you SURE there's enough goop on there? Just kidding, it looks like it will do it's job, which is disperse loads, very well.
Scissors.....as much as I hate the disposal economy, I broke down and bought 10 pair at Harbor Freight for $.99 each.... Glass kills them, but they last longer than I would have thought....still have 8 left.
Now I have to go into the barn so I can say I got something done today.....
Scissors.....as much as I hate the disposal economy, I broke down and bought 10 pair at Harbor Freight for $.99 each.... Glass kills them, but they last longer than I would have thought....still have 8 left.
Now I have to go into the barn so I can say I got something done today.....
Out there, alone, there is only truth.
-
Zach
- Boat Obsession Medal Finalist
- Posts: 684
- Joined: Wed Jan 25, 2006 6:28 pm
- Location: Beaufort, North Carolina
- Contact:
Re: The Great Grinder War of 2009
Today I spent some time cleaning up the frozen snot drippings that happen while fiberglassing overhead and large quantities on curved surfaces. I then vacuumed the boat. It takes about 3 trips with a vacuum before shes habitable without a dusk mask...
I made a mistake. I went to the marine surplus store... and found some beautiful pieces of aluminum angle iron that were intended to be engine mounting brackets for big yamahas. The kind of stuff I feel compelled to build a boat around. Then I found the backing plates to go with them... and an anodized high polished aluminum tube 1 5/8ths outside diameter... 1 3/8ths inside, which means I can slip fit a piece of 1 inch schedule 40 aluminum tube inside of it and have a friend plug weld them together...
Then I went to fastenal, and ordered a 1 inch diameter 316 stainless bolt. 32 dollar bolt... 50 bucks after washers and stuff.
Long story short, I've got the stuff to build a mast tabernacle. Basically, a pivot point a few inches off the deck that allows the mast to rotate forward or aft and be taken down for servicing without a crane. I have high hopes of one day taking her through the canals of europe... and it'd be nice to be able to hoist and lower the mast as needed... that and I've always wanted to be able to fly the bird at stubborn bridge tenders that wish to watch sailboats do circles for an hour before they allow them passage by lifting the bridge.
Back to the boat I did some studying on the mast beam, and decided didn't want to mix any more epoxy today... So let the ideas fester till tomorrow on how to best glue everything up. it looks like I'll have to through bolt everything, as I haven't found a local source for massive wood screws as they used originally.
I went to west marine three times... cotter pins, seizing wire, spreader boots, rigging tape... pricing out bottom paint and through hulls... and to buy a chain plate. They had one schaffer 3/8ths pin chainplate. 1/8th inch thick 304... 40 bucks out the door. I'm thinking I may go that route to get the stick back vertical and sailing for a while. Not as massive a saftey factor (I like the dumb numbers of overkill) but the original 1/8th inch bronze chainplates made it 48 years. Stainless is as strong, but not as corrosion resistant... will be good for a few years. I just need the longer length to get the bolts below the toe rail on the hull.
I'm dreaming up a way to center everything, I think Ebb over on the pearson ariel board talked about it once... taking two sticks the same length with two marks at equal points. Measure back from the stem down the sides of the boat the same distance... the stand up the sticks changing the angle side to side till they cross... showing the centerline of the boat. I figure I can hang a plumb bob from the two sticks to find the center of where the mast step ought to be. Moving it forward 2-3 inches, my tabernacles bolts will pass on each side of the beam, with plates under it. Ought to be plenty strong.
I'm figuring to do some measuring of the scribed waterline and see if it is symmetrical on both sides of the boat. If it is, I'll take a square and mark a line on each going vertically, then take a flexible batten to transfer the line up to the toe rail. That way when she is trimmed as designed, her chainplates will be plumb... which means if the stick isn't raked fore or aft at all, the pull will be perfectly inline to the chainplates.
I think it'll work, but that might just be the acetone exposure...
After doing my thinking on the mast beam, I pulled off the cockpit seacocks, and the raw water seacock, and scraped out all the sealant. I made a tool out of my 2 inch piece of cold roll by grinding it to fit the inside diameter of the through hulls. They laughed at it, and I bent it into a pretzel. So, I ground off the heads of the through hulls. On the two cockpit drains this slackened the seacocks inside, so I unthreaded them from the through hulls, then I used my pretzel, and unthreaded the through hulls from the hull... after heating them up with a torch till the sealant started to bubble. After that I started grinding. I pulled out the brownout box (dimmer switch/receptical combo) and detuned the beast... 7 inch grinder with a soft pad and PSA sandpaper discs. at 8,000 rpm it would roast the adhesive of and sling the paper off. I spun it a lot slower and it did a pretty decent job at bottom paint removal. With the paint out of the way I loaded a new 40 grit flap disc on the beast and ran it full throttle for as long as my arms held out... 2 through hulls. The hull is an inch thick here, so I'm feeling pretty content to go 3/4 of the way and fill it with biax, then grind back the inside a smidge, lay down a disc or two then fill up the rest with thickened epoxy with milled glass fibers. It's not like the hull isn't fine with the holes there now! (It would take a ridiculously large bevel... 1 inch times 10 = 10 inch radius around the hole...plus the 2 inch hole... I'd be starting with a 22 inch wide piece of glass cut in a circle and working up 10 layers thick, each layer a 1/2 inch or inch smaller diameter. I don't think so...
I then cut the exhaust outlet and sink fiberglass tube flush inside. The hose to my sink disintigrated when I pulled on it, ripped in half. Yikes. I'm re purposing one of my cockpit seacocks to sink drain duty. Deciding between a real pair of 2 inch cockpit drains, or going to a pair of 2 1/2's... Cost will play a big roll, but in any case the through hulls on my 1 1/2s necked down to 1 1/4. Unacceptable for an offshore boat.
Being that I am a connoisseur of overkill, I'm pleased to note that my friend Dave shared an idea... He uses concrete grinding discs to do fiberglass work. I had a metal grinding disc loaded on my 4.5 inch grinder tonight so I gave it a try. Wow! I'd say doing the first 80% with a grinding disc, then switching over to a flap disc to smooth things out... then finishing with a random orbit or DA... gives the exact same finished product, but at a much much quicker pace than starting with the DA.
From 7 to 10:00 tonight, I ground the bevel for 4 through hulls.
Zach - Almost like a day off!
1961 Pearson Triton
http://pylasteki.blogspot.com/
1942 Coast Guard Cutter - Rebuild
http://83footernoel.blogspot.com/
http://pylasteki.blogspot.com/
1942 Coast Guard Cutter - Rebuild
http://83footernoel.blogspot.com/
-
Oscar
- Candidate for Boat-Obsession Medal
- Posts: 320
- Joined: Thu Aug 16, 2007 6:54 pm
- Boat Name: Lady Kay IV
- Boat Type: 1990 Dragonfly 25
- Location: Bethlehem, PA
- Contact:
Re: The Great Grinder War of 2009
Many of the traditional vessels in Holland had a tabernacle where the mast continued below decks and had a serious weight bolted to it, to balance it around it's pivot point. We're talking solid wood masts here, not light stuff. There was a hatch in the foredeck in front of the mast which allowed the weight to come forward and above deck.I've always wanted to be able to fly the bird at stubborn bridge tenders that wish to watch sailboats do circles for an hour before they allow them passage by lifting the bridge.
I've seen them come at low bridges motoring at 3-4 knots, while a few deck hands nonchalantly lower the mast to just above horizontal, scoot under the bridge and whoppa up it went, sails went up, motor off and sailing again. Faster than it just took me to write it.....
The brownout box. I made one of those.....plugged my electric cement mixer in it to control the speed.....lol!
Out there, alone, there is only truth.