Alberg 35 Refit
Posted: Wed May 04, 2011 1:33 am
I've been meaning to document the refit of my Alberg 35, Auriga, but I've been so busy working on her the last few months, I haven't had time. So, here goes:
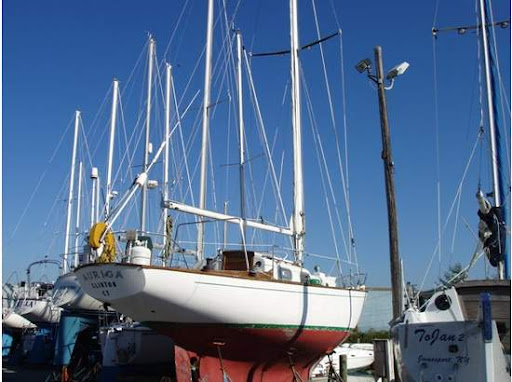
When purchased, Auriga seemed to be a well cared for boat for her age. She had the same issues most boats from this era suffer from. Rotten core from numerous leaking deck fittings, rotten mahogany rudder, swages and other rig components showing signs of deterioration, leaky ports etc. The good news was that she was repowered with a Universal M25XPB in the last ten years so that was one less thing to worry about. Another interesting upgrade was the "behind-the-mast" roller furling main sail (I'm actually planning on removing the furler and going back to a slab reefing mainsail after this season). She also has a fairly new Furlex furler for the headsails.
Photos of Auriga as purchased:

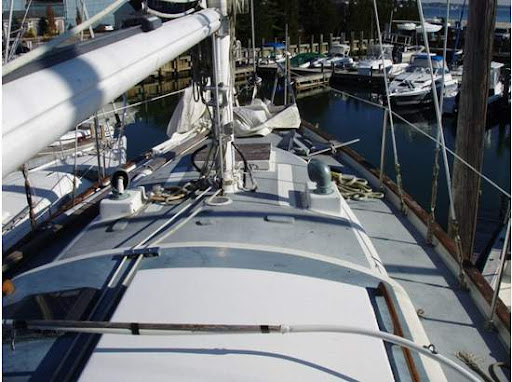

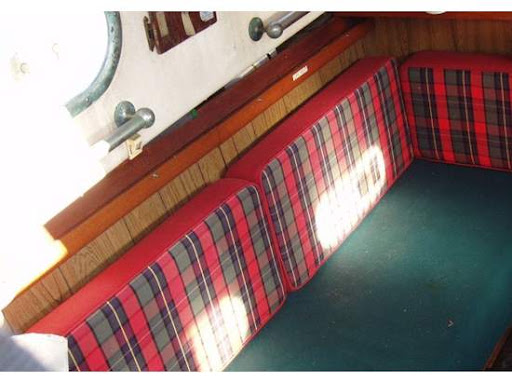
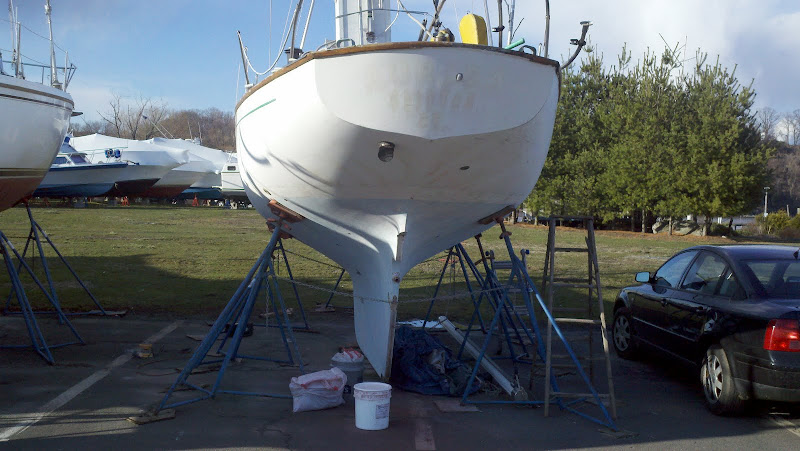
This past October, I brought her from the east end of Long Island back around to the Hudson where she is now on the hard. It was a two day trip motoring all the way. After I got her hauled out, the first order of business was to rip out all of the superfluous junk the previous owner had installed such as the helmsman seat (seen in the picture above), the incredibly dodgy LPG system (I won't even go into what I found), the old fresh water system, a ton of junk in the cabin, the list goes on. After all this stuff was cleaned out, I started focusing on structural issues. I plan to make this a multi-year refit so this year I wanted to focus on the most important seaworthiness issues. The biggest things were the rudder, deck, thru-hulls and drive-train (shaft, stuffing box, coupling and prop).
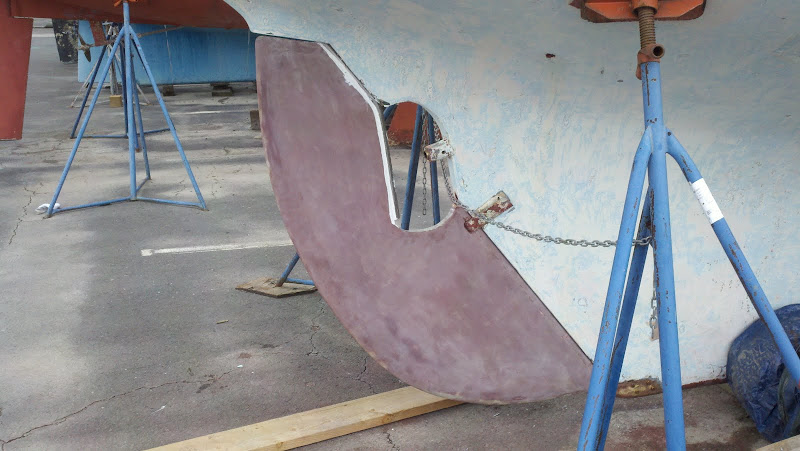
I started with the rudder. I won't go into too much detail on the rudder here as its been discussed in another thread: http://www.plasticclassicforum.com/view ... f=1&t=5252. The original rudder would have been fine had someone not barrier coated it in the past. I looks like it was coated with gelcoat (go figure). Water eventually got in and the wood rotted beyond repair. The project is complete now and it turned out pretty well. Below are photos of the old and new rudders. Still need to do a bit more fairing but it's mostly complete.

Next, I focused on the foredeck. The previous owner had installed a manual windlass, chainpipe and bow roller. None were bedded properly and the foredeck was completely delaminated. When I pulled the skin up, I found that balsa was completely soaked but, surprisingly, there was little rot. As many on this forum recommend, I decided to replace all the core and lay down new glass on top rather than try to use the old top skin. I built up solid glass pads for all load bearing fittings. The side decks are still quite solid with no signs of wet core. There is a small area on one side of the cabin top that is completely saturated but I haven't gotten to it yet. The previous owner had installed a Bomar hatch on this side and used wood screws going only into the balse to secure it. Needless to say, the core around that area is soaked. The aft deck and cockpit sole have a few soft spots that I'll need to tend to at some point also. The project went pretty well after I got the hang of it. It's a long, sticky job no matter how you do it. I didn't get a ton of photos as I was generally covered in epoxy but here are a few photos of the process:
Working under tarp in the dead of winter. Top skin removed. Scraping out all the balsa.

New core and glass complete.

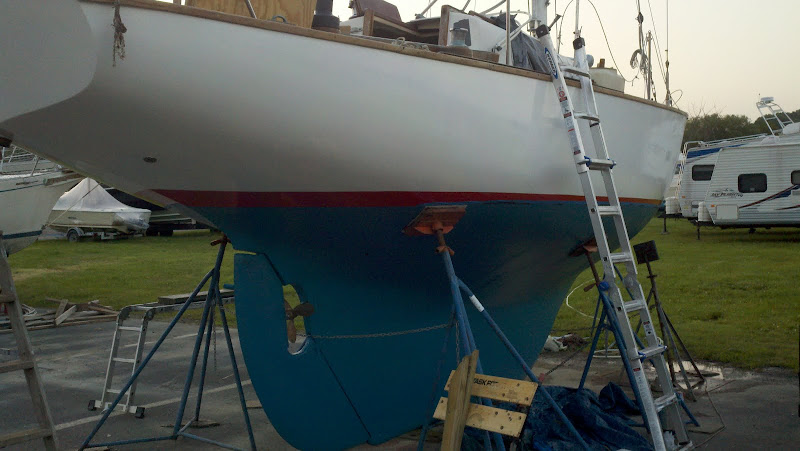
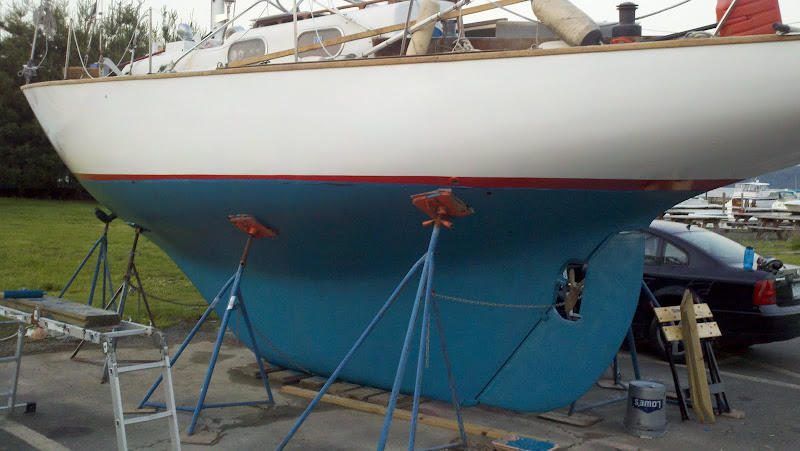
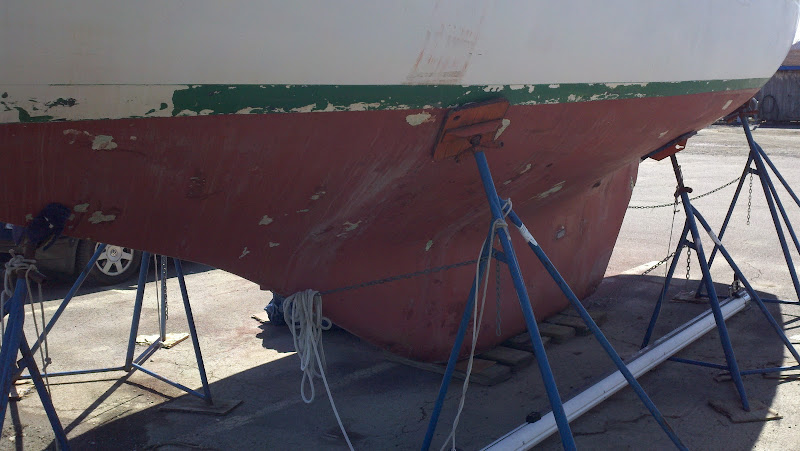
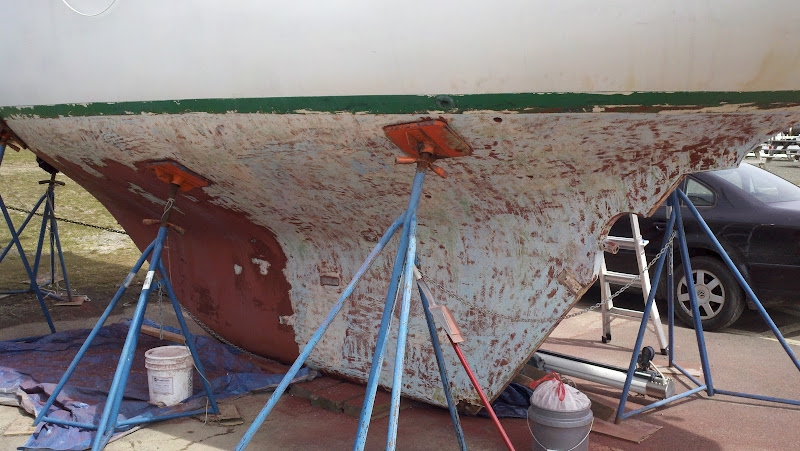
Next, I moved to the bottom. There was a good 20 years worth of bottom paint that was starting to fail in some areas so I decided to take the bottom down to gelcoat. I did 95% of this with a carbide scraper. I followed up with 60 grit on the RO sander to get the residual. I can't recommend the carbide scraper method enough. I used various strippers and sanding in the past and found them nasty and ineffective. The scraper takes a certain combination of brute force and finesse and once you find that right combination it works like a dream. Took me about three days to complete the bottom.
Before commencing.
Starboard after the first few hours of scraping.

Port after a few hours.
Port complete.

Aft view.
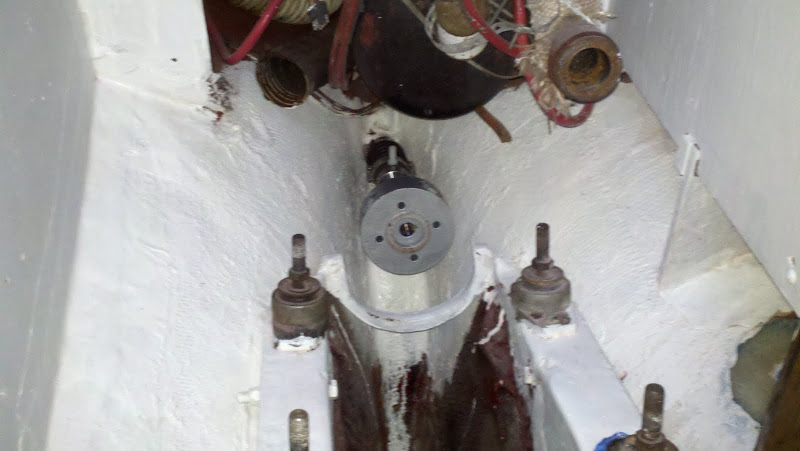
Next, I moved on to the engine and drive train. I needed to remove the shaft to get the upper rudder post out which ended up necessitating the cutting of the shaft. I also wanted to replace the antiquated Sealol shaft seal with a PSS seal. I would have gone with a traditional stuffing box but I couldn't find one with the dimensions I needed. The engine room was a mess. It was painted a dark red which made it difficult to see anything and was generally dirty and greasy. I decided that I might as well pull the engine out and clean and paint the engine room. It would also be infinitely easier to install the new shaft and seal with the engine out. Paint was beginning to flake of the engine in many spots so I used this opportunity to paint the engine as well. I haven't gotten the engine back in yet. Planning on doing that tomorrow. I used the mainsheet and a 2x6 beam over the companionway to hoist the engine off the beds and back onto the salon sole. Photos follow.
Engine room painted and PSS seal installed on the shaft log. In the bottom right hand side of the photo you can see the glass pad I built up and drilled for the new engine intake thru-hull and seacock.

Federal Fleixble coupling installed. Ready for the engine to be dropped back in.
New engine paint.

I am currently working on the seacocks. Auriga, as many boats of this era, had fiberglass tubes rising slightly above the waterline for sink drains and cockpit drains. I've ground all these out, filled the holes and glassed over them. I'm going with a composting head so I eliminated head intake and discharge. I'm routing the galley sink drain back to a tee in the port cockpit drain so that eliminates another thru-hull. The only holes I now have are the head sink/shower drain, engine intake and cockpit drains. I'm using
Groco 3/4" ball valve seacocks for the head sink and engine intake and 1 1/2" Groco ball valves for the cockpit drains. One really interesting and frightening thing I found when removing the head intake and discharge is that there were no thru-hulls. I know that Pearson would sometimes have a tube extending up slightly from the hull with a seacock mounted to it in lieu of a thru-hull but these were just flanged seacocks (tapered plug) through bolted and bedded down to the inside of the hull. Seems quite dodgy to me.
I'm planning to launch in about three weeks. My to do list is:
1.) Drop engine back in and roughly align shaft. More precise alignment will be done after I've had her in the water for a week or so.
2.) Complete seacock/thru-hull installs.
3.) Install bilge pumps. I'm installing a Rule 3700 gph manual pump and a small Rule 500 auto pump. I'm building a bridge about 8" from the bottom of the sump where the 3700 will live. I will have a rule float switch and will be wired to a three-way switch near the companionway. There will be another board coming down from the bridge (in the shape of a T) that will extend to the bottom of the sump. The 500 will live there. The 500 will be wired direct to the battery. The 3700 will discharge from the original fitting just above the bootstripe and the 500 will discharge in the cockpit.
4.) Finishing fairing/painting fordeck and reinstall deck fittings.
5.) Paint topsides. I'm using Interlux Perfection in the roll and tip fashion.
6.) Prime bottom with a coat or two of epoxy and bottom paint.
7.) Install fresh water components. Auriga has the two original Monel tanks and a Plastimo flexible tank under the V-berth. I'm installing all new vinyl PVC hose and making a simple PVC manifold for isolating tanks. I'm going with fresh/sea water in the galley and fresh in the head all pumped with Whale foot pumps. I got lucky and found a three Whale MK3 foot pumps locally from a guy parting out his boat after it got smashed up. They were almost new and he sold them for $40 each. Seems like a pretty good deal. I need to clean the Monel tanks. Anyone know of a good method of cleaning Monel water tanks with very limited access?
There will be a few other things added to the list I'm sure. Pictures and progress reports to follow.
When purchased, Auriga seemed to be a well cared for boat for her age. She had the same issues most boats from this era suffer from. Rotten core from numerous leaking deck fittings, rotten mahogany rudder, swages and other rig components showing signs of deterioration, leaky ports etc. The good news was that she was repowered with a Universal M25XPB in the last ten years so that was one less thing to worry about. Another interesting upgrade was the "behind-the-mast" roller furling main sail (I'm actually planning on removing the furler and going back to a slab reefing mainsail after this season). She also has a fairly new Furlex furler for the headsails.
Photos of Auriga as purchased:
This past October, I brought her from the east end of Long Island back around to the Hudson where she is now on the hard. It was a two day trip motoring all the way. After I got her hauled out, the first order of business was to rip out all of the superfluous junk the previous owner had installed such as the helmsman seat (seen in the picture above), the incredibly dodgy LPG system (I won't even go into what I found), the old fresh water system, a ton of junk in the cabin, the list goes on. After all this stuff was cleaned out, I started focusing on structural issues. I plan to make this a multi-year refit so this year I wanted to focus on the most important seaworthiness issues. The biggest things were the rudder, deck, thru-hulls and drive-train (shaft, stuffing box, coupling and prop).
I started with the rudder. I won't go into too much detail on the rudder here as its been discussed in another thread: http://www.plasticclassicforum.com/view ... f=1&t=5252. The original rudder would have been fine had someone not barrier coated it in the past. I looks like it was coated with gelcoat (go figure). Water eventually got in and the wood rotted beyond repair. The project is complete now and it turned out pretty well. Below are photos of the old and new rudders. Still need to do a bit more fairing but it's mostly complete.
Next, I focused on the foredeck. The previous owner had installed a manual windlass, chainpipe and bow roller. None were bedded properly and the foredeck was completely delaminated. When I pulled the skin up, I found that balsa was completely soaked but, surprisingly, there was little rot. As many on this forum recommend, I decided to replace all the core and lay down new glass on top rather than try to use the old top skin. I built up solid glass pads for all load bearing fittings. The side decks are still quite solid with no signs of wet core. There is a small area on one side of the cabin top that is completely saturated but I haven't gotten to it yet. The previous owner had installed a Bomar hatch on this side and used wood screws going only into the balse to secure it. Needless to say, the core around that area is soaked. The aft deck and cockpit sole have a few soft spots that I'll need to tend to at some point also. The project went pretty well after I got the hang of it. It's a long, sticky job no matter how you do it. I didn't get a ton of photos as I was generally covered in epoxy but here are a few photos of the process:
Working under tarp in the dead of winter. Top skin removed. Scraping out all the balsa.
New core and glass complete.
Next, I moved to the bottom. There was a good 20 years worth of bottom paint that was starting to fail in some areas so I decided to take the bottom down to gelcoat. I did 95% of this with a carbide scraper. I followed up with 60 grit on the RO sander to get the residual. I can't recommend the carbide scraper method enough. I used various strippers and sanding in the past and found them nasty and ineffective. The scraper takes a certain combination of brute force and finesse and once you find that right combination it works like a dream. Took me about three days to complete the bottom.
Before commencing.
Starboard after the first few hours of scraping.
Port after a few hours.
Port complete.
Aft view.
Next, I moved on to the engine and drive train. I needed to remove the shaft to get the upper rudder post out which ended up necessitating the cutting of the shaft. I also wanted to replace the antiquated Sealol shaft seal with a PSS seal. I would have gone with a traditional stuffing box but I couldn't find one with the dimensions I needed. The engine room was a mess. It was painted a dark red which made it difficult to see anything and was generally dirty and greasy. I decided that I might as well pull the engine out and clean and paint the engine room. It would also be infinitely easier to install the new shaft and seal with the engine out. Paint was beginning to flake of the engine in many spots so I used this opportunity to paint the engine as well. I haven't gotten the engine back in yet. Planning on doing that tomorrow. I used the mainsheet and a 2x6 beam over the companionway to hoist the engine off the beds and back onto the salon sole. Photos follow.
Engine room painted and PSS seal installed on the shaft log. In the bottom right hand side of the photo you can see the glass pad I built up and drilled for the new engine intake thru-hull and seacock.
Federal Fleixble coupling installed. Ready for the engine to be dropped back in.
New engine paint.
I am currently working on the seacocks. Auriga, as many boats of this era, had fiberglass tubes rising slightly above the waterline for sink drains and cockpit drains. I've ground all these out, filled the holes and glassed over them. I'm going with a composting head so I eliminated head intake and discharge. I'm routing the galley sink drain back to a tee in the port cockpit drain so that eliminates another thru-hull. The only holes I now have are the head sink/shower drain, engine intake and cockpit drains. I'm using
Groco 3/4" ball valve seacocks for the head sink and engine intake and 1 1/2" Groco ball valves for the cockpit drains. One really interesting and frightening thing I found when removing the head intake and discharge is that there were no thru-hulls. I know that Pearson would sometimes have a tube extending up slightly from the hull with a seacock mounted to it in lieu of a thru-hull but these were just flanged seacocks (tapered plug) through bolted and bedded down to the inside of the hull. Seems quite dodgy to me.
I'm planning to launch in about three weeks. My to do list is:
1.) Drop engine back in and roughly align shaft. More precise alignment will be done after I've had her in the water for a week or so.
2.) Complete seacock/thru-hull installs.
3.) Install bilge pumps. I'm installing a Rule 3700 gph manual pump and a small Rule 500 auto pump. I'm building a bridge about 8" from the bottom of the sump where the 3700 will live. I will have a rule float switch and will be wired to a three-way switch near the companionway. There will be another board coming down from the bridge (in the shape of a T) that will extend to the bottom of the sump. The 500 will live there. The 500 will be wired direct to the battery. The 3700 will discharge from the original fitting just above the bootstripe and the 500 will discharge in the cockpit.
4.) Finishing fairing/painting fordeck and reinstall deck fittings.
5.) Paint topsides. I'm using Interlux Perfection in the roll and tip fashion.
6.) Prime bottom with a coat or two of epoxy and bottom paint.
7.) Install fresh water components. Auriga has the two original Monel tanks and a Plastimo flexible tank under the V-berth. I'm installing all new vinyl PVC hose and making a simple PVC manifold for isolating tanks. I'm going with fresh/sea water in the galley and fresh in the head all pumped with Whale foot pumps. I got lucky and found a three Whale MK3 foot pumps locally from a guy parting out his boat after it got smashed up. They were almost new and he sold them for $40 each. Seems like a pretty good deal. I need to clean the Monel tanks. Anyone know of a good method of cleaning Monel water tanks with very limited access?
There will be a few other things added to the list I'm sure. Pictures and progress reports to follow.