Keel Doctor - and fiberglass patch questions

Ask a question...get an answer (or two).
Post Reply
sal's dad
Deck Grunge Scrubber
Posts: 26
Joined: Fri Aug 03, 2007 8:19 am

Keel Doctor - and fiberglass patch questions

Post by sal's dad »

Image
I am finally working on the Corinthian - the first task is to get the hull sound. Three things jumped out as needing some glass/epoxy work:

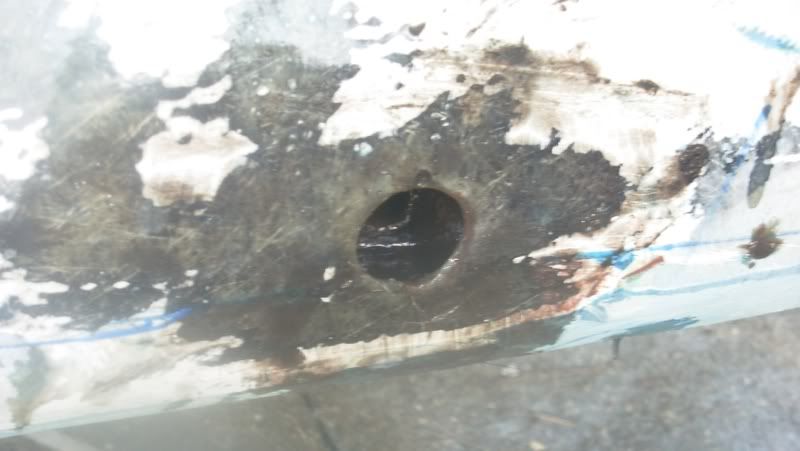
- Installing a garboard plug (there was none before, and the boat had sat on the hard, full of water, for an indeterminate number of years - I had the yard drill a 1" hole after the first day I saw it)
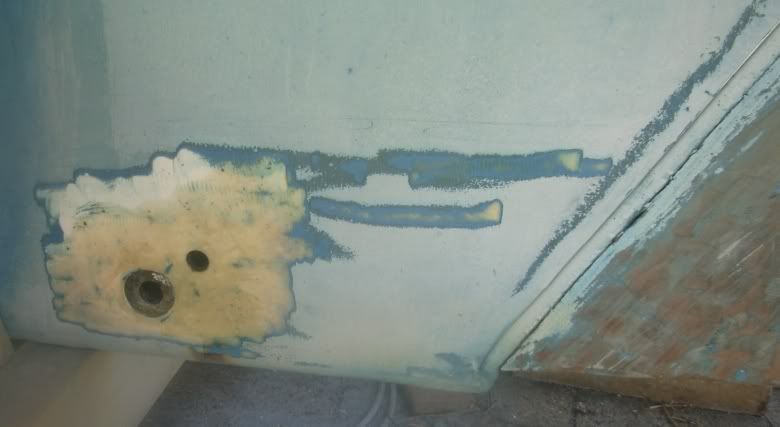
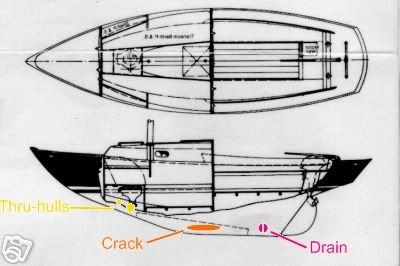
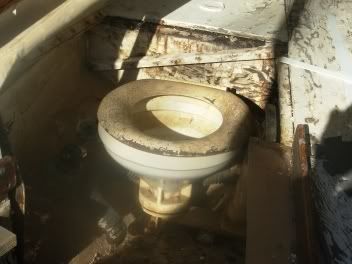
- Removal of the head, and sealing the thru-hulls. (Anybody need a vintage head? - a real collector's item!)
Image

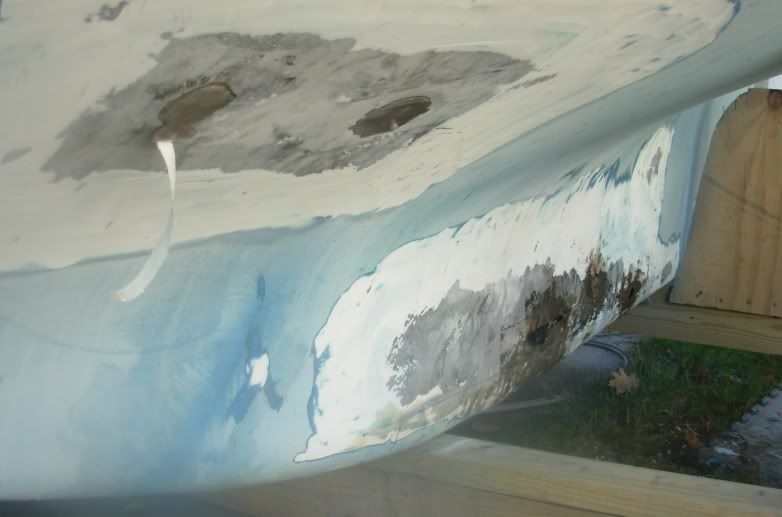
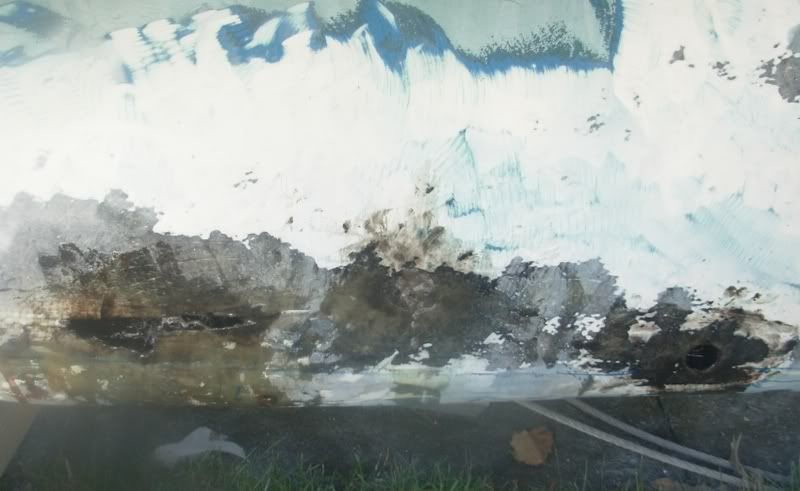
- Investigation of a crack in the ballast area, which was weeping moisture even after the bilge was drained to about 2".

Image
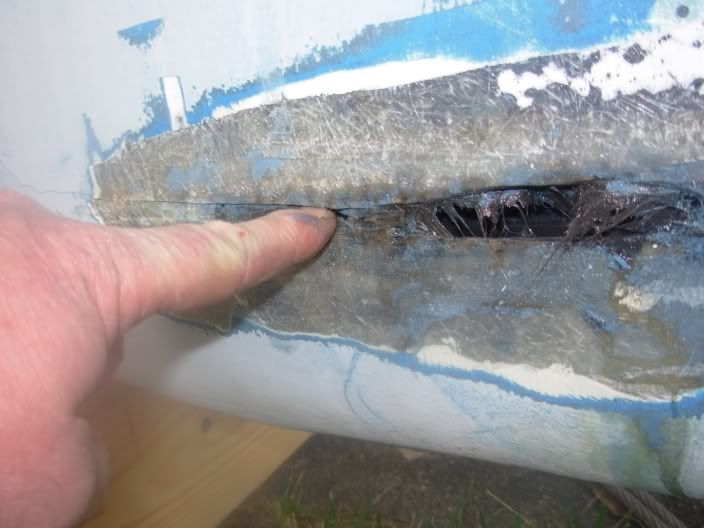
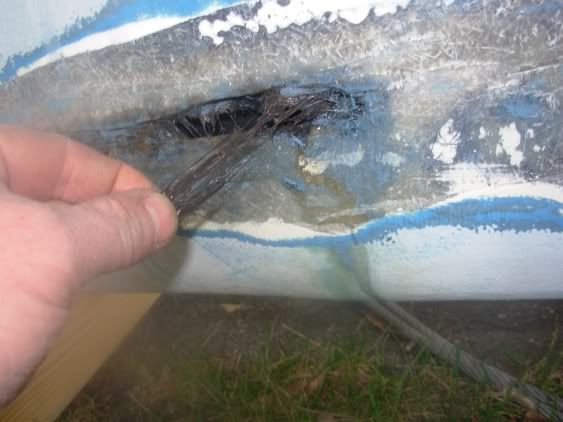
This last item turns out to be a problem. I cut away the bottom paint and gel coat (using the nifty Ryobi 18V planer - minimal dust!) and found that there is a void around the lead, maybe 1/2 wide at this point, with a significant amount of un-resined fiber inside. Presumably this void has been full of water for 20 or 30 or 40 years.
Image

Anybody encountered this? Any suggestions? I am thinking about a second garboard drain, or an inside drain from the ballast to the bilge, or simply filling the void with something - epoxy? concrete?

Thanks a million!
Last edited by sal's dad on Thu Apr 10, 2008 9:22 pm, edited 1 time in total.
jhenson
Candidate for Boat-Obsession Medal
Posts: 393
Joined: Mon Jan 17, 2005 9:59 am
Location: Marshall, Virginia

Post by jhenson »

I’m not that qualified to judge the best method of repair here, but you might consider two-part foam for this problem. You might be able to pour it into the void with a section of narrow PVC pipe, conduit, or similar tubing. The foam should expand to fill the entire void and then exit the existing hole. Once cured, you can then shape the foam to provide a mold for laying up material for the repair. Some form of relief hole may be necessary to allow the excess foam to escape, say on the other side of the keel. A little of this stuff goes a long way.

Joe
sal's dad
Deck Grunge Scrubber
Posts: 26
Joined: Fri Aug 03, 2007 8:19 am

Post by sal's dad »

A bit of googling brings up :

Good Old Boat article on the Ensign - one piece of advice is to drill a small drain every fall, and fill it before launch! (just don't forget!)
http://www.fios.org/roseman/pyc/ensign/ ... ission.pdf

http://www.pearsonariel.org/discussion/ ... 604&page=3
bcooke
Master of the Arcane
Posts: 2272
Joined: Sat Oct 04, 2003 10:55 pm
Boat Name: Jenny
Boat Type: 1966 Pearson Triton
Location: Rowley, MA
Contact:

Post by bcooke »

They make re-usable drain fittings too.

Image

This one is from the Hamilton Marine online catalogue.

-Britton
-Britton
Work is overrated.

Most everything you read on the Internet is wrong.

The Website
The Blog
User avatar
Rachel
Master of the Arcane
Posts: 3044
Joined: Tue Dec 07, 2004 7:59 pm

Post by Rachel »

Speaking of garboard drains, I had an interesting experience with one of the Buck Algonquin drains we're fond of* when a co-worker was installing one the other day.

I happened to be walking by just as he was tightening the fasteners, and he said "Hey, take a look at this - there's a drop of "goodge" there where I'm pretty sure there wasn't one a moment ago." He wiped it off and although no more appeared we decided better safe than sorry and he removed it before the 5200 set up.

After he cleaned it up, sure enough, there was a tiny hole that you could see on the "back" side (that goes up against the boat) just where the bulge of the keyway groove, the threaded part, and the back of the flange meet. It looked like a flaw (pit) that came about when it was being cast, not a crack or other problem. It probably would not have sunk the boat, since it was a little ways "in" from the outside, but still certainly undesirable! We sent it back for a replacement.

I have another one of these sitting around waiting for me to drill a hole in my own boat, so I'll have to take a close look at it in that area, although my guess is that it was a fluke on just that one, and it's still my favorite garboard drain (I guess it's weird to have a favorite garboard drain, isn't it...)

Rachel

*(Not the one Britton posted a photo of, but a different one also available at Hamilton Marine that is ALL bronze. Many of the "bronze" ones these days, if you read the fine print, have a brass plug. Ugh.) Here's the one I'm talking about:

Image

http://store.hamiltonmarine.com/browse.cfm/4,2236.html

Note that they also sell spare plugs for this model.
Ancient Race
Almost a Finish Carpenter
Posts: 94
Joined: Wed Aug 30, 2006 9:41 pm
Location: Cleveland

Post by Ancient Race »

Rachel wrote:Speaking of garboard drains, I had an interesting experience with one of the Buck Algonquin drains we're fond of* when a co-worker was installing one the other day.
Ha! Made me look, Rachel.

I have a Perko 124 bronze, also with a brass plug. I was going to install it in the Seafarer next week. So when I read your cautionary tale I was, well, cautioned.

But I see mine isn't it. And in any case fresh water is for bathing.

Greg
Tartan 27 #77
Seafarer Meridian 26
Jet 14 #952
User avatar
Rachel
Master of the Arcane
Posts: 3044
Joined: Tue Dec 07, 2004 7:59 pm

Post by Rachel »

Looking back at my post, I might not have been clear about one thing: What I was trying to say is that the Buck Algonquin drain plug that I referred to (the one that is shown in my last post with it's own "wrench" IS all bronze - both the flange and the plug. Many others that say they are bronze have a bronze flange but a brass plug, and I prefer all bronze.

Just check for the aforementioned flaw to make sure that was an isolated incident (I'll re-post after I've looked at mine, and I'll also check the new one we get to replace the flawed one).
User avatar
Rachel
Master of the Arcane
Posts: 3044
Joined: Tue Dec 07, 2004 7:59 pm

Post by Rachel »

An update on the Buck Algonquin bronze garboard drain:

We received a replacement drain today and there is no sign of a flaw where the previous one had a flaw and a small hole, so it looks as though it was probably a one time bubble or impurity that caused a casting problem.

Rachel
sal's dad
Deck Grunge Scrubber
Posts: 26
Joined: Fri Aug 03, 2007 8:19 am

Post by sal's dad »

So I drained the keel "void" as best I could, (drilling a number of 1/4 inch drains along the bottom, and blowing into the void with a hairdrier for a few hours) though the glass fibers are still damp. Then tilted the boat forward, and filled the lower couple inches of the void with epoxy.

Image
Upper left are the head thru-hulls, far right is the new drain, and the blue line a couple inches up is the approximate level of the epoxy.


Image
Closer view of the damaged area, and the drain.


Image
New drain, note cured epoxy, and hole (approx 3/8) thru the lead to the other side of the void. This allowed epoxy to flow thru (pretty sure about that!) and will allow water to drain. The lead ballast is a bit off-center, more than 1/2" from the hull to port, less than 1/4" to starboard. Which would explain why the damage was almost entirely to port.

I have tilted the boat up at the bow, so I can now fill the aft portion of the cavity so it flows to the drain.

A couple questions:

Fiberglass integrity seems good, and all those little holes I drilled have a small drip "nipple" of hard epoxy protruding. The shoe is now about 2" of solid epoxy, bonded to the lead, inside the original glass. Can I just sand the nipples off. skim with epoxy and paint? Or do I need to glass over? I would rather glass only the sides of the keel, not wrap around.

Patching with glass-epoxy: In critical areas, I have ground down to the underlying fiber. Do I need to uniformly grind off the gelcoat? or can I epoxy right over it? For example, in the next picture:

Image
The lower hole, I counter-sunk a bit for the drain flange, put on a light coating of epoxy, and now will bed with 5200 or 4200, then epoxy on a bit of fairing around the protruding flange.

But the upper hole I will patch - fill the hole roughly, grind smooth, then patch with glass. But can I just glass over the gelcoat? or grind at least part of it down to fiber? (I think I know the answer )-:

Thanks!
sal's dad
Deck Grunge Scrubber
Posts: 26
Joined: Fri Aug 03, 2007 8:19 am

Post by sal's dad »

very cool - the original poster can change the thread title, by editing the first post!
User avatar
Tim
Shipwright Extraordinaire
Posts: 5708
Joined: Tue Apr 01, 2003 6:39 pm
Boat Name: Glissando
Boat Type: Pearson Triton
Location: Whitefield, ME
Contact:

Post by Tim »

When patching, you're better off to grind away the gelcoat and adhere your new laminate directly to the old.

In addition, grind yourself a shallow (roughly equivalent to the thickness of the new material you plan to add) divot and taper around the area to be patched so that your new material ends up essentially flush with, not proud of, the surface.
---------------------------------------------------
Forum Founder--No Longer Participating
sal's dad
Deck Grunge Scrubber
Posts: 26
Joined: Fri Aug 03, 2007 8:19 am

Post by sal's dad »

Yup, I figured...

In the damaged area, the glass was surprisingly thin, so the patch will be a bit higher. Also, I have to build up maybe 1/4" to fair the keel drain; again glass is too thin to countersink it there.

And what do you think of leaving the 1/4" holes simply plugged with epoxy, no glass over?
Hirilondë
Master of the Arcane
Posts: 1317
Joined: Thu Dec 28, 2006 8:50 am
Boat Name: Hirilondë
Boat Type: 1967 Pearson Renegade
Location: Charlestown, RI

Post by Hirilondë »

sal's dad wrote:Also, I have to build up maybe 1/4" to fair the keel drain; again glass is too thin to countersink it there.
You don't have to, not that you can't or shouldn't.
Dave Finnegan
builder of Spindrift 9N #521 'Wingë'
--------------------------------------------------------------------------------------------------------------------------------------------------------------------
Gresham’s Law of information: Bad information drives out good. No matter how long ago a correction for a particular error may have appeared in print or online, it never seems to catch up with the ever-widening distribution of the error.
User avatar
Tim
Shipwright Extraordinaire
Posts: 5708
Joined: Tue Apr 01, 2003 6:39 pm
Boat Name: Glissando
Boat Type: Pearson Triton
Location: Whitefield, ME
Contact:

Post by Tim »

You don't need to countersink the drain flange (you can, if you choose). Frankly, I think it's a waste of time and materials on the typical non-racing boat that has plenty of other irregularities in the bottom. That slight protrusion makes an insignificant difference to your boat's performance, so unless you have your own reasons for wanting to do so, be assured that it's not a requirement.
---------------------------------------------------
Forum Founder--No Longer Participating
Post Reply