After visiting the Maine Boat Builders show, my wife is convinced we need a composting toilet. She's generally indifferent to most of the decisions we make on boat stuff so while I'm not completely convinced, I'm willing to give it a try.
The only thing that's unclear is what to do with the two through-hulls, which are right behind where the toilet will go. Wife says get rid of them, we'll never use them. I like the idea of filling them in and not worrying about them. However, what if..what if this composting toilet business is not all cake and ice cream. If I want to go to a conventional holding tank and toilet again, I'll need those holes, and the location is about the best where they are. If I glass over the holes, then drill them out again next season, it would seem that there is some strength lost due to the non-continuous glass fibers? If I redrill, it would be in the exact same spot since I've got some thick backing plates on the inside and the hole will remain in them.
On the other hand, I haven't really found a good way to cap the holes. I can't use the seacock due to space restrictions. The only thing I can see is cutting the inside through-hull down short and put some sort of cap on it after the nut. Then there's the issue of threads NPT & NPS. Can this be done safely? This doesn't seem like a great option either.
The best suggestions will receive one gallon of nice sweet smelling compost at the end of the season. Provided my boat does not sink.
-Jeff
Capping unused through-hulls?
-
preserved_killick

- Skilled Systems Installer
- Posts: 220
- Joined: Wed Oct 24, 2007 8:01 am
- Boat Name: Seagrass
- Boat Type: Alberg 30
- Location: NH
- Contact:
-
Quetzalsailor
- Master of the Arcane
- Posts: 1100
- Joined: Fri Aug 26, 2005 9:53 am
- Boat Name: Quetzal
- Boat Type: LeComte North East 38
- Location: Philadelphia, PA
A friend is quite satisfied with his composting head in a 43 footer. To my taste, it was not nearly so pretty, nor compact. I did not like having to deal with, both at 'production' and at 'distribution', the separate wastes. Walking through the saloon with a container of liquid to be deposited overboard did not fit my image of a fine yacht that his boat surely is!
If you are hesitating about permanently removing perfectly sound throughhulls and seacocks, you can cap either the throughhull or the seacock with bronze or maralon plumbing fittings. When I replaced, relocated, etc., all my throughhulls and seacocks, I installed a spare intended for a washdown; it's capped, ready for the two boat dollars and the hours work that the pump will require.
If you are hesitating about permanently removing perfectly sound throughhulls and seacocks, you can cap either the throughhull or the seacock with bronze or maralon plumbing fittings. When I replaced, relocated, etc., all my throughhulls and seacocks, I installed a spare intended for a washdown; it's capped, ready for the two boat dollars and the hours work that the pump will require.

I looked into doing this before I replaced my seacocks (that is, I wanted to remove the gate valves and then just cap off the through hulls). There was a thread that included my query but I couldn't turn it up in a search just now and I've got to head out soon.
The upshot is that I was never able to find any sort of NPS cap, and I wasn't comfortable just threading on NPT caps, with no valve as a fail-safe, should they start to leak. So I bit the bullet and replaced the seacocks I wanted to keep, and filled the others (biaxmat and resin, not just filler).
That said, I had a through-hull fail on a boat at sea once - it just came off in my hand to reveal bright blue ocean when we were 150 miles from shore. We put in a wooden bung (fiberglass boat) with a hammer, let it swell, and then carried on for a couple of months and a few thousand miles (not all offshore) until we could haul out to repair it. We had to work to get it out after all that.
One thing to consider is that -- at least on my A-30 -- the head intake seacock was situated such that the operating lever protruded into the companionway (hallway), and it was also downstream and "beneath" the discharge seacock. The intake plumbing run was awkward. So I filled them both in, then re-drilled the intake seacock hole very near to where the discharge one was (might have re-used old hole where it was but it was too large; since I went to the trouble of filling it I put it closer to the bulkhead for less interference with things).
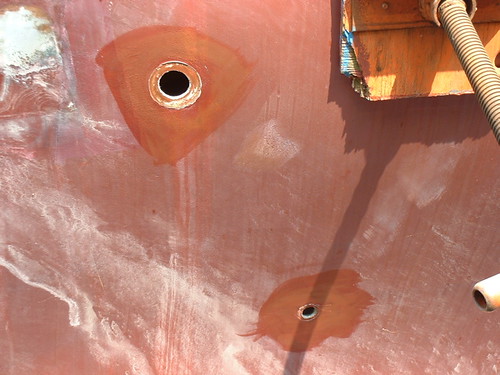
This photo shows the locations of the original openings with the old backing plates taped over (can't remember why; maybe to keep critters out temporarily?) The one on the upper right is the discharge, and the intake is lower left -- the blue spot beneath the hole in the platform.

The same holes on the outside of the hull, showing the relationship between discharge (higher and forward) and intake (lower and aft).
Since my boat was set up with a holding tank, and was going to be a Chesapeake boat for the forseeable future, I didn't put in a new discharge seacock, reasoning that it would not be that big a deal to haul and put one in at such time as I wanted to head off somewhere else. I would have put it downstream of the intake, at the aft end of the head compartment.
This did result in the head intake being slightly higher (i.e. closer to the waterline) than it was originally, but it's still a good bit beneath the waterline. Now it's more like where the Triton intake is on the stock boats I've seen (and a future discharge would also be located similar to the Triton's).
Here's new intake seacock going in just a bit forward of where the old discharge seacock was (ignore the backwards through hull; that was just there temporarily for locating purposes during the installation). The silver pipe is the outboard end of the head pump handle that you can see in the first photo -- it slides back out of the way when not being used.

Rachel
The upshot is that I was never able to find any sort of NPS cap, and I wasn't comfortable just threading on NPT caps, with no valve as a fail-safe, should they start to leak. So I bit the bullet and replaced the seacocks I wanted to keep, and filled the others (biaxmat and resin, not just filler).
That said, I had a through-hull fail on a boat at sea once - it just came off in my hand to reveal bright blue ocean when we were 150 miles from shore. We put in a wooden bung (fiberglass boat) with a hammer, let it swell, and then carried on for a couple of months and a few thousand miles (not all offshore) until we could haul out to repair it. We had to work to get it out after all that.
One thing to consider is that -- at least on my A-30 -- the head intake seacock was situated such that the operating lever protruded into the companionway (hallway), and it was also downstream and "beneath" the discharge seacock. The intake plumbing run was awkward. So I filled them both in, then re-drilled the intake seacock hole very near to where the discharge one was (might have re-used old hole where it was but it was too large; since I went to the trouble of filling it I put it closer to the bulkhead for less interference with things).
This photo shows the locations of the original openings with the old backing plates taped over (can't remember why; maybe to keep critters out temporarily?) The one on the upper right is the discharge, and the intake is lower left -- the blue spot beneath the hole in the platform.
The same holes on the outside of the hull, showing the relationship between discharge (higher and forward) and intake (lower and aft).
Since my boat was set up with a holding tank, and was going to be a Chesapeake boat for the forseeable future, I didn't put in a new discharge seacock, reasoning that it would not be that big a deal to haul and put one in at such time as I wanted to head off somewhere else. I would have put it downstream of the intake, at the aft end of the head compartment.
This did result in the head intake being slightly higher (i.e. closer to the waterline) than it was originally, but it's still a good bit beneath the waterline. Now it's more like where the Triton intake is on the stock boats I've seen (and a future discharge would also be located similar to the Triton's).
Here's new intake seacock going in just a bit forward of where the old discharge seacock was (ignore the backwards through hull; that was just there temporarily for locating purposes during the installation). The silver pipe is the outboard end of the head pump handle that you can see in the first photo -- it slides back out of the way when not being used.
Rachel
-
Tim

- Shipwright Extraordinaire
- Posts: 5708
- Joined: Tue Apr 01, 2003 6:39 pm
- Boat Name: Glissando
- Boat Type: Pearson Triton
- Location: Whitefield, ME
- Contact:
Re: Capping unused through-hulls?
This is not something you need worry about. The beauty of fiberglass is that you can patch and repair and fill and glass to your heart's content, and as long as you follow sound installation practices you will end up with no reduction in the strength of the overall structure.preserved_killick wrote:If I glass over the holes, then drill them out again next season, it would seem that there is some strength lost due to the non-continuous glass fibers?
In fact, given the technology and product advancements in the past 40 years, your repair is likely to be stronger than the surrounding laminate, frankly, and there is absolutely nothing to fear in drilling new holes through the repair, should it come to that.
In your situation, I'd remove the old through-hulls and seacocks and then fill and glass over the holes in the usual and accepted manner, which is well-documented through links from this site and others. Should the day arise when you may wish to install through hulls in the same locations again, then just do so. There are no concerns about strength.
---------------------------------------------------
Forum Founder--No Longer Participating
Forum Founder--No Longer Participating
You can actually see where the previous hole was in that last photo of mine; it's the white bit just barely poking out to the left of the new backing plate.
Not that you need me to back up what Tim said, but it did seem quite strong and sturdy when I drilled the new hole (which went in through part of the patch of the old hole). Not that my feelings are proof, but it sure did not seem weak.
And cutting through my blathering in my previous post, I agree that if it were me I would remove the through hulls and fill them in properly. Unless they've already been replaced, they're nothing to write home about anyway. Why not go into the new head with a clean install, and then haul and reinstall new seacocks if/when the time comes.
Rachel
PS: There are numerous threads here showing exactly how to fill in the old holes; I really am on my way out the door now (to go sailing :), and am not having any luck with quick searching but I remember one of them was started by Peter and had to do with filling in an old (large) instrument through hull. I think that one went on for a few pages and had lots of photos.
-
preserved_killick
- Skilled Systems Installer
- Posts: 220
- Joined: Wed Oct 24, 2007 8:01 am
- Boat Name: Seagrass
- Boat Type: Alberg 30
- Location: NH
- Contact:
-
JonnyBoats
- Candidate for Boat-Obsession Medal
- Posts: 372
- Joined: Fri Feb 04, 2005 4:54 pm
- Location: Wiscasset, ME
- Contact:
-
preserved_killick
- Skilled Systems Installer
- Posts: 220
- Joined: Wed Oct 24, 2007 8:01 am
- Boat Name: Seagrass
- Boat Type: Alberg 30
- Location: NH
- Contact:
We saw the Airhead at the show: http://www.airheadtoilet.com/ and have since found another manufacturer: http://www.natureshead.net/.
Which one we go with is still undecided. Both are pricey for what they are ($950 and $850). I'm thinking I should build my own since it is just a bucket with a urine separator and a mixing rod. We'll see. Something pre-made and ready to go sounds good too.
-jeff
Which one we go with is still undecided. Both are pricey for what they are ($950 and $850). I'm thinking I should build my own since it is just a bucket with a urine separator and a mixing rod. We'll see. Something pre-made and ready to go sounds good too.
-jeff
-
Maine Sail
- Skilled Systems Installer
- Posts: 243
- Joined: Fri Feb 24, 2006 10:47 am
- Location: Casco Bay
- Contact:
For the first year
For at least the first season, untl you know you like the composter, I'd leave the seacocks in place and use NPT plugs in the inboard end of the valve. This way the valve can remain closed and even if open the plug will stop flow.
I know of a few guys who have made the conversion then gone back..
I know of a few guys who have made the conversion then gone back..
-
preserved_killick
- Skilled Systems Installer
- Posts: 220
- Joined: Wed Oct 24, 2007 8:01 am
- Boat Name: Seagrass
- Boat Type: Alberg 30
- Location: NH
- Contact:
I don't know whether you still have the original Alberg brass gate valves, but if you do, then you could take some comfort from the fact that they're not quite up to the task like new bronze or Marelon seacocks would be (should you have to go back and install them later).
Actually, while we're on the topic, have you checked (or replaced) the original .... erm... "through hulls" that were on the engine intake and the saltwater sink intake? They were "homemade" 1/2" ID pipe that was pushed out through the hull, had a washer put over the end on the outside, and then the pipe peened over. :Shudder:
Not to make more work for you....
Rachel
-
preserved_killick
- Skilled Systems Installer
- Posts: 220
- Joined: Wed Oct 24, 2007 8:01 am
- Boat Name: Seagrass
- Boat Type: Alberg 30
- Location: NH
- Contact:
Thanks Rachel,
The seacocks are all new and look good. The only valve I'm not crazy about is a Vetus Water Scoop (engine intake) and Vetus Ball Valve.
http://viewer.zmags.com/showmag.php?mid=wwqshw#/page84/
Not ideal but will probably stay like that for another season.
-jeff
The seacocks are all new and look good. The only valve I'm not crazy about is a Vetus Water Scoop (engine intake) and Vetus Ball Valve.
http://viewer.zmags.com/showmag.php?mid=wwqshw#/page84/
Not ideal but will probably stay like that for another season.
-jeff
-
JonnyBoats
- Candidate for Boat-Obsession Medal
- Posts: 372
- Joined: Fri Feb 04, 2005 4:54 pm
- Location: Wiscasset, ME
- Contact:
(referring to composting heads)I know of a few guys who have made the conversion then gone back..
I am considering getting one of these heads as I do not like the idea of a big holding tank. It's a lot of money, and I would like to know as much as possible before committing. Can you tell us any more about why they went back?
Thanks.