All About Marine Crimping

This is the place to post your ideas, thoughts, questions and comments as relates to general boatbuilding and reconstruction techniques and procedures (i.e. recoring, epoxy, fiberglass, wood, etc.)
Post Reply
Maine Sail
Skilled Systems Installer
Posts: 243
Joined: Fri Feb 24, 2006 10:47 am
Location: Casco Bay
Contact:

All About Marine Crimping

Post by Maine Sail »

Hi All,

Yesterday was a slow one so I got out the camera, marine wire, terminals and crimper's and wrote a new photo based "how to" on marine crimping.

It came to my attention, after looking at nearly 50 boats before buying our current CS-36, that most DIYer's and or boat yards, do not know how to make a proper crimp. After seeing so many bad crimps and solder joints on boats we looked at I decided to take the time to write the following piece. As usual I loaded it with plenty of photos..

The article is not yet 100% complete and I'm sure I will continue tweaking it so fee free to let me know what you think I forgot or need to add..


http://www.pbase.com/mainecruising/wire_termination

Image
-Maine Sail

Canadian Sailcraft 36T
Casco Bay, ME
http://www.marinehowto.com
User avatar
Peter
Boat Obsession Medal Finalist
Posts: 580
Joined: Mon Nov 15, 2004 11:23 pm
Boat Name: Pagan
Boat Type: Albin Ballad 30
Location: Pedder Bay (Victoria), BC, Canada
Contact:

Post by Peter »

Acoustic: Great article, thanks!
I'm bookmarking it for use during my future, much needed, re-wiring job. The old adage that a worker is only as good as their tools is so true!
Peter
==================
Victoria BC Canada
Albin Ballad 30

http://www.mostlyaboutboats.ca
MikeD
Candidate for Boat-Obsession Medal
Posts: 375
Joined: Wed Aug 24, 2005 1:42 pm
Boat Name: Totoro
Boat Type: Sea Sprite 23 (#626)
Location: Scarborough, Maine

Post by MikeD »

I'll second that!
Mike
Totoro (SS23 #626)
JMS
Bottom Paint Application Technician
Posts: 13
Joined: Wed Mar 21, 2007 10:22 am
Location: Long Beach, CA

Post by JMS »

Another great article. Thanx, acoustic.
Perfection is achieved, not when there is nothing more to add, but when there is nothing left to take away. Antoine de Saint-Exupery (1900-1944)

1976 Cal 2-27 No. 203
User avatar
Rachel
Master of the Arcane
Posts: 3044
Joined: Tue Dec 07, 2004 7:59 pm

Post by Rachel »

Thanks very much for the article -- the photos sure do make it easy to learn.

I have one question for you: I see that the heat-shrink connectors look really great, so I have nothing against using them. But I'm curious to know what you think of regular (good quality) connectors and then heat-shrink tubing (just because you don't mention that).

I haven't gotten into much wiring (yet), but I'm thinking that there must be times that you can't or don't use the heat-shrink connectors.

Thanks again,
Rachel
Maine Sail
Skilled Systems Installer
Posts: 243
Joined: Fri Feb 24, 2006 10:47 am
Location: Casco Bay
Contact:

Rachel

Post by Maine Sail »

Rachel,

The problem with using heat shrink tubing, over an already insulated terminal, is that in most instances it will not be able to simultaneously fit over the insulation and then be able to shrink enough to fit over the wire tight enough to make a seal. In order to use adhesive lined heat shrink tubing effectively you need to use NON-INSULATED crimp terminals, and a crimper designed for NON-INSULATED terminals. This way the heat shrink tubing will shrink to fit all items snugly.

The one problem I have with using the adhesive lined heat shrink tubing vs. using a heat shrink connector is that the heat shrink tubing, currently available, is far thinner than the thickness of the heat shrink used on the factory made heat shrink terminals.

I have lots of both styles of terminals in both insulated and heat shrink but I have only used the heat shrink connectors for about the last three years exclusively. They are well worth the expense!

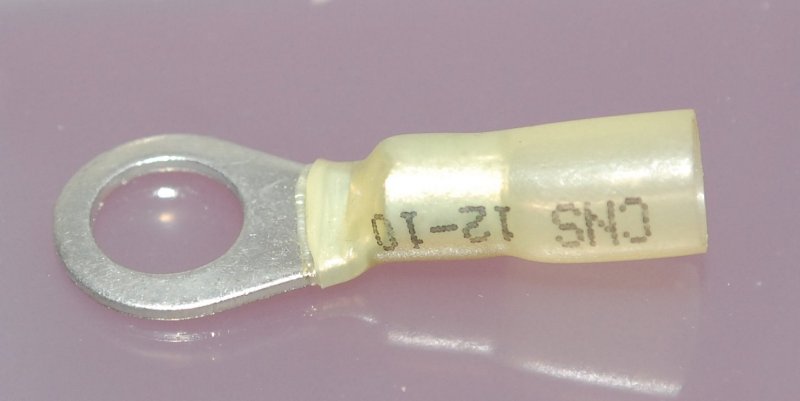
Take a close look at the seal, on the ring end, of this factory made crimp. You could waste a lot of expensive adhesive lined heat shrink tubbing trying to duplicate that type of seal!

In my experience it saves you very little money in the long run trying to come up with a cheaper alternative to a time tested and proven method..


Image
-Maine Sail

Canadian Sailcraft 36T
Casco Bay, ME
http://www.marinehowto.com
Hirilondë
Master of the Arcane
Posts: 1317
Joined: Thu Dec 28, 2006 8:50 am
Boat Name: Hirilondë
Boat Type: 1967 Pearson Renegade
Location: Charlestown, RI

Post by Hirilondë »

All electrical work at the boatyard here is done with the heat shrink terminals, butt connectors, blade or bullet connectors etc that acoustic is advocating. Nice article acoustic, contains some valuable info.
Dave Finnegan
builder of Spindrift 9N #521 'Wingë'
--------------------------------------------------------------------------------------------------------------------------------------------------------------------
Gresham’s Law of information: Bad information drives out good. No matter how long ago a correction for a particular error may have appeared in print or online, it never seems to catch up with the ever-widening distribution of the error.
User avatar
Rachel
Master of the Arcane
Posts: 3044
Joined: Tue Dec 07, 2004 7:59 pm

Post by Rachel »

Thanks, Acoustic.

By the way, I wasn't asking about the use of adhesive-lined shrink tubing as an economic measure; I was simply curious what you thought of it as compared to heat-shrink connectors. Except for certain cases, I'm always about buying the best-quality materials for the job (just ask my bank account!).

Thanks for the clarification and the photo. You too, Hirilondë.

Rachel
fusto
Master Varnisher
Posts: 109
Joined: Sun Aug 13, 2006 9:49 pm
Boat Name: Erebus
Boat Type: Apollo 16
Location: Adams, MA

Post by fusto »

Just as a side note:

This is the only crimper currently recommended by ABYC.

Image

Somewhat important for those in the industry, maybe not so much for the hobbyist.
Its an Ancor product, but not cheap. They list for about $200+, but I got mine for about $150.
It makes a double crimp like Ancor's other double crimp tools. One crimp crimps the terminal to the wire, and the second crimp is on the remainder of the terminal to act as a strain relief.
Its basically the single crimp ratchet tool with another set of dies for the strain relief crimp.
It also has the ratcheting mechanism that wont release until you've completely crimped the terminal. You cant "half" crimp it.

Because here at the boatyard we need to be ABYC compliant in all our installs each one of my electricians was issued one. For heat shrink terminals we use the single crimp ratchet tool.

It takes a little getting used to, but its really a nice crimper. I've been using mine heavily for about 4 years now, and so far not a single issue. Crimps are still as good as day one.
Zachary
Adams, MA
User avatar
Rachel
Master of the Arcane
Posts: 3044
Joined: Tue Dec 07, 2004 7:59 pm

Post by Rachel »

Fusto,

Just curious: Do you tend to use the heat-shrink terminals most of the time? Or some other combination that works with the ABYC-approved double crimper you show?

Rachel
Maine Sail
Skilled Systems Installer
Posts: 243
Joined: Fri Feb 24, 2006 10:47 am
Location: Casco Bay
Contact:

That's

Post by Maine Sail »

That's the same tool I use but for the article I used less expensive crimpers because, as you know, most sailors are quite cheap and recommending a $300.00 list price crimper was not going to fly.

I just scanned my copy of E-11 and find no wording stating that the crimper you & I use is the only approved crimper? I also spoke with Dan Eddy, the Product Manager for Ancor products before writing my article and he stated that both the "double crimp tool" and the "single crimp tool" I showed meet ABYC requirements but that the tool we use is just a higher quality and longer lasting unit.

If you could direct me to where you found that information I'd really appreciate it..
-Maine Sail

Canadian Sailcraft 36T
Casco Bay, ME
http://www.marinehowto.com
Maine Sail
Skilled Systems Installer
Posts: 243
Joined: Fri Feb 24, 2006 10:47 am
Location: Casco Bay
Contact:

Post by Maine Sail »

Rachel wrote:Fusto,

Just curious: Do you tend to use the heat-shrink terminals most of the time? Or some other combination that works with the ABYC-approved double crimper you show?

Rachel
Rachel,

I use heat shrink terminal exclusively unless I'm wiring bullet plugs for a stereo or a device mounted in a very dry area then I will sometimes use regular insulated connectors (because I have a ton of them) with my double crimp tool.

The double crimp tool, can be used on heat shrink but it tends to damage the heat shrink and leave "foggy spots", after it has been heat shrunk, where the dies clamped down. The single crimp tool leaves a much nicer heat shrink..
-Maine Sail

Canadian Sailcraft 36T
Casco Bay, ME
http://www.marinehowto.com
Maine Sail
Skilled Systems Installer
Posts: 243
Joined: Fri Feb 24, 2006 10:47 am
Location: Casco Bay
Contact:

Some tid bits from ABYC

Post by Maine Sail »

11.16.3. WIRING TERMINALS

1.16.3.3. Each conductor-splice joining
conductor to conductor, conductor to connectors, and
conductor to terminals must be able to withstand a
tensile force equal to at least the value shown in Table
XVI for the smallest conductor size used in the splice
for a one minute duration, and not break.


11.16.3.8. Solderless crimp on connectors shall
be attached with the type of crimping tools designed
for the connector used, and that will produce a
connection meeting the requirements of E-11.16.3.3.


TABLE XVI – TENSILE TEST VALUES FOR CONNECTIONS states that for a 10ga wire to meet the above "crimp requirement" it must hold a tensile strength of at least 40lbs. !

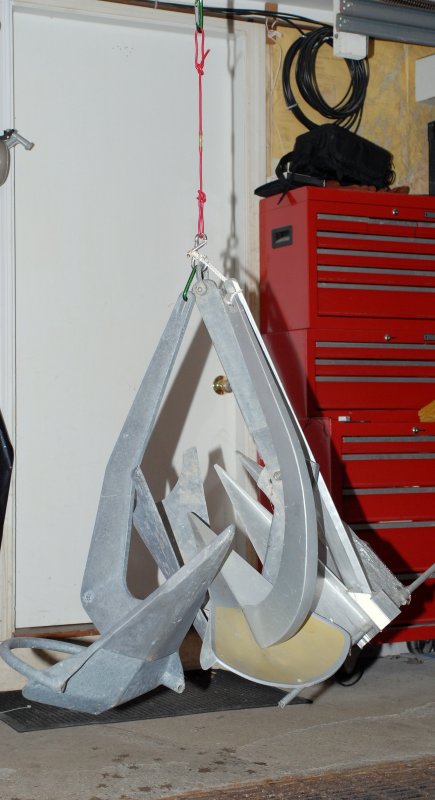
The crimp in this photo is holding close to 95lbs. and it hung there for over an hour...!!!! The ratcheting single crimper's in the article are of the proper type for the connector, heat shrink, and they blew away the ABYC standard for an approved crimp on a 10ga strand by more than double and it held this load at double the ABYC requirement for 60 times longer than they require!

Image
-Maine Sail

Canadian Sailcraft 36T
Casco Bay, ME
http://www.marinehowto.com
JetStream
Skilled Systems Installer
Posts: 169
Joined: Sat Apr 26, 2003 8:53 pm
Boat Name: Sojourn
Boat Type: Pearson 27
Location: Jamestown, RI

Post by JetStream »

Very nicely done. Thanks for sharing.
Bruce
fusto
Master Varnisher
Posts: 109
Joined: Sun Aug 13, 2006 9:49 pm
Boat Name: Erebus
Boat Type: Apollo 16
Location: Adams, MA

Re: That's

Post by fusto »

acoustic wrote:I just scanned my copy of E-11 and find no wording stating that the crimper you & I use is the only approved crimper?
In typical ABYC fashion the crimper is not "approved" its "recommended".

I dont believe the actual crimper is specified anywhere in the ABYC manual, as I don't think they can legally endorse any specific brand product.

I think that specific crimper is ABYC "recommended" because its the only one that meets the ABYC specifications for the resulting crimp.

Ancor just seems to have cornered the market.

I have the cheaper single crimp model as well, and it works just fine.
The spendy one is a nice tool though.
Again, maybe not for the hobbyist.
Last edited by fusto on Wed Feb 27, 2008 10:26 pm, edited 1 time in total.
Zachary
Adams, MA
fusto
Master Varnisher
Posts: 109
Joined: Sun Aug 13, 2006 9:49 pm
Boat Name: Erebus
Boat Type: Apollo 16
Location: Adams, MA

Post by fusto »

Rachel wrote:Just curious: Do you tend to use the heat-shrink terminals most of the time? Or some other combination that works with the ABYC-approved double crimper you show?
It really depends on the specific situation.
If Im wiring 50 connectors on a main panel in the salon on a big powerboat, I'm not using heat shrink.
If Im up the top of a mast wiring in a new nav light, heat shrink is the only way to go.
Its usually a judgement call as I reach into my bag for the terminal.
If there is any chance of moisture getting into the terminal (I know, I know, boats are always wet, but some more than others) then I go heat shrink.
In practice I probably go 70/30 heatshrink to non-heatshrink.

As far as the double crimper on heat shrink when I've been out in the field or on a sea trial and had to use a heat shrink terminal but only had my double crimper, its always worked fine.
You're not supposed to because you could potentially damage the heat shrink, but in actual practice, if its a high quality terminal (we only stock Ancor terminals) you'll never have an issue using your double crimper on a heat shrink terminal.
At least thats been my experience.
Of course your mileage may vary.
Zachary
Adams, MA
feetup
Almost a Finish Carpenter
Posts: 99
Joined: Tue Jan 16, 2007 11:35 am
Location: Ladysmith, Vancouver Island

Post by feetup »

One thing that seems to be ignored with regard to terminals is the use of a good dielectric grease. The trucking industry has been using this for some time now to deal with the enormous amounts of salt, calcium chloride and liquid de-icer that gets sprayed up onto the lighting and antilock braking wiring under a truck or trailer. I would consider the severity of service on over the road trucks and trailers to be as bad or worse than marine applications in the sloopy northwest and around the Great Lakes. Whenever there is no protection on wiring you will find the same green powder trying to conduct electricity as on a poorly maintained boat, but with a thoughtfull application of dielectric grease the untinned wire used on trucks and the crimp terminals remain bright.
You cannot protect a terminal from moisture with even shrink and seal terminals nor from a certain amount of wicking unless the shrink remains totally uncompromised. By smearing a bit of dielectric grease in the wire before crimping and on the terminal and connection after you effectively seal the connection from the elements including oxygen and salt.
There are a number of places to obtain the product but I use a product called NYK by "Trucklite" which is available at any good truck dealer in small tubes or larger caulking gun size tubes. I think you would find that it would protect even a poorly made crimp. It remains a clear amber grease the consistancy of petrolium jelly for years after application and completely eliminates oxydation wherever the film is complete. I wouldn't think of even inserting a light bulb without a light smear. It's kind of like a New York bagel, always "mit a schmear"

Feetup.
bcooke
Master of the Arcane
Posts: 2272
Joined: Sat Oct 04, 2003 10:55 pm
Boat Name: Jenny
Boat Type: 1966 Pearson Triton
Location: Rowley, MA
Contact:

Post by bcooke »

It remains a clear amber grease the consistancy of petrolium jelly for years after application
I have actually used Petroleum Jelly like you would a dielectric 'grease' with decent results.

-Britton
-Britton
Work is overrated.

Most everything you read on the Internet is wrong.

The Website
The Blog
Tony
Skilled Systems Installer
Posts: 223
Joined: Wed Apr 09, 2003 8:14 pm
Boat Name: S/V Bonnie Blue
Boat Type: Catalina 22
Location: Portland, Oregon
Contact:

Post by Tony »

I know this is an old thread, but I recently purchased a no-name ratcheting double-crimper for insulated terminals at a discount tool store for 26.99 that seems to do a great job, so if you're looking for something that's not 300 dollars they're out there. I just wish I had it a week ago, when I was doing the majority of the connections in my new 12V system :-(
Tony
Steve'O
Bottom Paint Application Technician
Posts: 24
Joined: Mon Apr 21, 2008 3:59 pm
Location: NY/NJ

Post by Steve'O »

Come on spill the beans. Where did you get it? harbor freight?
Steve
"Good Hope"
Tripp/Lentsch 29
Tony
Skilled Systems Installer
Posts: 223
Joined: Wed Apr 09, 2003 8:14 pm
Boat Name: S/V Bonnie Blue
Boat Type: Catalina 22
Location: Portland, Oregon
Contact:

Post by Tony »

I got it a place called Lucille's Tools in Hillsboro, OR. Think about one of those travelling tool-trucks (not the Mack guys, the generic semi-trailer kind) that stops randomly for a week...and put it in a small storefront. I'm at work and don't remember the brand, but it wasn't anything special. The dies are a little sharp, I'll probably file the edges just a bit to round them over on the outside. Other than that I'm happy with it.
Tony
Maine Sail
Skilled Systems Installer
Posts: 243
Joined: Fri Feb 24, 2006 10:47 am
Location: Casco Bay
Contact:

Regarding Cheap Crimpers.

Post by Maine Sail »

Hi Guys,

I have done a comparison of the Harbor Freight Crimper to the Ancor and there IS a difference...

Over the years I have purchased a number of tools from Harbor Freight and it is more MISS than HIT.. The Ryobi stuff is a great value and surprisingly reliable. Here is an example of just ONE tool from Harbor Freight where there is certainly a difference.

I ordered the Harbor Freight Tools double ratcheting crimper and compared it's construction, specifically the crimp dies, which are the important part, to the Ancor Double Crimp Ratchet Crimper.

It was stated by some on other forums that the HFT crimper was identical to the Ancor model. I wanted to see for myself but I'll let you decide..

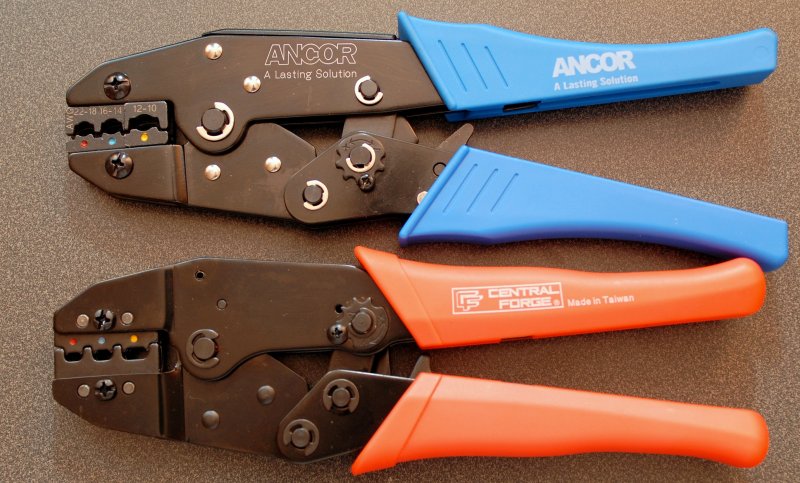
Ancor and HFT Crimpers:
Note the non-removable dies on the HFT crimper. You'd literally have to pound out those drift pins to replace those dies.
All Photos ©1998-2008 Hale Kai Inc.
Image

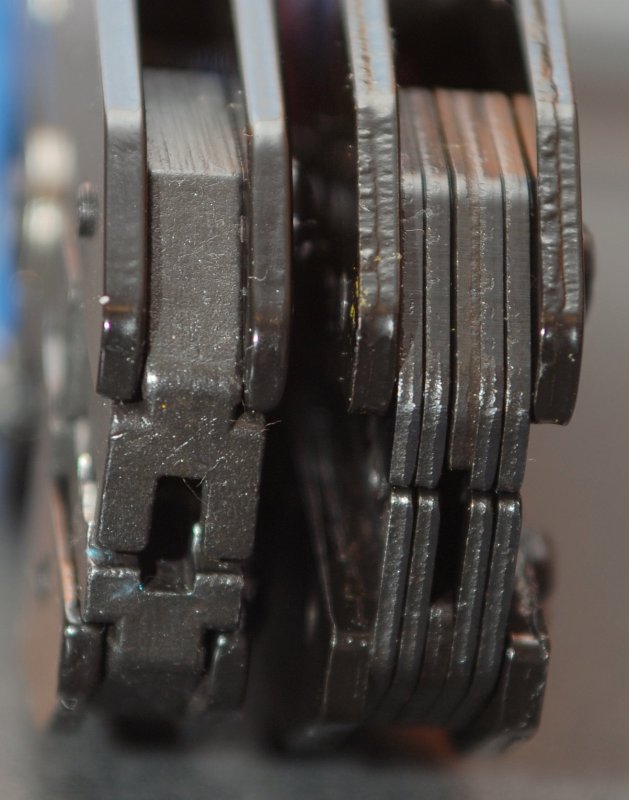
Crimp Dies:
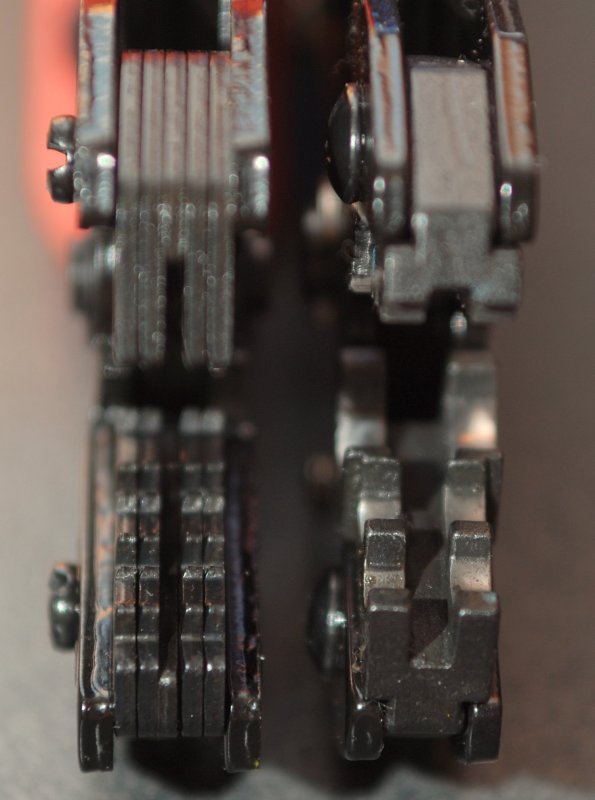
The Ancor crimper on the left has the proper spacing to execute a double crimp and nicely machined heads from a solid ingot. The HFT crimper has incorrect spacing to properly execute a double crimp and uses cheap plates of steel to make up the crimp dies.
Image

Crimp Jaw Surface: Note the sharp edges and the improper spacing on the HFT crimper vs. the well machined and properly spaced jaws of the Ancor crimper.
Image

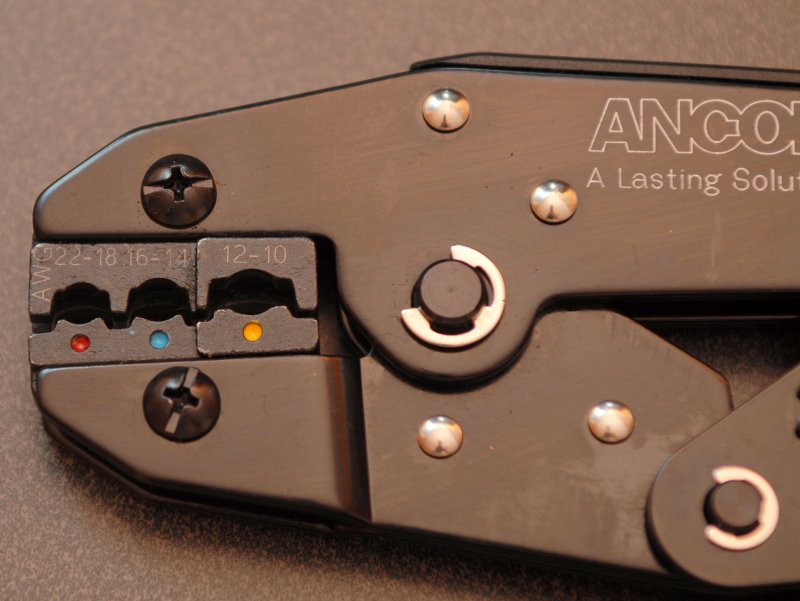
Ancor Crimp Head: the fit and finish is very good and the crimp jaws are in the correct location top and bottom.
Image

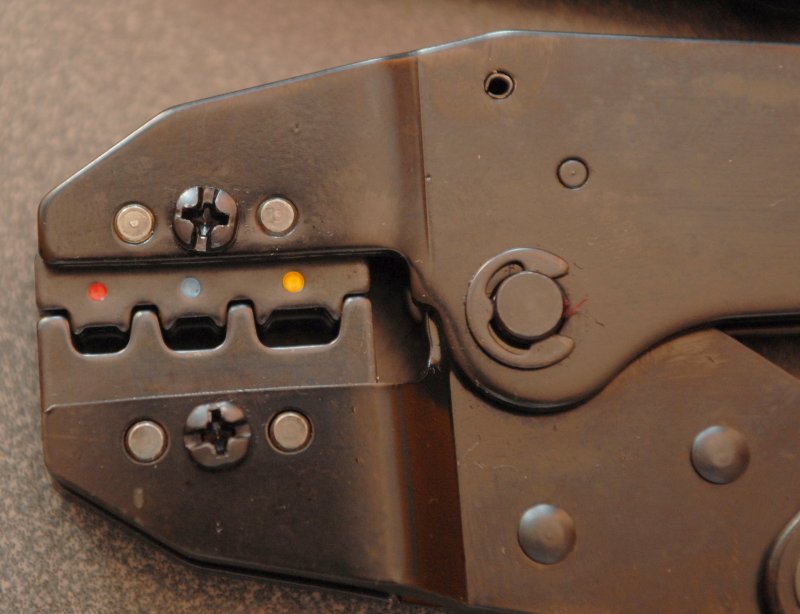
HFT Crimp Head: These dies do not even have the proper profile and are located incorrectly. The jaw on the bottom should be on the top!
Image

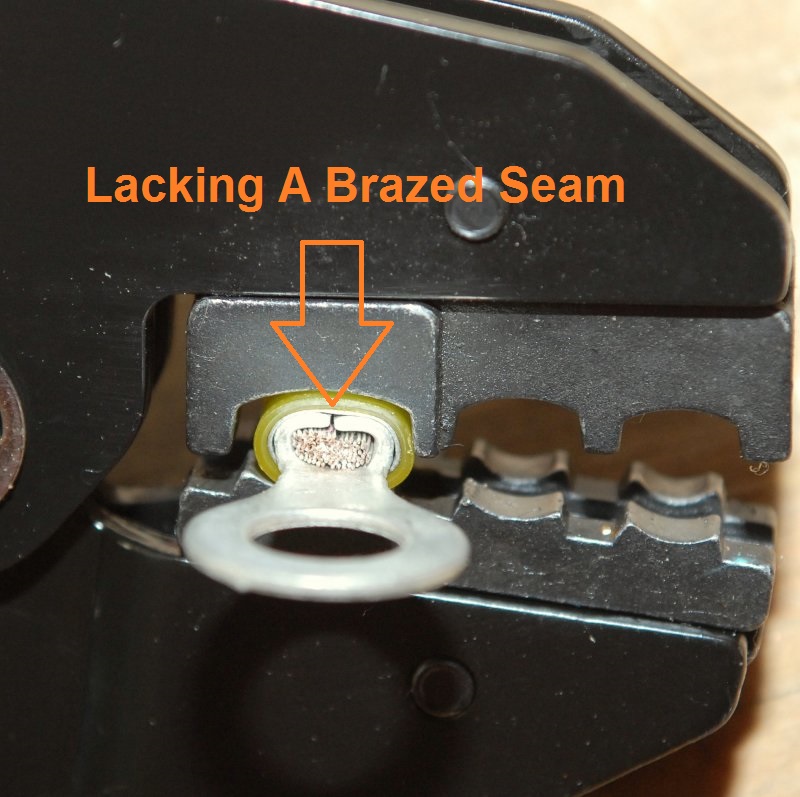
Proper Die/Jaw Orientation: This is the proper jaw orientation for a double crimp ratchet tool. The spit in the barrel of the connector always faces the top. On the HFT tool your would need to crimp backwards!
Image

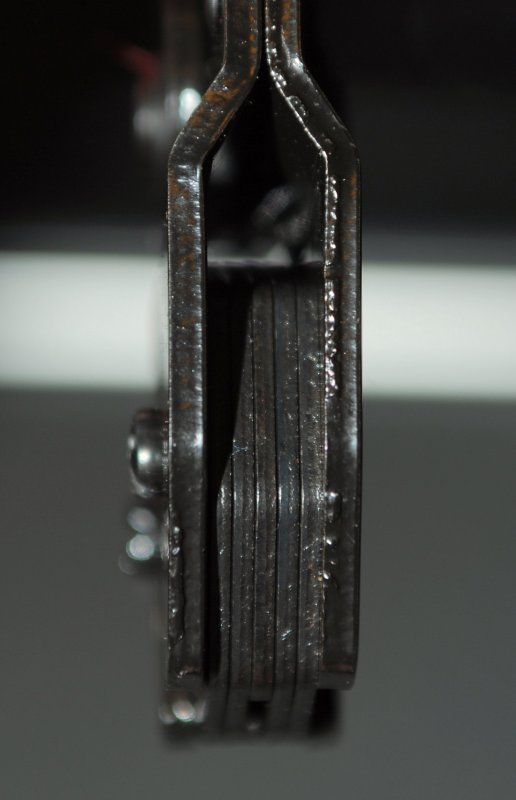
Close Up Of Sloppy Machining:
This crimper JUST came out of the shipping envelope an hour ago and already it's showing signs of RUST!! Also look at the rough surface where the steel was cut. See picture number two for a side by side look at the sloppy machining.
Image

I paid $14.99 plus 6.99 S&H (which took 20 DAYS!) for the HFT crimper and $55.00 for the Ancor crimpers. The Ancor crimpers came with detailed instructions and the HFT crimpers came with NOTHING. The crimp dies on the HFT tool makes and improperly spaced crimp and the heads are not replaceable. The Ancor crimper makes beautiful and repeatable crimps every time and the dies can be replaced if they wear out!

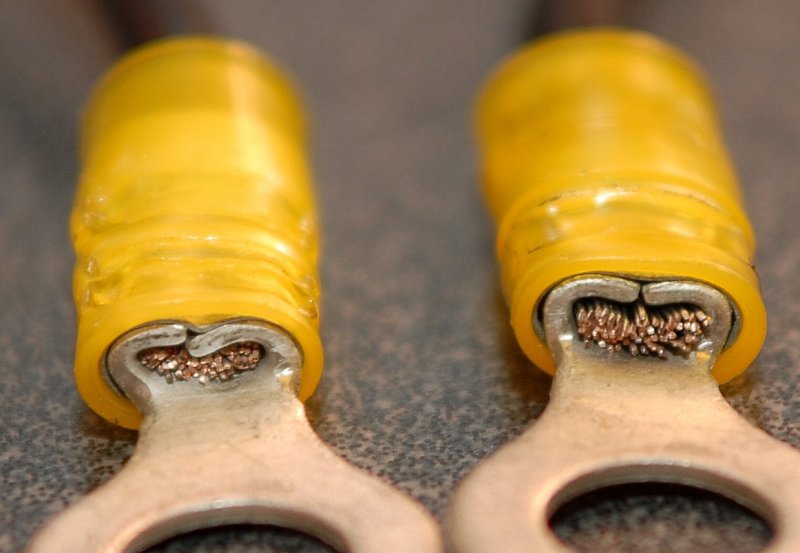
Here are two identical crimps, same terminals, same wire just different crimpers.

Front Close Up:
HFT on left Ancor on Right
All Photos ©1998-2008 Hale Kai Inc.
Image

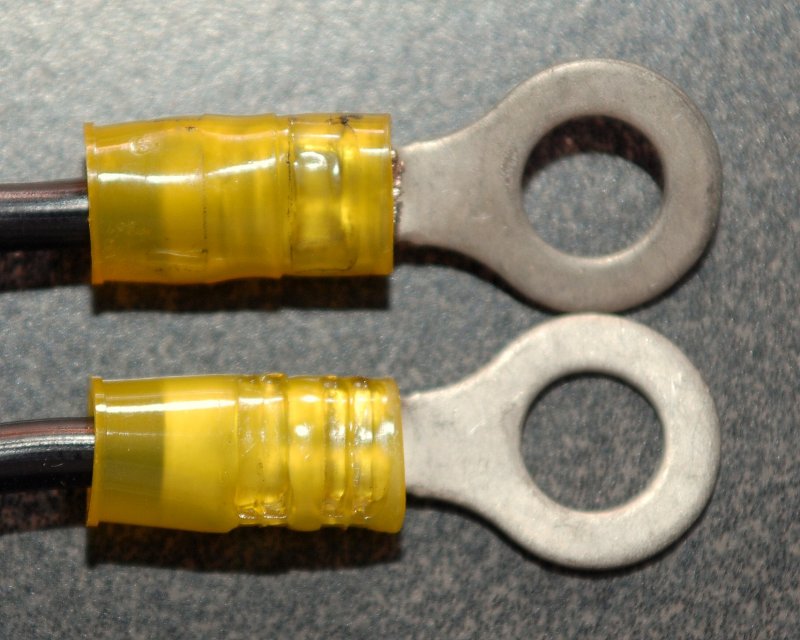
Crimp Locations: This is IMPORTANT a double crimper is supposed to crimp the strain relief. The HFT crimper (bottom crimp) crimps the slot between the strain relief barrel and the crimp barrel. Look closely through the nylon and you'll see that the crimp barrel was not even touched and it's still round! Look at the Ancor crimp (top) and you can see a very slight black line depicting the crimp jaw outline. Also notice the almost invisible crimp in the nylon. The proper spacing of the Ancor dies makes a properly spaced crimp and actually achieves the "double crimp"!
Image

Anatomy of a crimp connector: I took apart an insulated terminal to show why the crimper is referred to as double crimper. The spade gets one crimp (left side of photo) and the strain relief barrel (middle of the photo) gets a second crimp where I have scuffed the metal. The "colored dot" side of the jaws, of the Ancor "double" crimper, are the appropriate size for crimping this strain relief barrel and the non dot side is sized for the crimp barrel. On the Ancor crimper these dies are sized for both the strain relief and the crimp barrel specifically and on the HFT crimper both sides of the jaw are identical as in there is no specific side for a strain relief crimp or a wire crimp! Truly a one size fits all approach! Using the appropriate crimper such as the Ancor will create both crimps in one single motion properly.

If I were to disassemble a heat shrink connector all you'd see is the heat shrink and the terminal. You'd only have two pieces, not three, hence the term "single crimp" as it only crimps the crimp barrel because there is no strain relief barrel on a heat shrink terminal. This photo shows the valley that the HFT tool crimped in the strain relief barrel!
Image


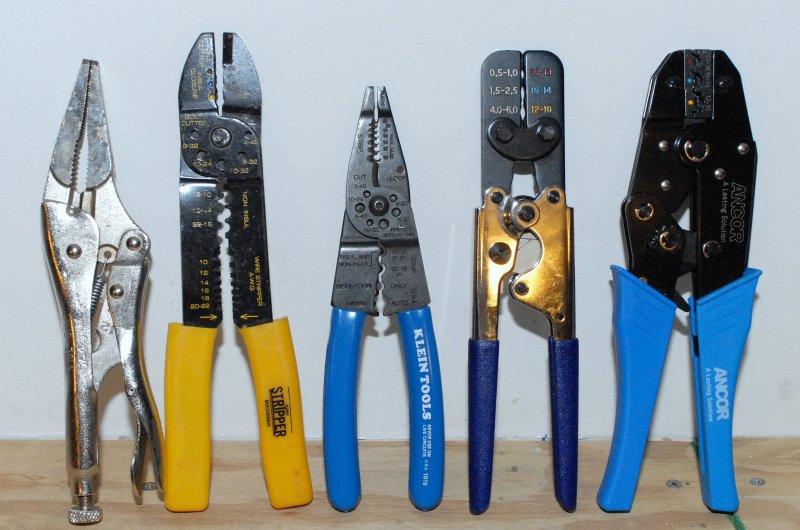
To me the extra $33.02 for the Ancor crimpers was and is well worth the expense considering it actually makes a proper crimp. Fit and finish aside and just looking at execution the HFT tool makes the crimps in the WRONG location on the connector....

Again this tool may be just the ticket for some just not me...
-Maine Sail

Canadian Sailcraft 36T
Casco Bay, ME
http://www.marinehowto.com
Tony
Skilled Systems Installer
Posts: 223
Joined: Wed Apr 09, 2003 8:14 pm
Boat Name: S/V Bonnie Blue
Boat Type: Catalina 22
Location: Portland, Oregon
Contact:

Post by Tony »

Acoustic,

I didn't mean to infer that the tool I got was as good as the Anchor tool, it's not. If was doing wiring as a business, yea, I'd get the better tool. For MY usage it seems to work well. It's not a HF tool, but is quite similar (probably made by the same chinese factory). I do seem to get better crimps than the ones you've shown.
Tony
Maine Sail
Skilled Systems Installer
Posts: 243
Joined: Fri Feb 24, 2006 10:47 am
Location: Casco Bay
Contact:

And I was not..

Post by Maine Sail »

And I was not inferring that your tool was bad! Just comparing two crimpers I personally own.

I have never and will never use the HFT crimper on my boat. I rarely use the Ancor Double Crimper because I use 99% heat shrink connectors that require the "Single Crimp Ratchet Tool"...

So confusing...
-Maine Sail

Canadian Sailcraft 36T
Casco Bay, ME
http://www.marinehowto.com
Capn_Tom
Skilled Systems Installer
Posts: 194
Joined: Thu Jan 12, 2006 6:04 pm
Boat Type: Westsail 32
Location: Erlanger, Ky

Post by Capn_Tom »

I'm making my shopping list for my rewire project. For some reason my wife doesn't think a 100 ft spool of 12 awg primary wire makes a good christmas gift!

If santa will only bring me one crimper should he choose the Ancor single crimper and a boatfull of adhesive heat shrink terminals or the Ancor double crimper with insulated terminals?

BTW the single crimp tool isn't widely available while the double is carried just about everywhere.
The board does not cut itself short!
Tony
Skilled Systems Installer
Posts: 223
Joined: Wed Apr 09, 2003 8:14 pm
Boat Name: S/V Bonnie Blue
Boat Type: Catalina 22
Location: Portland, Oregon
Contact:

Post by Tony »

Personally if I had to choose between adhesive heat shrink or insulate terminals, I'd take the heat-shrink every time for marine use.
Tony
Maine Sail
Skilled Systems Installer
Posts: 243
Joined: Fri Feb 24, 2006 10:47 am
Location: Casco Bay
Contact:

Sailors Solutions

Post by Maine Sail »

Capn_Tom wrote:I'm making my shopping list for my rewire project. For some reason my wife doesn't think a 100 ft spool of 12 awg primary wire makes a good christmas gift!

If santa will only bring me one crimper should he choose the Ancor single crimper and a boatfull of adhesive heat shrink terminals or the Ancor double crimper with insulated terminals?

BTW the single crimp tool isn't widely available while the double is carried just about everywhere.
The best price on heat shrink terminals, in smaller quantities, that I've found is from Sailors Solutions. The sell Berkshire wire too (great stuff and a lot less money) and FTZ crimp connectors which have proven to be more consistent for me than either AMP, Ancor or 3M..

http://www.sailorssolutions.com/index.a ... Electrical


Oh and they sell a single ratchet crimper for heat shrink connectors for $39.95!!!!!! It's basically the same exact crimper Ancor sells for a lotl ess money than the Ancor..


http://www.sailorssolutions.com/index.a ... Item=WP042
-Maine Sail

Canadian Sailcraft 36T
Casco Bay, ME
http://www.marinehowto.com
Tony
Skilled Systems Installer
Posts: 223
Joined: Wed Apr 09, 2003 8:14 pm
Boat Name: S/V Bonnie Blue
Boat Type: Catalina 22
Location: Portland, Oregon
Contact:

Post by Tony »

I used FTZ connectors for my electrical project last year, I was quite happy with them.
Tony
Zach
Boat Obsession Medal Finalist
Posts: 684
Joined: Wed Jan 25, 2006 6:28 pm
Location: Beaufort, North Carolina
Contact:

Post by Zach »

NAPA sells heat shrinking crimp connectors by the box.
Been a few years, but the pricing was definitely cheaper than a dollar per...

(Making a mental note to stop by and see.)
1961 Pearson Triton
http://pylasteki.blogspot.com/
1942 Coast Guard Cutter - Rebuild
http://83footernoel.blogspot.com/
Capn_Tom
Skilled Systems Installer
Posts: 194
Joined: Thu Jan 12, 2006 6:04 pm
Boat Type: Westsail 32
Location: Erlanger, Ky

Post by Capn_Tom »

If you are in the market for wire or terminals check out the sale at Hamilton Marine. 100' spool of 12 awg ancor primary $34, 25 pk heat shrink ring terminals $17. All of the electrical items I compared were a great value. Most of the other sale items could be found elsewhere at the same or better prices.
The board does not cut itself short!
telekitr
Bottom Paint Application Technician
Posts: 13
Joined: Sun Jun 15, 2008 8:13 am

Re: All About Marine Crimping

Post by telekitr »

Thanks so much for your great reference site. I have it bookmarked and are referring to it regularly in the retro of our boat. Pictures are amazing and the step by step that you outline for the various projects is invaluable!!
Ernie
Ernie
S/V Iemanja
Vermont
Post Reply