Bit of a coundrum here. I'm having my decks painted by pros. I've removed all deck hardware and am going to pot the holes with thickened epoxy. The problem is I'm under time constraints due to on-the-hard fees and want to begin potting immediately, have rethunk that. The decks will be sanded down to fiberglass by the painters in two weeks. Two issues here. I won't be able to see the condition of the core till after sanding and there will be a fair amount of that at the stantion positions. Do I wait to pot after sanding or after fairing?After fairing seems the logical time, but would it make that much difference if it was done after sanding?
Warren Fraser
BCC s/v Voyager of Yokohama[/list]
When to pot deck holes?
-
wfraser
- Bottom Paint Application Technician
- Posts: 14
- Joined: Wed Oct 15, 2008 9:52 am
- Location: Tokyo, Japan
When to pot deck holes?
Warren Fraser
s/v Voyager of Yokohama
s/v Voyager of Yokohama

I feel like I'm missing something here. I would normally say to go ahead and pot the holes right away, and you have the added benefit of not having to make the tops flush, since they'll be sanded down with the rest of the deck prep anyway.
But I don't understand the part about not knowing the condition of the core until the decks are sanded (?) Do you mean you're going to sand all of the top skin off? How else would sanding help you to see the core?
Idea: Do you have a teak deck overlay, and that's what's going to be removed? (Although surely that would be "pried" off?)
Help me to see the obvious that's probably clear to everyone else :D
Rachel
-
wfraser
- Bottom Paint Application Technician
- Posts: 14
- Joined: Wed Oct 15, 2008 9:52 am
- Location: Tokyo, Japan
The decks are being stripped down to bare fiberglass. The core is plywood and I'm pretty sure I have rot somewhere. The boat is thirty years old and I know this will be the first time the decks will have been taken down this far. So my question is at what point do I pot- before or after sanding the current 12 layers of paint off, or after the painters have laid down the epoxy and fairing coats. I like to think there is someway the holes can be accessed for potting at any time in the process.
Warren Fraser
s/v Voyager of Yokohama
s/v Voyager of Yokohama
-
Tim

- Shipwright Extraordinaire
- Posts: 5708
- Joined: Tue Apr 01, 2003 6:39 pm
- Boat Name: Glissando
- Boat Type: Pearson Triton
- Location: Whitefield, ME
- Contact:
If you think your deck core has rot, what steps are you taking prior to this painting project to not only determine the existence of rot, but to repair it? I may be missing something too, but the cart looks in front of the horse.
You're not going to get any valuable insight into the core's condition even after sanding, at least not visually. The sanded bare fiberglass isn't going to allow you to suddenly see inside the core any better than you can now. Sanded fiberglass is not see-through. You need to use other means to determine the core's condition, and then address any areas that require work, before the painters get going.
As far as filling holes, you can do it anytime. The earlier the better.
---------------------------------------------------
Forum Founder--No Longer Participating
Forum Founder--No Longer Participating
-
wfraser
- Bottom Paint Application Technician
- Posts: 14
- Joined: Wed Oct 15, 2008 9:52 am
- Location: Tokyo, Japan
And here I am, a language professional, tongue tied in trying to get this across. More information about the condition of the deck and my assumptions may help. About 15% of the fiberglass has been exposed, in an area of the stern deck with lots of thru deck fittings, and thankfully no dark areas are visible through the fiberglass around any holes. Dark areas, I have been told, indicate rot.
Thus far, the paint removal process has made it easy to see through the fiberglass. I'm assuming that will continue and any evidence of core problems will be easy to spot. The idea of drilling test holes seems a waste when the plywood will be visible. Or am I way off base with this? Are there types of rot around deck holes that are not visible?
My goal in filling the holes is to make them easy to relocate when it comes time to refit. My idea is to leave behind a little divet for each deck hole under the paint. How to go about this given the entire process is the heart of my question.
Warren Fraser
s/v Voyager of Yokohama
s/v Voyager of Yokohama
-
Jason K
- Boat Obsession Medal Finalist
- Posts: 741
- Joined: Fri Mar 18, 2005 10:41 pm
- Boat Name: Rambunctious
- Boat Type: J/30
- Location: Mandeville, LA
- Contact:
Hi Warren,
I do think you're a little off base. The core and it's condition are not visible through the glass; fiberglass can be translucent, but not transparent. If you suspect rot, you need to thoroughly check for it. If there's ever a time to recore, it's right before a paint job. In addition, it will be real disappointing to paint the boat and then realize you missed an area of wet core.
Water can migrate in strange ways through a boat. What may look like a little rot near, say, a fuel fill, can lead to a rotten sidedeck a meter (or more) away.
What makes you think you have wet core, by the way?
As far as testing goes, there are a couple of ways you can go about it. The first is to use (or hire a surveyor to use) a moisture meter to map the boat for areas of high moisture content.
The other option is to percussion test. This can work quite well - use a hammer (you may want to use one with a hard plastic tip) and strike the deck with a steady pressure every inch or so. Do it fairly rapidly - not like a Led Zep drummer - more like a steady march cadence. You're looking for a change in the sound that is dull and flat sounding, rather than the sharp report you'll hear in good areas.
Then - test holes! Search the areas you've mapped carefully and you may also want to test other areas as well. The drilling of test holes isn't a waste. It will give you solid evidence of the core condition where you drill and it isn't like they'll be that much work to fill, given the scope of your project.
Warren wrote:The idea of drilling test holes seems a waste when the plywood will be visible. Or am I way off base with this? Are there types of rot around deck holes that are not visible?
I do think you're a little off base. The core and it's condition are not visible through the glass; fiberglass can be translucent, but not transparent. If you suspect rot, you need to thoroughly check for it. If there's ever a time to recore, it's right before a paint job. In addition, it will be real disappointing to paint the boat and then realize you missed an area of wet core.
Water can migrate in strange ways through a boat. What may look like a little rot near, say, a fuel fill, can lead to a rotten sidedeck a meter (or more) away.
What makes you think you have wet core, by the way?
As far as testing goes, there are a couple of ways you can go about it. The first is to use (or hire a surveyor to use) a moisture meter to map the boat for areas of high moisture content.
The other option is to percussion test. This can work quite well - use a hammer (you may want to use one with a hard plastic tip) and strike the deck with a steady pressure every inch or so. Do it fairly rapidly - not like a Led Zep drummer - more like a steady march cadence. You're looking for a change in the sound that is dull and flat sounding, rather than the sharp report you'll hear in good areas.
Then - test holes! Search the areas you've mapped carefully and you may also want to test other areas as well. The drilling of test holes isn't a waste. It will give you solid evidence of the core condition where you drill and it isn't like they'll be that much work to fill, given the scope of your project.
If you want to leave a little divet, simply leave the potted holes slightly underfilled and don't fair them when fairing the rest of the decks. The paint itself is way too thin to hide something like this; it will certainly be visible in the finished product.Warren wrote:My goal in filling the holes is to make them easy to relocate when it comes time to refit. My idea is to leave behind a little divet for each deck hole under the paint. How to go about this given the entire process is the heart of my question.
-
Quetzalsailor
- Master of the Arcane
- Posts: 1100
- Joined: Fri Aug 26, 2005 9:53 am
- Boat Name: Quetzal
- Boat Type: LeComte North East 38
- Location: Philadelphia, PA
I think he's trying to tell us that the sanding has removed the gelcoat, exposing the layup of fiberglass. So, it's translucent and he and the sanders can see darker areas which he's been told indicate rotted core.
Warren, I think, like the others, that now's the time to investigate and fix the core. Before your finish job. I would guess that bad spots will be associated with holes, cracks and other penetrations through the top surface of the deck. I would not expect to find that areas 'way out in the field of an unsullied deck would have rotted core. Water can travel long ways in voids, so that's not a perfect thought. Drill investigative holes at the dark areas and sniff, measure moisture, whatever to decide whether you have a problem. If no problem then fill the holes with filled, reinforced epoxy and let the finishers do their work. If wet or rotten, cut the top 'glass out, replace the core, replace the top glass piece itself and scarpf it in or re-layup the deck... and let the finishers do their work.
As for your original question, if the hardware, stanchion, or whatever is going back on, and the core is sound and dry, clean out the bore and coat out the edge of core with epoxy, and forget about filling it or leaving a divot. If it's not going back, and the core's sound and dry, clean out the bore and fill with filled, reinforced epoxy. If it's a big hole that's no longer needed, like for a shore power fitting or an instrument, then taper the 'glass edge (scarpf) and throw some equivalently thick new 'glass in, in plane with the face of the deck. Of course, when replacing or adding new hardware through your 'new' deck, drill slightly oversize holes, coat out the core edge, bed the new work properly. There has been lots of traffic on this site, and lots of other places, about this issue, so read up.
Do all your core and other 'rough' repairs before your paid perfectionists get to work. Pay attention to resins, fillers, glazes, primers and paints to avoid problems with dissimilar or incompatible materials. Much potential for evil.
-
Tim
- Shipwright Extraordinaire
- Posts: 5708
- Joined: Tue Apr 01, 2003 6:39 pm
- Boat Name: Glissando
- Boat Type: Pearson Triton
- Location: Whitefield, ME
- Contact:
You might be able to see dark areas, but then again how do you know you're seeing it all? It doesn't make sense to rush into a deck paint job when there's already clear evidence that you have some suspect core, until you know that you have identified all areas and come up with a plan for repair as needed. Proceed with a little prudence now, till you know for sure your deck's condition.
The existence of any suspect core is generally cause to thoroughly investigate all other areas to adequately determine their condition. I know what sanded fiberglass looks like, and while it's translucent and might allow identification of clearly discolored areas, the sanded material is not clear and has textural and visual inconsistencies that might not (read: probably not) allow one to see everything that might be suspect beneath. Dark means badly rotted...but what about areas that are on their way, but haven't become discolored yet? My point is you can't count on being 100% sure you're seeing it all. Decks are mysterious things, and even the best efforts can often lead to legitimately missed areas.
It's fun to get the nice cosmetic stuff going, but you don't want to shoot yourself in the foot and end up with unrepaired areas that you wish you'd taken a little time to find before applying the fancy paint job.
If you're concern with filling the hardware holes is that the pros might fair over them and therefore cause you to lose the locations, then leave then open for now. You can do the filling anytime, but if you don't have control over their potential loss (i.e. by others fairing over them), then better to leave them completely open now.
And don't forget: you can always locate them belowdecks and drill pilotholes through from there to get you started in the right location.
---------------------------------------------------
Forum Founder--No Longer Participating
Forum Founder--No Longer Participating
-
David
You cannot see your core thru the outer fiberglass of your decks. You can go ahead and overbore all your deck mounting holes. The boring will give you a good idea if you have rot at those entry points which are the ususal points of entry. If you find rot you know where to begin chasing it. If you find dry core, then go ahead and fill them solid before the painting is done. To locate the solid filled holes, position the piece of deck hardware you will be remounting over the overbored and filled holes and use a selfcentering drill bit to drill a position hole 1/8" or so deep. Then when everything is freshly painted out you can finish drilling all your holes (and tap them I hope so they never leak) and mount your hardware.
Good luck with it,
David
Good luck with it,
David
-
David
You cannot see your core thru the outer fiberglass of your decks. You can go ahead and overbore all your deck mounting holes. The boring will give you a good idea if you have rot at those entry points which are the ususal points of water entry. If you find rot you know where to begin chasing it. If you find dry core, then go ahead and fill them solid before the painting is done. To locate the solid filled holes, position the piece of deck hardware you will be remounting over the overbored and filled holes and use a selfcentering drill bit to drill position holes 1/8" or so deep in the center of each filled hole. Then when everything is freshly painted out you can finish drilling all your holes (and tap them I hope so they never leak) and mount your hardware. Of course you will want to tell your painter not to fill in those position holes.
Good luck with it,
David
Good luck with it,
David
-
bcooke
- Master of the Arcane
- Posts: 2272
- Joined: Sat Oct 04, 2003 10:55 pm
- Boat Name: Jenny
- Boat Type: 1966 Pearson Triton
- Location: Rowley, MA
- Contact:
and that is where the confusion lies. If we all take this to be true then your question makes perfect sense. Unfortunately, I and apparently almost everyone else hear has never heard of this. I would be highly sceptical of any 'pro' that states this is a reliable method of identifying 'bad' core.I have been told, indicate rot.
I guess I could see how dark areas under fiberglass could be an indication of rotten core. It is hardly a certainty and a highly non-standard method of determining the condition of deck coring.
The 'hammer test' (whacking the fiberglass with a hammer and listening for the tone) is usually a first step and works pretty well. It also requires a practiced ear to do reliably. Best left to the pros perhaps.
Drilling test holes works pretty good too. Filling the holes afterwards is dead simple.
Just because the deck is 30 years old doesn't mean the core is toast. It might be. It might not be. Its definitely something to fix before you upgrade the cosmetics as its a real bummer to cut out a section of nicely painted skin afterwards.
The problem with big boat projects is that they tend to get bigger before they are done. Best have lots of time available before you begin.
-
wfraser
- Bottom Paint Application Technician
- Posts: 14
- Joined: Wed Oct 15, 2008 9:52 am
- Location: Tokyo, Japan
Thanks to everyone for their comments.
I'll be going through the hammer routine this weekend and will take a few samples from the core as well. I watched and listened to a surveyor when I was surveying previous boats and he helped clarify what to listen for. I'll also more closely inspect the interior ends of the holes for signs of water intrusion.
As for suspect rot sites, I'm concerned about two stantions that were leaking when I bought the boat. I plugged up the leaks, and found out later from someone other than the seller that she had been idle on the hard for two years and idle in the water for another two years. They're the only leaks I've ever found, so I'm optimistic.
Warren Fraser
s/v Voyager of Yokohama
s/v Voyager of Yokohama
-
Idon84
- Skilled Systems Installer
- Posts: 245
- Joined: Tue Mar 04, 2008 8:06 pm
- Boat Name: Cosmic Dancer
- Boat Type: Hess Cutter
- Location: Olympia, WA
- Contact:
Warren,
I'm just seeing this now. When I bought the Cosmic Dancer my main concern was the core. I know this is not a tried and true method but I used my 300+ lbs. body with a springing step to see if I felt deck move at all. This doesn't work with all boats especially lighter boats but the BCC should be solid overall with no movement in the deck.
My second step was to drill exploratory holes around around all through deck fittings. This would start close to the fitting and radiate out until I found good core. This area is the worst that I found fortunately.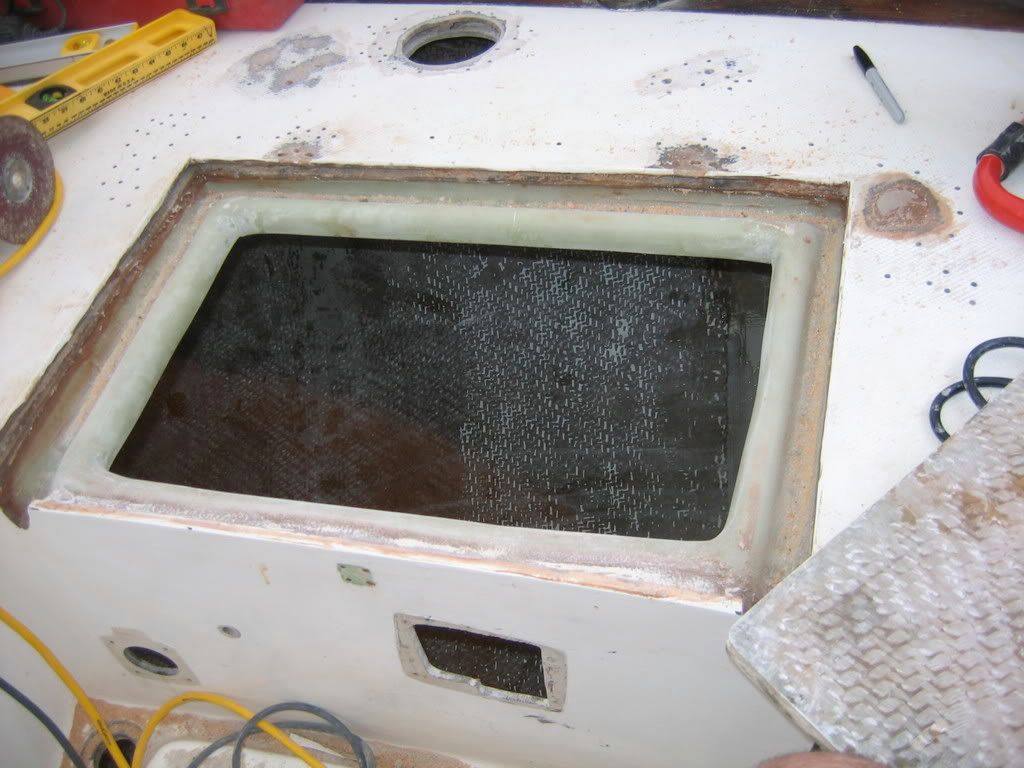 [/img]
The picture above is a good example. Here you notice the hatch, to the right is an old fill fitting, and above is a 2 old cleat holes, a cowling hole etc. I started close to the edge of each and drilled holes until I found dry core. The old fill hole on the right only has one ring of holes around it. Meaning I didn't find any issue with this area, I'll just fill with epoxy. The upper left corner of the hatch has many holes. I just drilled until I found dry core. That whole area was wet as indicated by the many holes. I dug the entire wet core out of that area with a nail bent to a 90 degree in my drill. I'll fill with some new core material by inserting through the edge of the hatch (not always and option) and fill the rest with epoxy.
Some major wet core that I missed was around the bottom of the portlights. 4 of the 6 had been leaking for some time and I had to completely cut out the inner core on the inside to dig away the bad core.
When I put a clear coating of neat epoxy on the interior I saw A LOT of dark core that I belived was bad. When I drilled the hole it wasn't so. My 2 cents, judging a wet core is best done by drilling not by looking.
I hope my rambling helps!
I'm just seeing this now. When I bought the Cosmic Dancer my main concern was the core. I know this is not a tried and true method but I used my 300+ lbs. body with a springing step to see if I felt deck move at all. This doesn't work with all boats especially lighter boats but the BCC should be solid overall with no movement in the deck.
My second step was to drill exploratory holes around around all through deck fittings. This would start close to the fitting and radiate out until I found good core. This area is the worst that I found fortunately.
[/img]The picture above is a good example. Here you notice the hatch, to the right is an old fill fitting, and above is a 2 old cleat holes, a cowling hole etc. I started close to the edge of each and drilled holes until I found dry core. The old fill hole on the right only has one ring of holes around it. Meaning I didn't find any issue with this area, I'll just fill with epoxy. The upper left corner of the hatch has many holes. I just drilled until I found dry core. That whole area was wet as indicated by the many holes. I dug the entire wet core out of that area with a nail bent to a 90 degree in my drill. I'll fill with some new core material by inserting through the edge of the hatch (not always and option) and fill the rest with epoxy.
Some major wet core that I missed was around the bottom of the portlights. 4 of the 6 had been leaking for some time and I had to completely cut out the inner core on the inside to dig away the bad core.
When I put a clear coating of neat epoxy on the interior I saw A LOT of dark core that I belived was bad. When I drilled the hole it wasn't so. My 2 cents, judging a wet core is best done by drilling not by looking.
I hope my rambling helps!
-
Idon84
- Skilled Systems Installer
- Posts: 245
- Joined: Tue Mar 04, 2008 8:06 pm
- Boat Name: Cosmic Dancer
- Boat Type: Hess Cutter
- Location: Olympia, WA
- Contact:
What is wrong with my english? Replace portlight with porthole, and inner core with inner laminate. Duh!Some major wet core that I missed was around the bottom of the portlights. 4 of the 6 had been leaking for some time and I had to completely cut out the inner core on the inside to dig away the bad core.
-
wfraser
- Bottom Paint Application Technician
- Posts: 14
- Joined: Wed Oct 15, 2008 9:52 am
- Location: Tokyo, Japan
I count 90 holes in the deck in Bryon's picture, including the largest one. Just out of curiosity, if I were to tap two or three hundred similar holes in V'ger's deck, would it be a simple process for the guys doing the straight epoxy coating work to fill the holes with straight epoxy? Or do the test holes need to be filled with a different epoxy mix?
Warren Fraser
s/v Voyager of Yokohama
s/v Voyager of Yokohama
-
David
I like to think of the fillers as how much crush resistence do I need, how much tenacity in an adhesive mix do I need. There might be times that you are fairing a deck that will have something mounted over it and will need to resist a stronger compression force--or if you are filling overbored holes that you will later tap for threaded screws--those situations call for a high density filler like West 404 or a similar high density filler. But if you are overboring holes and filling them later to just drill them but not tap, and you didn't need resistence to high compression, use whatever filler you have. It will work fine.